10. Stocktake

YAY!!! It’s stocktake time!

If we start with that kind of enthusiasm perhaps we’ll get through this job without a change of career?!

Just remember… you do this job so when YOU look for resources in your catalogue you WILL find them on the shelves. Simple.

What is a stocktake?

Checking what is on the shelves compared to what is in the Library system.

(Keep your eyes peeled for any mis-shelved, mis-labeled or damaged resources in need of repair or replacement while you are at it!)

Basic Steps of a Stocktake:

Step 1 – Wipe out old Stocktake data before you begin a new stocktake.

(Utilities > Stocktake > New Stocktake is how you wipe out old stocktake data…)

Step 2 – Know the parts of your collection and which bits you want to check.

(Create a report via Utilities > Reports > Collection Statistics…might be *scary and require some data cleanup*)

Step 3 – Tidy up the shelves taking extra care to spot little books in big books and know where things are.

(You might have a Repairs area, Frozen Resources area, New Resources display… keep an eye on what’s not where it should be!)

Step 4 – Scan your Barcodes… This might be into Circulation > Stocktake > Add one at a time OR downloaded into the same place from a Portable barcode reader,

OR through Circulation > Stocktake > File Append from a Buffer file or Txt file… HOW does not matter… as long as you get the barcodes on resources into the Stocktake area.

Print out Stocktake CheckSheet and How to Use the Stocktake CheckSheet instructions and use them to the letter!

(These pages walk you through the nitty gritty steps to stocktake a section of your library, just repeat the process for each column until you are finished what you intend to do in this year’s stocktake… no need to do step one between sections unless you have a good reason to do it!)

Step 5 – Stocktake completed checklist… Once it’s all said and done, you should:

a) Have a Last Stocktake Date on every resource barcode that was scanned (in the database that is! Reconcile does that!).

b) Have a report that lists ALL items found to be missing this year (Items manually marked missing and found missing in Stocktake) (Utilities > Reports > Barcode Listing… Set Selection Criteria –> Status Low and High = M & Status Date Low & High = Set Date).

c) Have done a few returns of items that you thought were on loan but were actually on the shelves (If there is lots – Make buffer file and Return).

d) Have a number to indicate how many Missing items turned up (items marked missing that were found in stocktake – Found report).

e) Have fixed a few records in Data Entry to adjust info that was incorrect.

You can now be confident that if your Library System says a resource is not on loan and is in a certain place you can go to that place and pick up that resource… every time.

Stocktake Related Instructions (General Stocktake Page)

  1. Step by Step guide to doing a stocktake
  2. Stocktaking Tips & Warnings
  3. Cleaning up Data for a Stocktake
  4. Using the Stocktake Checksheet (If you want to edit the details you can Download DOC)
  5. How to Start a New Stocktake
  6. Setting Stocktake Parameters
  7. Adding Barcodes to your Stocktake
  8. Stocktake Using a Memory Scanner
  9. Using Files to add your to Stocktake
  10. Exporting your Stocktake Data
  11. View your Stocktake
  12. Stocktake Reports
  13. Reconciling your Stocktake
  14. Marking Items as Missing
  15. Writing Resources off that have been Missing for a Long Time

{ 0 comments… add one now }

Leave a Comment

Stocktaking with LibCode Suite

The Stocktaking process… We strongly advise that the everyday library tasks of Cataloguing and Circulating do not continue until the stocktake has been completed and Reconciled. (This can be broken up into VERY small sections to make it possible.)

  1. Clean out old stocktaking information
    • Utilities > Stocktake > New Stocktake > at ‘Do you wish to purge all stock items and commence a new stocktake?’ choose Yes.
  2. Starting the stocktake
    • Circulation > Stocktake > Add > ‘Do you wish the program to pause when an entered barcode is not found or the item is outside the stocktake parameters?’
    • No – If you are using a portable barcode scanner… jump down to * a few lines down! (See bottom of this page for documents about portable barcode readers.), OR
    • Yes – this means you can Set the Parameters (“Parameters” are just selection criteria… ways to describe what part of your Library you want to stocktake! eg. Location Low=F High=F –> means the Fiction section.)
    • Set the parameters for the section of the Library for the stocktake e.g. Dept = __ to __, Site = __ to __, Location = F to F… you could load the Data Entry program and look up a resource from the section you want to set in the parameters screen to work out what each field should contain… Lowest and Highest possible data values should be set. __ (blank) to __ (blank) means field must be blank. Z’s are the highest possible value… So __ to ZZZZZ means field can contain ANYTHING!
    • To stocktake the whole collection, leave the parameter settings at the default settings… __ to ZZZZZZZ (all z’s until full).
    • * Start scanning item barcodes or downloading portable scanners into the Circulation > Stocktake > Add screen!

      1. Check what’s missing in a section of the library
        • You do this report now to see if you have missed adding any items into the stocktake (might have skipped a whole shelf!).
        • Utilities > Stocktake > Report > Missing… keep same parameters as setup in Step 2.
      2. Scan in any overlooked items
        • Circulation > Stocktake > Add….. keep same parameters as setup in Step 2.
      3. Check for Loans Found (resources on shelves that are still on loan to a borrower!)
        • Circulation > Stocktake > Reports > Loans Found….. return these items manually (if there’s lot’s call LibCode for a shortcut!).
      4. View scanned resources using ‘parameters’ to check data entry accuracy
        • Circulation > Stocktake > View… keep same parameters as setup in Step 2 and see if you can spot any:
        • RED items (Data Entry info does not match what you think it should), OR
        • BOLD items (Barcode scanned is not in the system at all!) Fix these records in Data Entry on the spot or pull the books off the shelves and put a sticky note on them to fix later.
        • The list is displayed in the order you scanned the items so you can easily find the items on the shelf! (Two people makes this easy… one singing out what to find and the other scooting around the shelves!)
      5. Reconcile the Stocktake – Tag all ‘stocktaken records’ with a stocktake date…
        • (This step puts a date in the ‘Last Stocktake Date’ field to indicate when the items were last included in a stocktake – items on loan will be included in this. The missing status will also be removed from any items that were previously lost, but have now been found through the stocktake. Utilities > Stocktake > Reconcile… keep same parameters as setup in Step 2.
        • It is REALLY IMPORTANT this step be completed as soon as the stocktake for the section has been finished.
      6. Tag all missing items with an ‘M’ Status and a Status Date
        • This step marks items that have not been scanned into the stocktake with an ‘M’ for missing and a date.
        • Utilities > Stocktake > Mark missing… keep same parameters as Step 3.
      7. Optional Step… Writing Off long time Missing Items

        • You can “move” all barcodes that have been missing (M) for a long time into W for Written Off. Many people don’t do this… they just Cull long time Missing items. The good thing is this removes “old” missing items from your Stocktake Missing reports.
        • To do the job just go into Utilities > Stocktake > Write Off… and be careful with the Status date that you set for the job… I suggest you do it for ALL records by clicking the Default button to reset criteria.
      8. Print Missing Items Report
        • This will give you a hardcopy of all items marked missing.
        • Circulation or Utilities > Stocktake > Report > Missing… setup the parameters you used in Step 2 > Preview > Print

Start again at step 2 for next section of the Collection!

Instructions for the 4 Portable/Memory Barcode scanners we have ever sold and supported…

(If we’ve forgotten one, let us know!)

Cipher 1067M and LibCode Stocktake

Cipher 1166 and LibCode Stocktake

Cipher 1560 and LibCode Stocktake

MetroLogic and LibCode Stocktake

- – - – - – - – - – - – - – - – - – - – - – - – - – - – - – - – - – - – - – - – - – - – - – - -

Stocktake Related Instructions (General Stocktake Page)

    1. Step by Step guide to doing a stocktake
    2. Stocktaking Tips & Warnings
    3. Cleaning up Data for a Stocktake
    4. Using the Stocktake Checksheet (If you want to edit the details you can Download DOC)
    5. How to Start a New Stocktake
    6. Setting Stocktake Parameters
    7. Adding Barcodes to your Stocktake
    8. Stocktake Using a Memory Scanner
    9. Using Files to add your to Stocktake
    10. Exporting your Stocktake Data
    11. View your Stocktake
    12. Stocktake Reports
    13. Reconciling your Stocktake
    14. Marking Items as Missing
    15. Writing Resources off that have been Missing for a Long Time

{ 0 comments… add one now }

Leave a Comment

What is the purpose of a Stocktake?

  • Stocktaking is basically your opportunity to find out what has walked out the door of your library without being borrowed.
  • Stocktaking involves actually handling every resource in your collection (not currently on loan) so it is a perfect time to check the condition and age of your resources… which usually leads to lots of repairing and culling.
  • You’ll find resources that were marked missing in previous stocktakes back on the shelves.
  • You’ll finding Culled resources that have found their way back onto your shelves.

Using one terminal or input point

  • If you are stocktaking multiple sections you should write down the date and time you start a section and then the date and time you finish a section.  That way you can effectively use the Date/Time selection criteria in the Stock Parameters for viewing data entry consistency and when generating reports.
  • When you decide to stocktake a section you MUST finish ASAP.  Do not lend or return from section or missing item results will be incorrect.
  • Download your portable scanner straight into the Add area in Circulation under Stocktake.

Using Multiple Machines / Scanners

  • You should create files of barcodes and use the Append option to import lists of barcodes into the Stocktake.  This way you can treat each ‘batch’ of data as a separate entity… viewing, reporting, reconciling and marking missing without effecting other resources in your collection.
  • Create files of barcodes with your portable scanner.  Download all the barcodes from a section of your library into the one file for Append to stocktake… it is fine to download several ‘loads’ of barcodes into the one file which can then be Appended in one go! (One file, one section of the collection keeps it simple.)

Use the Stocktake Check Sheet

  • The LibCode Suite – Stocktaking Check Sheet has been created to help you keep a tab on the stocktaking process.  Using this form makes it practical to have several people on the job at the same time because you can see at a glance what needs to be done and what other people are doing regarding the stocktake.
  • All you need to do is print out a few copies of the form and fill in the details as you go until the entire collection (or part you are doing) is fully accounted for!
  • We have created two versions of a Stocktaking Check Sheet form to help you keep your stocktake under control.  The ‘Standard’ one is for basic printers and ‘Laser’ is for Laser printers (they’re basically the same but the Laser one is just a bit snazzier to look at!)

- – - – - – - – - – - – - – - – - – - – - – - – - – - – - – - – - – - – - – - – - – - – - – - -

Stocktake Related Instructions (General Stocktake Page)

  1. Step by Step guide to doing a stocktake
  2. Stocktaking Tips & Warnings
  3. Cleaning up Data for a Stocktake
  4. Using the Stocktake Checksheet (If you want to edit the details you can Download DOC)
  5. How to Start a New Stocktake
  6. Setting Stocktake Parameters
  7. Adding Barcodes to your Stocktake
  8. Stocktake Using a Memory Scanner
  9. Using Files to add your to Stocktake
  10. Exporting your Stocktake Data
  11. View your Stocktake
  12. Stocktake Reports
  13. Reconciling your Stocktake
  14. Marking Items as Missing
  15. Writing Resources off that have been Missing for a Long Time


{ 0 comments… add one now }

Leave a Comment

Perfect Data is easy to stocktake…so, you might need to do some cleaning up of your database before you start a stocktake.

RULE No. 1. – Backup before you do Bulk Updates!

RULE No. 2. – If you have a big data edit job to do… contact the LibCode Office to check if there is a quick way to do the job!

Good quality Shelf List details are the key here. When I say Shelf List details we are talking about:-

Department, Site, Location, Classification Number and Main Entry (M.E. is the three letters on the Spine label… who knows WHY it is called “Main Entry” but that it is the technical terminology). GMD is worth a look too because there is usually a bit of inconsistency between GMD and Location that makes resources hard to find.

Here’s what we suggest you do to get your database in good shape:

1.  Do a Collection Statistics report: (Utilities > Reports > Collection Statistics…)

Here is an example report with some issues that need some attention:

Arrow

    • Notice the 7 CD resources? They should be CDR and that’s a good example of when you just jump into Data Entry, Click on the Location column header to sort the data in Location order and type CD in the Find box to jump to the first record that needs fixing…
      • Shift-F12 (Next in List function) is your friend when it comes to jumping back to the next record after where the item was BEFORE you changed it! (Check it out you will use it a LOT as you clean up data!)
    • Notice the 386 LIB location records? They should not have LIB in the Location field in this collection… after checking these items in Data Entry using the Filter – Location – Equal to – LIB function to look at the items I see that they are actually Non-Fiction items with Classification numbers and just have an extra LIB added to the Location field.
      • This is a prime example for a Bulk Update to change all items with a Location – Lib to Lib… Replace the Location with – No Location and all is well. See Catalogue Update instructions for a more detailed description of the bulk update process… Be Careful!

2.  Jump in to Data Entry and use the Find box on various columns to find and fix data:

    • You can leave the Collection Statistics report on the screen and use Alt-Tab to jump into Data Entry to clean up data you find to be dodgy in the report OR just print the report and work your way through it.

Arrow

3.  Re-arrange columns in Data Entry / Catalogue tab to make data checking easier:

The order of the columns displayed in the Catalogue tab of Data Entry is not fixed. You can move the columns around to make it easier to check data and even to create reports!

    • The little Printer button pops up a Report Generator that allows you to print based on what you have selected and the grid layout you have setup
      • Use Grid > Save configuration to keep a copy of your custom layouts!
    • Left Click and Hold button down then drag to move columns…
    • Closing Data Entry will reset grid layout. If you Saved a configuration you can load it via Grid > Load…

4.  Use multi-select functions on Data grid to highlight dodgy items:

Make a Quick Edit list…

  • IF you hold down the CTRL button as you scroll down your data, you can click on individual records to highlight them. Keep the CTRL button down and you can keep selecting or de-selecting more records.
  • Once you have gone through and found a bunch of dodgy records, you can click the Show Sel. Only button to hide all the non-selected records and print a report of only the ones you had highlighted.
    • Try this after clicking on the Site column header to sort data in Shelf List order… usually there’ll be some nasties at the start (with no Site, Location, Classification No. or M.E.) and then you’ll find more between sections… (between Non-Fiction and Junior Fiction, Between Junior Fiction and Fiction etc…)

Create a Report for checking…

  • Once you have highlighted a bunch of dodgy records and it’s time to create a report! Just move the columns around to be exactly where and how wide you want them to be and click Print.
  • Don’t forget to use the Save Configuration function under Grid to keep a copy of your layout to use later… this does not save the selection criteria OR the highlighted records… just the layout of the grid.

5.  Use Update function in Utilities to sort out big editing tasks:

As you look around your data you may find chunks of data that need adjusting. If you can describe the records in a way that makes them unique (eg. They are the ONLY records that have LIB in the Location field) then you can probably fix them in one swoop.

Bulk Update is the function… it’s a little scary the first hundred or so times but once you got it sorted it’s great! (Here’s an example of a Location Bulk Data Update)

- – - – - – - – - – - – - – - – - – - – - – - – - – - – - – - – - – - – - – - – - – - – - – - -

Stocktake Related Instructions (General Stocktake Page)

  1. Step by Step guide to doing a stocktake
  2. Stocktaking Tips & Warnings
  3. Cleaning up Data for a Stocktake
  4. Using the Stocktake Checksheet (If you want to edit the details you can Download DOC)
  5. How to Start a New Stocktake
  6. Setting Stocktake Parameters
  7. Adding Barcodes to your Stocktake
  8. Stocktake Using a Memory Scanner
  9. Using Files to add your to Stocktake
  10. Exporting your Stocktake Data
  11. View your Stocktake
  12. Stocktake Reports
  13. Reconciling your Stocktake
  14. Marking Items as Missing
  15. Writing Resources off that have been Missing for a Long Time


{ 0 comments… add one now }

Leave a Comment

What is this all about?

The Stocktake Checksheet was created by Bronny at a busy High School to make sure each section of her library was stocktaken properly.

Each column represents a single section of the library.

- For example:  This could be the Entire Fiction section or just Fiction A – C.

Each row in the document represents something you need to do…

- As long as you fill out each row as you go, there is no chance any time will be wasted!

This document tries to explain how to actually do each task on the Stocktake Checksheet. (Click here for the downloadable DOC)

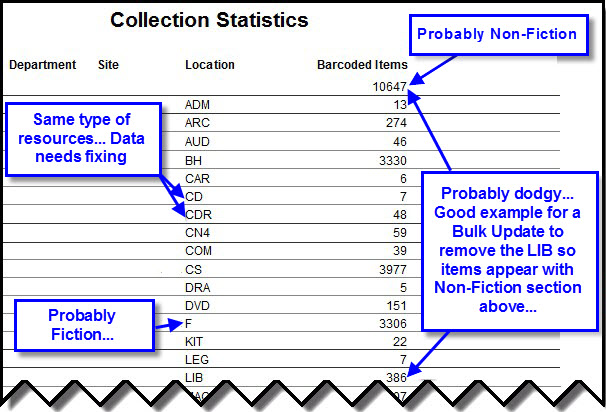
Section being Stocktaken: (This relates to Stock Parameters which is simply selection criteria)

Write down which part of the collection you are about to stocktake.

For example ‘Fiction’ or perhaps write ‘Location = F’… which better represents how to describe the section AS selection criteria (otherwise known as Parameters).  Location F - F and Main Entry A - AZZ is a more specific example of what you might write at the top of a column.

*Tip for Experts*

If you are creating files to Append, this is a great place to write the name of the file that contains barcodes for the section!

Loans Suspended:

You should not lend or return resources from the actual section of the collection you are stocktaking.  Tick this column when you’re happy that everyone knows not to lend or return resources from the section of the collection you are working on.

For example stick a Post-It on the Circulation terminal that says ‘No LOANS for Fiction!’

*Tip for Experts*

You can return resources as long as you remember to zap items into stocktake before shelving or inload a buffer file made from Returned Items report between the dates of your stocktake…

Check for Resources from this section stored in other places:

Tick this column after you have checked the Returns Trolley, Repairs and Reservations Shelves and retrieved all resources from the section you are stocktaking… just scan them in so they are taken into account and not treated as missing!

Shelves Checked:

Tick this column after you have checked the shelves for resources lying down or stuck inside other resources.  We also suggest you take the time to get the section in correct shelf order because this will save lots of time when it comes to finding resources with dodgy data later!

Date/Time Started AND Date/Time Finished:

Fill in the time you start scanning barcodes into the Add option or the time you start Appending a file of barcodes.. then do the same for the Finish times.  This information will allow you to deal with chunks of your stocktake without having to clear out the entire stocktake file.  Very handy once you get used to it!

Data Viewed / Adjusted:  (Go into Circulation > Stocktake > View)

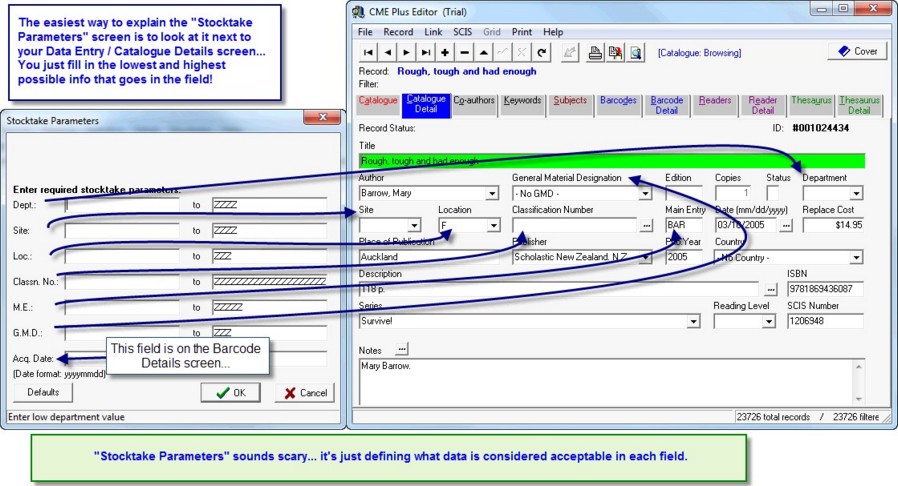
After scanning in a section (or Appending a file of barcodes) go into View and set the parameters that should describe the resources just scanned. ‘Parameters’ sounds scary but it is just selection critera… eg. Dept __ to __ , Site __ to __ , Location F to F, M.E. A to AZZZZ, GMD __ to __  would typically be the ‘parameters’ for a Fiction resource with letters on the spine label between A and AZZZZ. Make sense? (Fill out the Date/time details if you have recorded them so ONLY the barcodes scanned during that time span will be displayed.)

This displays a list of all the items you scanned in the order you scanned them… you can now have a quick look through the list to find RED items that appear to be in the wrong place (maybe something wrong with the data!) or BOLD not in the catalogue at all (data entry mistake or totally missing record).

You can deal with these straight away by jumping into the Data Entry module and editing the records… or, you might just remove questionable items from the shelves, attach a note to each resource detailing what needs to be done and fix them later…

Tick the column when you are happy that this task has been completed.

*Tip for Experts*

See ‘Creating and Appending Barcode files’ at end of these instructions for more details about creating and using barcode files in the Stocktaking process

Found Report: (Go into Utilities > Stocktake > Reports > Found)

Prints a report (if there are any) of items that were scanned on the shelves but are currently marked missing.  These resources have turned up after being tagged missing in a previous stocktake.  Record the number of items ‘Found’ in this column… YAY!!! Found items!

Missing Report:

Go into Circulation > Stocktake > Reports > Missing and Preview the report to see if you have accidentally missed any resources.  If you need to, print the report and go back to the shelves to double check and Add any extra resources to Circulation > Stocktake > Add.

When you are happy that only actually Missing resources are on the list then record the number in this column.

Reconciled: (Go into Utilities > Stocktake > Reconcile) (‘Last Stocktake Date’ is a field on the barcode data entry screen…)

When you are confident you have thoroughly checked and re-checked the section you should Reconcile which will add a Last Stocktake Date to each item found in this section of the collection.  ‘Found’ items are automatically fixed during this operation.  Tick this column after you have Reconciled the section and record the appropriate dates as outlined below:

Found items:

This is the Last Stocktake Date assigned to items actually seen during the section stocktake.

On Loan items: 

This is the Last Stocktake Date assigned to items that were out on loan during section stocktake.

Many schools choose not to differentiate between these items because it doesn’t really matter if they are on loan – you ‘know’ where they are.  If you don’t want to have two different Last Stocktake Dates assigned, feel free to set the identical date in both fields when prompted.

Missing Items Marked: (Go into Utilities > Stocktake > Mark Missing)

Tick this column after Missing items in the section have been marked Missing.  Record the Status Date of the items in this column as well.

Comment:

Record any special notes you would like to remember about the stocktake of this section.

Section Completed:

Tick this box and initial it to indicate that this section has been totally dealt with and lending and returning can be resumed.

Final Missing Items Report: (List of ALL items found missing in a year… including stocktake info)

Once you have completed all the sections you want to stocktake you can do an All-in-one report via Utilities > Reports > Barcode Listing and set the criteria as Status (Bcode) Low Value - M / High Value - M AND Status Date Low Value – Start of year / High Value - End of year.

Creating and Appending Barcode Files…

To create a file of barcodes you should open NotePad (Under START > Programs > Accessories > NotePad) and then zap or type in your barcodes (there should be one barcode per line).  Save the file as a Text (.txt) file and then go into Circulation > Stocktake > Append and select the file you created with the barcodes in it and any barcodes in the file,  not already in the Stocktake, will be added to the file…

There are MANY ways to approach a stocktake. If you have found an easy way and have some instructions to go with the plan we’d love to hear about it! There are some changes planned for next year’s stocktake so keep your eyes peeled for the details!

Here is the Stocktake Checksheet…

LibCode Suite – Stocktaking Check Sheet for  __ / __ / ____     (Page __ of __)

Section being Stocktaken
Loans Suspended o o o o o o
Checked for resources from this section stored in other places. (Frozen boxes, repairs, reserves etc.) o o o o o o
Shelves Checked o o o o o o
Date / Time Startedyyyy / mm / ddhh : mm : ss ____ / __ / ____ : __ : __ ____ / __ / ____ : __ : __ ____ / __ / ____ : __ : __ ____ / __ / ____ : __ : __ ____ / __ / ____ : __ : __ ____ / __ / ____ : __ : __
Date / Time Finishedyyyy / mm / ddhh : mm : ss ____ / __ / ____ : __ : __ ____ / __ / ____ : __ : __ ____ / __ / ____ : __ : __ ____ / __ / ____ : __ : __ ____ / __ / ____ : __ : __ ____ / __ / ____ : __ : __
Data Viewed / Adjusted o o o o o o
Loans Found Report o ____ items o ____ items o ____ items o ____ items o ____ items o ____ items
Missing Report o ____ items o ____ items o ____ items o ____ items o ____ items o ____ items
Found Report o ____ items o ____ items o ____ items o ____ items o ____ items o ____ items
Reconciled-    Found Items-    On Loan Items o__ / __ / ____ / __ / __ o__ / __ / ____ / __ / __ o__ / __ / ____ / __ / __ o__ / __ / ____ / __ / __ o__ / __ / ____ / __ / __ o__ / __ / ____ / __ / __
Missing Items Marked o __ / __ / __ o __ / __ / __ o __ / __ / __ o __ / __ / __ o __ / __ / __ o __ / __ / __
Comment
Section Completed(Allow loans again…) o _________ o _________ o _________ o _________ o _________ o _________

(Click here for downloadable DOC you can edit and play around with!)

- – - – - – - – - – - – - – - – - – - – - – - – - – - – - – - – - – - – - – - – - – - – - – - -

Stocktake Related Instructions (General Stocktake Page)

  1. Step by Step guide to doing a stocktake
  2. Stocktaking Tips & Warnings
  3. Cleaning up Data for a Stocktake
  4. Using the Stocktake Checksheet (If you want to edit the details you can Download DOC)
  5. How to Start a New Stocktake
  6. Setting Stocktake Parameters
  7. Adding Barcodes to your Stocktake
  8. Stocktake Using a Memory Scanner
  9. Using Files to add your to Stocktake
  10. Exporting your Stocktake Data
  11. View your Stocktake
  12. Stocktake Reports
  13. Reconciling your Stocktake
  14. Marking Items as Missing
  15. Writing Resources off that have been Missing for a Long Time

{ 0 comments… add one now }

Leave a Comment

This is where old stockfiles are purged before commencing a new stocktake.  It is not necessary to undertake a stocktake of your complete resource collection.

Sections can be done at a time that is convenient to both you and your organisation.  To carry out a partial stocktake i.e. one area of your collection at a time, is the easiest and less daunting method.

Cleaning out old stocktaking information

    • You have to clean out the last stocktake details before starting a new one…

(Utilities > Stocktake > New Stocktake…)

    • Don’t forget you don’t need to change ‘Missing’ records to ‘Written off’ in LibCode Suite as you did in LibCode DOS.  The Status Date field means it is perfectly ok to leave Missing items in the system until you are tired of them being there… after all, they might just turn up!  You can print lists of items found missing within certain date ranges at any time by using selection criteria…
    • When you select a new stocktake you will be asked if you would like to “purge” all stocktake items before you continue. All this does is delete the previous stockfile, no records etc. are deleted, just the file containing when the barcode was entered and barcode number. So there is nothing to worry about as long as you have finished with your previous stocktake, before you begin your next one.
    • Do not start a New Stocktake if you are saving all the zapped barcodes to do one big Missing Report, Found Report, Reconcile and Mark Missing at the end of the entire collection stocktake!

ENSURE YOU ARE COMPLETELY FINISHED WITH YOUR LAST STOCKTAKE BEFORE YOU BEGIN ANOTHER ONE!

- – - – - – - – - – - – - – - – - – - – - – - – - – - – - – - – - – - – - – - – - – - – - – - -

Stocktake Related Instructions (General Stocktake Page)

  1. Step by Step guide to doing a stocktake
  2. Stocktaking Tips & Warnings
  3. Cleaning up Data for a Stocktake
  4. Using the Stocktake Checksheet (If you want to edit the details you can Download DOC)
  5. How to Start a New Stocktake
  6. Setting Stocktake Parameters
  7. Adding Barcodes to your Stocktake
  8. Stocktake Using a Memory Scanner
  9. Using Files to add your to Stocktake
  10. Exporting your Stocktake Data
  11. View your Stocktake
  12. Stocktake Reports
  13. Reconciling your Stocktake
  14. Marking Items as Missing
  15. Writing Resources off that have been Missing for a Long Time

{ 0 comments… add one now }

Leave a Comment

During stocktake you need to set Stocktake Parameters.  This can be a little daunting the first few times so here is an explanation of the Stocktake Parameters screen… The Parameters screen is on the left and the Data Entry screen is on the right.

A Special Note:

The Stocktake Parameters set in Step 2 are only for visual comparison of the data you have scanned… to… the existing catalogue of resources.  This screen has been included so you can check your data entry consistency so it does not matter if you don’t get it right the first time. IF everything turns up RED then you might need to have another go!

Each field on this screen allows you to set a Range of possible values… Low Value to High Value.  Lets look at the  Site displayed on the screen shot above as an example…

Site:   ’   ’ to  ZZZZ means Site should be anything between Blank and ZZZZ (which is the highest possible value for a Site field entry) so this describes ALL resources.  If you put Site:  SCI   to   SCI  then the Site must be equal to SCI for the record to NOT appear RED… make any sense?

Just go ahead and set some crazy parameters and see what happens… the best way to understand these settings is to experiment!

An explanation of each field is included here…

DataTime: (Only displayed when you are about to VIEW the scanned items…)

This field allows you to view a certain time span of your stocktaking activities (defaults to the Date/Time of the first item you zapped to the Date/Time of the last item zapped).  For Example… you were stocktaking the Fiction section between 1pm on the 13th of September, 2010 and 3pm on the 13th of September, 2010… (Format is Year, Month, Day, Hour, Minutes, Seconds)

So the Date/Time entries would be     20100913130000         to                20100913150000

(yyyymmddhhmmss)                       (yyyymmddhhmmss)

Site:

The Site describes possible value that the Site field should be for the catalogue records you are stocktaking… ’    ’  to  ZZZZ as shown above means the Site can be anything. For Fiction books it would probably be Site:   ’   ’ to   ’    ’ (which means it must be blank).

Loc:

Loc describes the possible value of the Location field should be for the resources you wish to view.  Fiction books would probably be  Loc:   F  to  F  (which means Loc must be ‘F’).

Classn. No.:

The Classn. No. sets the possible value that the Dewey Number field should be for the catalogue records you want test.  Fiction books would probably be Dewey no. : ’  ’  to ’  ‘.

M.E.:

The Main Entry is the three (can be up to 5) letters that appear on the spine label.  This entry describes the possible values the spine labels of resources you are checking should be.  Fiction books would probably be M.E.:  A  to  ZZZZZ  (which means ALL… although you could split up the fiction section by using… A  to  AZZZZ which would only be the A fiction resources…)

GMD:

General Material Designation (or Description) describes what should be in the GMD field for the resources you are checking.  Fiction books should probably be GMD:  ’  ’ to  ’  ‘.

Acq Date:

The Acquisition Date describes what should be in this field for the resources you are checking.  You would usually leave this set as is, which describes all resources purchased up to the day you started zapping items for the stocktake.  It is set so that if you enter new resources during the Stocktake process you don’t need to remember to stocktake them!

Defaults button:

This is the ‘I am a little confused’ button.  It resets the values of all the settings on the screen to include ALL records in the catalogue.  This is a good place to start the Stocktake Parameters setting process.  Then you move through the items asking yourself… ‘Now what should this field contain for the items I have just zapped?’

- – - – - – - – - – - – - – - – - – - – - – - – - – - – - – - – - – - – - – - – - – - – - – - -

Stocktake Related Instructions (General Stocktake Page)

  1. Step by Step guide to doing a stocktake
  2. Stocktaking Tips & Warnings
  3. Cleaning up Data for a Stocktake
  4. Using the Stocktake Checksheet (If you want to edit the details you can Download DOC)
  5. How to Start a New Stocktake
  6. Setting Stocktake Parameters
  7. Adding Barcodes to your Stocktake
  8. Stocktake Using a Memory Scanner
  9. Using Files to add your to Stocktake
  10. Exporting your Stocktake Data
  11. View your Stocktake
  12. Stocktake Reports
  13. Reconciling your Stocktake
  14. Marking Items as Missing
  15. Writing Resources off that have been Missing for a Long Time

{ 0 comments… add one now }

Leave a Comment

When you jump into Add you will see this screen…

Arrow

In English this means…

“Do you want a warning when there is something wrong with the item you just scanned?”

-  “Pausing on error” allows you to immediately identify a resource that is outside the parameters of the area currently being stocktaken.  You can only use ‘Pause on Error’ if you’re adding directly into the LibCode Stocktake function.

-  You MUST click No if you want to download a portable scanner straight into LibCode… you don’t want the program popping up saying “HEY! That was a dodgy barcode!” while the scanner is busy sending 2000 barcodes as fast as it can!

-  Another way to download your scanner is to open a NotePad document and download into that then Save it with a file name that tells you what barcodes are in the file… you can then use Circulation > Stocktake > File Append function to inload…

There are three ways you can add to your stocktake file using the ‘Add’ option -

    1. By bringing the resources to the main Library or Circulation computer and entering each barcode individually either using a barcode scanner or typing the info using your keyboard.   This option allows you to check the physical state of the resource for damage and if it is still a useful resource to own! Is it too old? Does it need repairing? Do you think it would be used more if it was shelved in a more appropriate area?  These concerns can be addressed at the time of stocktaking.
    1. Using a portable memory scanner will allow you to take the scanner to the location of the resources.  Whether they are in the main collection area or in another area.  Resource barcodes are scanned and stored in your portable scanner and then downloaded into LibCode Suite. This option saves you carrying loads of resources to the computer and speeds up stocktake.One of the drawbacks of this method is you cannot pause on error as you enter barcodes therefore you can’t check the resource / barcode validity until you view your ‘remote’ batch of barcodes after they have been added to the stockfile. The software has a View function that was created for exactly this purpose so it’s all good… just something to be aware of. If your data is dodgy you might want to take the first option so you can cleanup your data on the spot.
    1. A laptop can also be used, although you will require a Barcode Scanner with a USB connection and a USB Pen Drive for backups.
      • Backup LibCode Suite on the main library computer to a USB drive using Alternate Backup function in Utilities… call the destination folder CMESTOCK (eg. J:CMEStock (case is not important, it just looks nice!).
      • Attach the USB Barcode Scanner to the laptop.
      • Plug in the USB and create a new icon on the laptop desktop to J:CMESTOCKLCSafe.exe.
      • Open up Circulation > Stocktake > Add and start scanning in the barcodes.  Remember to follow the instruction for stocktaking as outlined on the stocktake check sheetDo not make any changes to the catalogue on this laptop.  It is safer to do all data editing on the main library computer.
      • Once you have scanned in the barcodes for a particular area you can then use the Circulation > Stocktake > View option to check for items outside paramaters and other errors.  You can also Print the Reports to screen for a quick visual check.  This will allow you to recheck the shelves for missing items before Exporting the Stockfile to transfer to “Server” copy.
      • When you have finished scanning in an area open Circulation > Stocktake > Export and Click on the Export button.
      • Name your file appropriately eg Junior fiction scanned in today would be J:Stocktake20101208JF (where J: is the pen drive).
      • Click on the USB icon on the bottom task bar and STOP USB DEVICE – for safe removal of the USB drive.
      • Go to your main library computer and backup – Utilities > Backup-Restore > Backup.
      • Insert the Pen Drive into the main library computer and open up Circulation > Stocktake > File Append.
      • Locate the Pen Drive (Removable disk) by clicking on the … highlight the file and click OK.
      • Click the Append button and you will be told how many records were added to the stockfile. If you have accidentally scanned an area or barcode in twice it will not duplicate in the stockfile.
      • You can now generate your stock reports from the Utilities screen and continue on as per the general stocktaking instructions.
      • If you’re happy with the inload you can return to the laptop and continue with the next section.
      • Although there is no need to clear out the stocktake details on the laptop, it might make it clearer in your own mind if you hit the New Stocktake option on the LAPTOP in utilities at the beginning of each new section.

Thus endeth this lesson!

- – - – - – - – - – - – - – - – - – - – - – - – - – - – - – - – - – - – - – - – - – - – - – - -

Stocktake Related Instructions (General Stocktake Page)

  1. Step by Step guide to doing a stocktake
  2. Stocktaking Tips & Warnings
  3. Cleaning up Data for a Stocktake
  4. Using the Stocktake Checksheet (If you want to edit the details you can Download DOC)
  5. How to Start a New Stocktake
  6. Setting Stocktake Parameters
  7. Adding Barcodes to your Stocktake
  8. Stocktake Using a Memory Scanner
  9. Using Files to add your to Stocktake
  10. Exporting your Stocktake Data
  11. View your Stocktake
  12. Stocktake Reports
  13. Reconciling your Stocktake
  14. Marking Items as Missing
  15. Writing Resources off that have been Missing for a Long Time

{ 0 comments… add one now }

Leave a Comment

Instructions for the 4 Portable/Memory Barcode scanners we have ever sold and supported…

(If we’ve forgotten one, let us know!)

Cipher 1067M and LibCode Stocktake

Cipher 1166 and LibCode Stocktake

Cipher 1560 and LibCode Stocktake

MetroLogic and LibCode Stocktake

- – - – - – - – - – - – - – - – - – - – - – - – - – - – - – - – - – - – - – - – - – - – - – - -

Stocktake Related Instructions (General Stocktake Page)

  1. Step by Step guide to doing a stocktake
  2. Stocktaking Tips & Warnings
  3. Cleaning up Data for a Stocktake
  4. Using the Stocktake Checksheet (If you want to edit the details you can Download DOC)
  5. How to Start a New Stocktake
  6. Setting Stocktake Parameters
  7. Adding Barcodes to your Stocktake
  8. Stocktake Using a Memory Scanner
  9. Using Files to add your to Stocktake
  10. Exporting your Stocktake Data
  11. View your Stocktake
  12. Stocktake Reports
  13. Reconciling your Stocktake
  14. Marking Items as Missing
  15. Writing Resources off that have been Missing for a Long Time

{ 0 comments… add one now }

Leave a Comment

Stocktake data can be collected using a number of non-networked computers / laptops using either the Utilities > Setup > Buffer file OR by opening Notepad and scanning in the resource barcodes.  The file is then saved and added to the Stock file by using the File Append to inload the saved *.txt or *.buf file.

This can prove very handy when you have a number of people assisting with your stocktake.  Each person is allocated a specific area to stocktake.  Their file is saved and imported at a later date by the stocktake ‘co-ordinator’.  The date and time each section is inloaded can be recorded using the Stocktake Checksheets and then you can create Reports and View each specific area.

Arrow

  1. Save your files in one folder so you can find them easily.
  2. Always call the file something descriptive i.e. usually the location where you collected the data.
  3. When using the File Append option make sure you look for All Files.  This screen defaults to *.txt files so if you created your file using the Utilities > Setup > Buffer file option the file will be a *.buf format and it will not appear on this list until you change to All Files.

Setting up a Laptop to collect Stocktake Data:

Using a Laptop to create a text file.  This will allow you to scan in the barcodes (a Barcode Scanner with a USB connection will be needed) and then add this file to your stocktake on the main library computer.

    1. Connect your barcode scanner to the laptop.
    2. Create a folder on the C: or D: called Stocktake and have a USB memory stick handy.
    3. Open up Notepad by clicking on START > Accessories > Notepad.
    4. Scan in the barcodes for a particular area eg. Junior Fiction A – L (Get some kind of sequence going).
    5. Once you have finished scanning the barcodes for this area click on FILE / SAVE AS and save the file to the Stocktake folder as a text file.  Name the file so you know what it is eg JF20101207A-L.TXT
    6. When the file has been saved to the hard drive save it again, this time to the USB drive.
    7. Take the USB stick to the main library computer and open up Circulation > Stocktake > File Append.  Locate the USB drive and the relevant file and click Open.  If you can’t find it on your drive click the drop down arrow in the Files of Type field and select ALL FILES.
    8. Now click the Append button and you will be given confirmation of how many barcodes have been added.
    9. Proceed with the stocktake as per the Stocktake Instruction Check Sheet.

- – - – - – - – - – - – - – - – - – - – - – - – - – - – - – - – - – - – - – - – - – - – - – - -

Stocktake Related Instructions (General Stocktake Page)

  1. Step by Step guide to doing a stocktake
  2. Stocktaking Tips & Warnings
  3. Cleaning up Data for a Stocktake
  4. Using the Stocktake Checksheet (If you want to edit the details you can Download DOC)
  5. How to Start a New Stocktake
  6. Setting Stocktake Parameters
  7. Adding Barcodes to your Stocktake
  8. Stocktake Using a Memory Scanner
  9. Using Files to add your to Stocktake
  10. Exporting your Stocktake Data
  11. View your Stocktake
  12. Stocktake Reports
  13. Reconciling your Stocktake
  14. Marking Items as Missing
  15. Writing Resources off that have been Missing for a Long Time

{ 0 comments… add one now }

Leave a Comment

10.10 Exporting your Stocktake Data

November 26, 2012

If you have set up a stand alone computer or laptop to do your stocktake, but your main database is on the Server (or main library computer) you can collect stocktake data, export the data in a text file format and then append it to the stocktake on the Server or main library computer. This [...]

Read the full article →

10.11 View your Stocktaking, the Stockfile…

November 26, 2012

This is where you start comparing the scanned items to the database and fix problem records… (Circulation > Stocktake > View > Set parameters > Find and fix dodgy data in Data Entry module…) Setting parameters can be a bit tricky to start off with but once you have the done it a couple of times it makes more [...]

Read the full article →

10.12 Stocktake Reports…

November 26, 2012

To do these reports you’ll need to be able to set Stocktake Parameters. (Click here to see an explanation of Stocktake Parameters) There are 2 places you can do a Missing and Found report… Circulation > Stocktake > Reports… The reports are here so you can view and check on your process. Also when you are in [...]

Read the full article →

10.13 Reconciling your Stocktake…

November 26, 2012

When you have completed either a partial or a full stocktake you need to Reconcile the records… If you don’t, you have wasted the time and effort stocktaking. Before Reconciling a stocktake, you should print a Found Items Report. Part of the Reconcile process removes the Missing status from Found records… so if you Reconcile [...]

Read the full article →

10.14 Mark Items as Missing…

November 26, 2012

WARNING!!! Good idea to do a BACKUP before you do this… just in case you need to say OOPS! Once you have reconciled your stocktake and you are totally happy with your Stocktake > Missing report for certain parameters THEN you need to mark resources Not on Loan OR not included in the stocktake as Missing. [...]

Read the full article →

10.15 Writing Resources off…

November 26, 2012

This is NOT a necessary thing to do. You can always just treat items that have been missing for a long time as written off… eg. Use the Cull Items function (see below for instructions) to print and then delete all items that have been missing for over 3 years. This function is for those [...]

Read the full article →

10.16 Disaster Recovery

November 26, 2012

What needs to be done for your database in the event of your library collection being damaged and how do you recover from it? Three scenarios spring to mind: 1. Lost the lot! Guard your USB backups like they are worth half a million dollars… because they are! Call the LibCode Office (07) 4638 9415 [...]

Read the full article →

10.17 Sandra’s Stocktake Tips

December 1, 2015

There are a always a number of ways to attack a stocktake and we have made lots of attempts over the years to document the process…it seems one size does not fit all! Below you will find a copy of Sandy’s Super-popular Stocktake Steps, as well as a link to the stocktake instructions from our [...]

Read the full article →