08.06.06.08 Synchronising Borrowers and Rolling Over Student Data

Synchronising Borrowers with an in-load file (In-loading borrower information from another computer system).

These are the Office Systems we have setup a standard process for:

*** IMPORTANT NOTE***

These instructions may have been created for old versions of Office Systems.

The important information is:

- The number of fields in the file you are creating for Synchronising Borrowers.

- The ORDER of those fields.

- The DATA that is in those fields… (ie. If you want to use MAZE format and you DON’T want address details, you still need to export the correct number of fields BUT you could export an empty field from your Office System instead of the real information! Make sense? Must still have 13 fields in the file you create if you want to use “MAZE…” Synchronise Borrower option).

OneSchool

    • The New office system found in Qld State Schools.
    • CSV text file format.
    • MUST be 8 fields… School_Centre,EQID,MSID,Last_Name,Preferred_First_Name,Middle_Names,Year_Level,Roll_Class.

SMS

    • The OLD office system found in Qld State Schools.
    • CSV text file format (comma delimited).
    • MUST be 6 fields… StudentID,Surname,Given_Name,Year_Level,Group,Class.

MAZE

    • The office system commonly found in Qld private schools.
    • Tab delimited text file format.
    • Must be 13 fields… Enrolment No.{tab}Surname{tab}Given or Preferred Name{tab}Gender{tab}YearLevel{tab} RollClass{tab}Address1 {tab}Suburb/Town{tab}PostCode{tab}EmailAddress{tab}HomePhone {tab}FaxNo.{tab}MobilePhone.

TEXT FILE – for ANY Office System, even the ones mentioned above

    • Needs to be a Tab delimited file OR a CSV (comma delimited file).
    • Can be in any order and contain any number of fields… you “map” the fields in LibCode to the fields in you data file during synchronise process.

Updating Borrower information from another computer system.

Updating the Borrower information is exactly the same as in-loading the information in the first instance except there are a few things you need to check before you start!

This is what happens when you synchronise existing borrower information:

The Pre-Synchronise Checklist…

  • Make sure you have done a Backup!

  • You MUST have the student’s enrollment number (or any other unique identifier) in the Borrower No. field of the Borrower’s details.  This number is used as a unique reference point for each student.

For example…

If John Smith has an existing Borrower No. of 1234 then any information attached to 1234 in your in-load file will replace John’s original details (which is why we suggest you make a backup BEFORE synchronizing borrower information).

If you need to enter your borrowers manually jump into Circulation > Borrowers OR Groups areas as necessary (see the Adding Borrower Details page.)

Tags: bulk change borrowers, bulk rollover, roll over, synchronise borrowers, synchronize borrowers, updating borrowers info, in-load, inload, in-loading, inloading, one school rollover, one-school rollover, roll-over, sms, maze, pre-synchronise, pre-synchronize, pre-syncronise, bulk student update, bulk borrower update

{ 0 comments… add one now }

Leave a Comment

Some things to do BEFORE you start:

  • Backup Before you start!!! (an Alternate or External backup is perfect because it’s quick!)

    • Load LibCode > Utilities > Backup/Restore… Alternate or External Backup
      • Remember where the backup is so you can restore Circulation Only  if there is a problem with this process…
    • If you do the normal “Backup” then if you have to Restore / Circulation only then the system automatically knows where to get the data…
  • Check ALL Student borrowers DO HAVE the EQID as their “Borrower No.” in the LibCode Circulation system.
    • Jump into Circulation > Borrowers > when Borrowers are displayed click Borrower No. column to sort borrowers then look down the list.
      • Staff (Staff is in the Group field) don’t need a Borrower No. but ALL Students that you want to Synchronise with OneSchool data MUST have their EQID as their Borrower No.  Edit borrowers as necessary.
  • Make sure you Check your data AFTER the synchronise…
    • If there is a problem DON’T use Circulation…
    • Utilities > Backup-Restore > Restore > Circulation Only data from the backup you made… or call us for help!
  • You can create a file from ANY Office System to use this inload function but it MUST be 8 fields and CSV! School_Centre,EQID,MSID,Last_Name,Preferred_First_Name,Middle_Names,Year_Level,Roll_Class

Now… take a deep breath, be calm and let’s do this magic… ;-)

Steps for OneSchool

  1. Ask your office people to Log into One School.
  2. Go to Reports.
  3. Go into Data Export Reports.
  4. Select Library Export.
  5. A file download screen appears with the option to Open or Save… Click save and save the data on to a USB stick.
  6. Once the download is complete close the window- now you are ready to load the file into LibCode!
  7. You could open this file in EXCEL and use the info to add EQID as Borrower No. for students if necessary.
  8. It is important to ensure that this file is saved in a *.csv format (comma separated values).
  9. Now the LibCode bit…
  10. Do a backup! (Can be an Alternate or External backup if you are in a hurry.)
  11. Might be a good idea to take note of a couple of students in Circulation > Borrowers to check after the synchronise. (See Step 13)
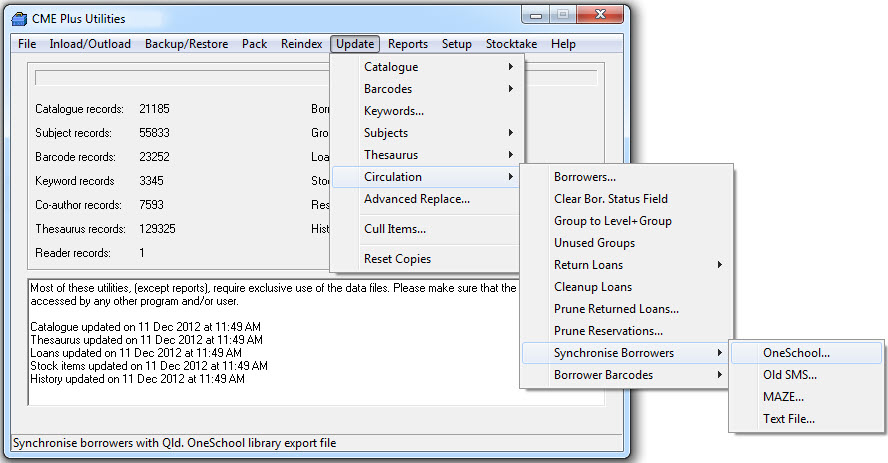
  12. Go into Utilities > Update > Circulation > Synchronise Borrowers > OneSchool.  Note that if you don’t have a OneSchool option you need to upgrade your LibCode software!
  13. Check out the options on the screen as there are a couple of things you need to check out and answer,  then click Synchronise.
  14. CHECK YOUR DATA NOW!!!! Go into Circulation > Borrowers and have a good look around.
  • Look up a few students you know and check the details are correct…
  • Look up a few students you know have left and make sure that’s ok
  • Look up some new students and make sure they are ok…

IF NOT HAPPY… you need to Restore > Circulation Only from the backup you did in Step 9. and give us a call.)

All done!

Arrow

Tags: oneschool, one school, rollover, roll over, eq schools, one-school, borrower inload, eqid, student numbers, using one school for eq

{ 0 comments… add one now }

Leave a Comment

{ 1 trackback }

There are a few things you need to do before you begin this process:

1.  Do a system BACK-UP

2.  Check ALL Student borrowers have the Sims Student ID as their “Borrower number”

3.  CHECK your data after the synchronise… if there is a problem DON’T use Circulation. Instead, restore your circulation data via the back-up you made in step 1… or call us for help!

SIMS In-Load

To do this you must have the Student Enrollment number (or SiMS number) in the Borrower No. field for each student.

This number is used as the identifying field for adjustments to existing data and to determine if a student is current.

HINT!  AN EASY WAY TO CHECK this is to Load Circulation / Borrowers and click the Borrower No. column header… all borrowers with NO number will be listed at the top… Students MUST have an enrollment number so please get one from the office if they don’t.  Even past students will need a number because otherwise the system will mark them as “left”.

The Steps…

  1. Create a file from the office system
  2. For Qld State Schools, download student information from the SIMS machine:
  3. SMS / Utilities / (Data Export may be the next step depending on version of SMS) / Data export to Oasis /  and follow the prompts.
  4. Have a USB stick handy or save the file to a shared network drive you can access from the Library

For all other Office Systems…

You need to create a CSV (comma delimited text file) with this format:  StudentNumber, Surname, GivenName, YearLevel, Class, Group

“Student Number” is a unique student identifier… usually an enrollment number

“Class” is the Roll Class or Home Group that would be used to chase overdues.

It does not matter what you call your file, but when you use the Synchronise function it will automatically list all TXT files so it is easier to

keep it as a TXT file.

To in-load new student information, select Utilities > Update > Circulation > Synchronise > SMS

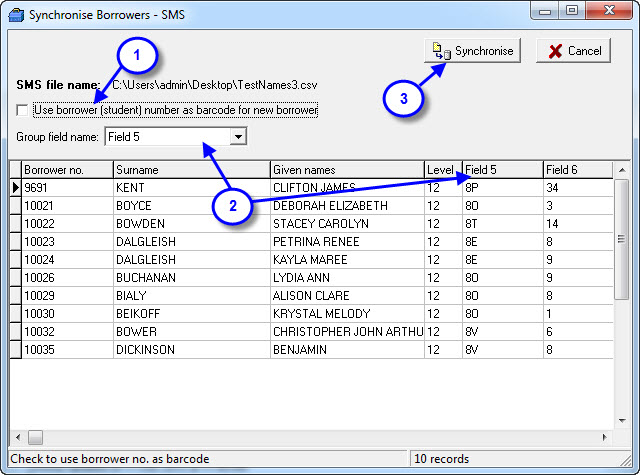
Browse to find the file to be in-loaded (datoal.txt if you have data from SMS) and when you click OK the screen below will appear:

Arrow

  1. (Screenshot) If you tick this option LibCode will put the Borrower Number (or enrolment number) into the new students as their Borrower ID (or Borrower Barcode).
  2. (Screenshot) You need to check which column in your file contains the information you want inloaded into the Group field.  This should be the Roll Class information that would normally be used to chase up overdue loans.
  3. (Screenshot) This is the Ready, Set, Go button.
    • Check your borrower information is correct by going into Circulation and then Borrowers and scroll around the list checking randomly that everything seems in order.
  4. Delete all the students in the LEFT class that do not have outstanding loans.  Manually via Circulation > Borrowers (Bold borrowers have loans) or Utilities > Update > Circulation > Borrowers > Set criteria as Group : Low Value = LEFT  : High Value = LEFT and click Purge (version 5+ users only and make sure you only delete the LEFT borrowers with no unreturned loans!)
  5. Delete all unused Groups by using the Utilities > Update > Circulation > Unused Groups function

Note:

  • For all other office systems, you need to create a CSV (comma delimited text file) with this format:
  • StudentNumber, Surname, GivenName, YearLevel, Class, Group
    • Student Number” is a unique student identifier- usually an enrolment number
    • Class” is the Roll Class or Home Group that would be used to chase overdue items

Tags: eq school office system, inload borrowers from sims, inload borrowers from sms, sync borrowers, synchronise borrowers, using state school format sms

{ 0 comments… add one now }

Leave a Comment

PLEASE NOTE!!!

Backup BEFORE you start

Check ALL Student borrowers DO HAVE the Office System Enrolment Number as their “Borrower No.” in the LibCode Circulation system.

CHECK your data after the synchronise… if there is a problem DON’T use Circulation…

(Restore your Circulation data from the backup you made… or call us for help!)

Now… back to the calm considered version of the instructions… ;-)

Inload from MAZE office system…

  • To do this you must have the Student Enrollment number in the Borrower No. field of each Student borrower. (This number is used as the identifying field for adjustments to existing data and to determine if a student is current or not…so, if it is not on each and every student in the system you can’t use this option until you check / add this number to each student.)
  • EASY WAY TO CHECK… Load Circulation > Borrowers and click the Borrower No. column header… all the borrowers with no Number will be at the top… Students MUST have their enrollment number from your office system… Staff do not need a number. Past Students need a number so they get marked LEFT!

The Steps…

  1. Create a file from office system… please ask your MAZE system guru to produce a TAB delimited file with the following information in it…
    • ST.ENROLMENT_NUM        ST.SURNAME        ST.GIVEN_NAME        ST.GENDER        ST.YR_LEVEL        ST.CLASS        DF.HOME_STREET        DF.HOME_SUBURB        DF.HOME_POST        DF.EMAIL_ADDRESS        DF.HOME_PH        DF.PG1_FAX_NUMBER        DF.PG1_MOBILE_PH
    • -        For all other office systems… You need to create a TAB delimited text file with this format… Enrolment No.{tab}Surname{tab}Given or Preferred Name{tab}Gender{tab}YearLevel{tab} RollClass{tab}Address1 {tab}Suburb/Town{tab}PostCode{tab}EmailAddress{tab}HomePhone {tab}FaxNo.{tab}MobilePhone
    • (“Roll Class” is the Class or Home Group that would normally be used to chase overdues.)
    • It does not matter what you call your file but when you use the Synchronise function it will automatically list all TXT files so it is easier to name your file as a TXT file.
  2. To inload new student information, select Utilities > Update > Circulation > Synchronise Borrowers > MAZE  Browse to find the file to be inloaded and when you click OK the screen below will appear…

Arrow

      1.  If you tick this option LibCode will skip the first row of your file when the inload begins (the first row is usually the field headers for the file).
      2.  If you tick this option LibCode will put the Borrower Number (or enrollment number) into the new students as their Borrower ID (or Borrower Barcode)…
      3.  This option will fill the group field.
      4.  This is the Ready, Set, Go button…
  1. Check your borrower information is correct by going into Circulation and then Borrowers and scroll around the list checking randomly that everything seems in order
  2. You could manually delete all the students in the LEFT class that do not have outstanding loans or you could use the Bulk Deleting Borrowers procedure.

If the wheels fall off… DON’T use Circulation until you Restore the Circulation data from the backup you made OR call us for help.

Good luck… it’s actually very easy once you’ve done it 1000 times!

Tags: inload from maze, inloading borrowers from maze, synchronise borrowers from  maze, using maze data

{ 0 comments… add one now }

Leave a Comment

PLEASE NOTE!!!

***Backup BEFORE you start

*** Check ALL Student borrowers DO HAVE the Office System Enrolment Number as their “Borrower No.” in the LibCode Circulation system…

(If your are starting from scratch obviously this does not count!)

*** CHECK your data after the synchronise… if there is a problem DON’T use Circulation…

(Restore your Circulation data from the backup you made… or call us for help!)

Now… back to the calm considered version of the instructions… ;-)

Inload from any office system… that can create a text file (tab or comma delimited data)

  • To do this “borrower synchronise” you must have some sort of unique Student Enrollment number in the Borrower No. field of each Student borrower. (This number is used as the identifying field for adjustments to existing data and to determine if a student is current or not…so, if it is not on each and every student in the system you can’t use this option until you add this number to each existing student.)
  • EASY WAY TO CHECK… Load Circulation > Borrowers and click the Borrower No. column header… all the borrowers with no Number will be at the top… Students MUST have their enrolment number from your office system… Staff do not need a number. Past Students need a number so they get marked LEFT (even a dodgy made up one will do!).

The Steps…

  1. Create a file from the office system… please ask your system guru to produce a TAB delimited or Comma delimited file with the following information in it…
    • Enrolment No.{tab}Surname{tab}Given or Preferred Name{tab}Gender{tab}YearLevel{tab} RollClass{tab}Address1 {tab}Suburb/Town{tab}PostCode{tab}EmailAddress{tab}HomePhone {tab}FaxNo.{tab}MobilePhone
    • (“Roll Class” is the Class or Home Group that would normally be used to chase overdues and {tab} could be a comma!)
    • It does not matter what you call your file but when you use the Synchronise function it will automatically list all TXT files so it is easier to name your file as a TXT file (you can still find it… just read the screen!).
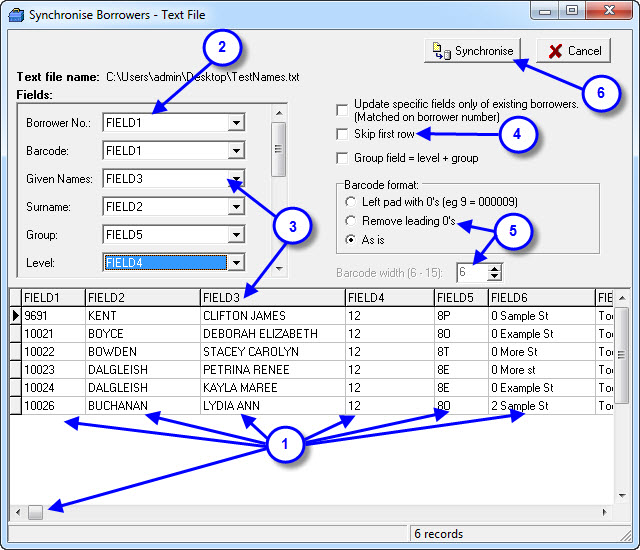
  1. To inload new student information, select Utilities > Update > Circulation > Synchronise > Text file… > Browse to find the file to be inloaded and when you click OK the screen below will appear…

Arrow

      1.  This is the data you have given LibCode to work with… it automatically splits fields into columns if TAB or Comma (,) have been used as “Delimiters”…
      2.  Here is an example of how “fields” from the data are matched to LibCode fields… in this example the “Field 1″ data is used for both Borrower No. AND Barcode.
      3.  Keep moving through the fields of your data and match them to LibCode fields… skip unnecessary ones…
      4.  Some options… Update Specific…= Only update existing borrowers, Skip first row = Ignore first row of data (often field “headers”), Group field = If you would like LibCode to create one field out of two fields from your data file… your call on these options.
      5.  Barcode formatting options… some schools need to fill the barcode field with leading 0′s (zeros) to a certain length… use as necessary.
      6.  Click Synchronise when you are good to go! (Assuming you have done a backup you can easily Restore back to your previous data if something goes wrong!).
  1. Check your borrower information is correct by going into Circulation and then Borrowers and scroll around the list checking randomly that everything seems in order.
  2. You could go in to Utilities > Update > Circulation > Borrowers > Select Group > Low Value Left – High Value Left / Click Apply button and click Purge – Only borrowers with NO unreturned Loans but not really necessary… AND we will use the data in a future upgrade if you leave it there!

If the wheels fall off… DON’T use Circulation until you Restore the Circulation data from the backup you made (Utilities > Backup-Restore > Restore > Circulation Only…) accept default if you did a “Backup” or Browse if you did some other backup and find the files… OR call us for help.

Good luck… it’s actually very easy once you’ve done it 1000 times!

Tags: using a text file, txt file, import borrowers, inload borrowers, tas, tass

{ 0 comments… add one now }

Leave a Comment

  1. Login to OneSchool
  2. Reports / Student Management / Lists…
  3. Select Dynamic Student List Report
  4. Scroll down and tick the following fields: Year Level, Roll Class, Date of Birth, Age, Sex, MISId, Residential Address
  5. Select Excel as the Report Format, then select Generate Report
  6. You will then be asked ‘Do you want to Open or Save this file?’ Click Save and save to your Desktop
  7. Go to the Desktop and open the Excel File
  8. Right click on the 1 (in the Blue/Grey box…it’s the Row number indicator) and click Delete. Repeat this until you only have the data headings e.g. Student Name, etc…across the top row (under column letters)
  9. To split up Surname and First Name:
    1. Create a new column to the right of the Student Name column (right click on B column header and click Insert)
    2. Now right click on Column A (should highlight Student Names) and up on the top ribbon menu select “Data” tab and then under that select ‘Text to columns’
    3. Select ‘Delimited’ then ‘Next’
    4. Unclick ‘Tab’ and click ‘Comma’ and then click ‘Next’
    5. Click ‘Finish’
    6. If it asks you ‘do you want to replace the contents of the destination cells’ then select ‘Yes’
    7. In Cell B1 give the column a name… GivenName
  10. Adding @eq.edu.au to MIS number
    1. Insert a column to the right of the column containing the MIS number
    2. Click at the start of the new column and add in the formula =I6&”@eq.edu.au” (I is the number of the column where the MIS number is found, 6 is the row of the first student)
  11. Save the document as an Excel File.
  12. Then go to File > Save As, go to Save as Type > Tab Delimited (*.txt)
  13. Save as *.txt file to Desktop
  14. Close the document.
  15. Open LibCode > Utilities > Backup/Restore > External Backup give this a specific name e.g. 20140211PreSynch
  16. Go to Utilities > Update > Circulation > Synchronise Borrower > Text File
  17. Select Yes (as you have already backed up)
  18. Choose the file and Open
  19. Untick ‘Update Specific Fields of Existing Borrowers Only’ to update all students
  20. Tick ‘Skip first row’ as these are the headings
  21. Match the Fields to the relevant Titles
  22. Check and if all is correct, Synchronise
  23. Close, then go into Circulation > Borrowers and check to see if everything is okay.
  24. If the wheels fall off… DON’T use Circulation until you Restore the Circulation data from the backup you made (Utilities > Backup-Restore > Restore > Circulation Only…) accept default if you did a “Backup” or Browse if you did some other backup and find the files… OR call us for help.

{ 0 comments… add one now }

Leave a Comment

  1. Login to OneSchool
  2. Reports / Student Management / Lists…
  3. Select Dynamic Student List Report
  4. Scroll down and tick the following fields: Year Level, Roll Class, Date of Birth, Age, Sex, MISId, Residential Address
  5. Select Excel as the Report Format, then select Generate Report
  6. You will then be asked ‘Do you want to Open or Save this file?’ Click Save and save to your Desktop
  7. Go to the Desktop and open the Excel File
  8. Right click on the 1 (in the Blue/Grey box…it’s the Row number indicator) and click Delete. Repeat this until you only have the data headings e.g. Student Name, etc…across the top row (under column letters)
  9. To split up Surname and First Name:
    1. Create a new column to the right of the Student Name column (right click on B column header and click Insert)
    2. Now right click on Column A (should highlight Student Names) and up on the top ribbon menu select “Data” tab and then under that select ‘Text to columns’
    3. Select ‘Delimited’ then ‘Next’
    4. Unclick ‘Tab’ and click ‘Comma’ and then click ‘Next’
    5. Click ‘Finish’
    6. If it asks you ‘do you want to replace the contents of the destination cells’ then select ‘Yes’
    7. In Cell B1 give the column a name… GivenName
  10. Save the document as an Excel File.
  11. Then go to File > Save As, go to Save as Type > Tab Delimited (*.txt)
  12. Save as *.txt file to Desktop
  13. Close the document.
  14. Open LibCode > Utilities > Backup/Restore > External Backup give this a specific name e.g. 20140211PreSynch
  15. Go to Utilities > Update > Circulation > Synchronise Borrower > Text File
  16. Select Yes (as you have already backed up)
  17. Choose the file and Open
  18. Untick ‘Update Specific Fields of Existing Borrowers Only’ to update all students
  19. Tick ‘Skip first row’ as these are the headings
  20. Match the Fields to the relevant Titles
  21. Type in @eq.edu.au as Domain part of email
  22. Check and if all is correct, Synchronise
  23. Close, then go into Circulation > Borrowers and check to see if everything is okay.
  24. If the wheels fall off… DON’T use Circulation until you Restore the Circulation data from the backup you made (Utilities > Backup-Restore > Restore > Circulation Only…) accept default if you did a “Backup” or Browse if you did some other backup and find the files… OR call us for help.

{ 0 comments… add one now }

Leave a Comment