08.06.06 Updating Circulation (Bulk Data Edit, Inload and Deleting) Data…

Under this option you can globally update or bulk change information relating to the circulation of resources.

Arrow

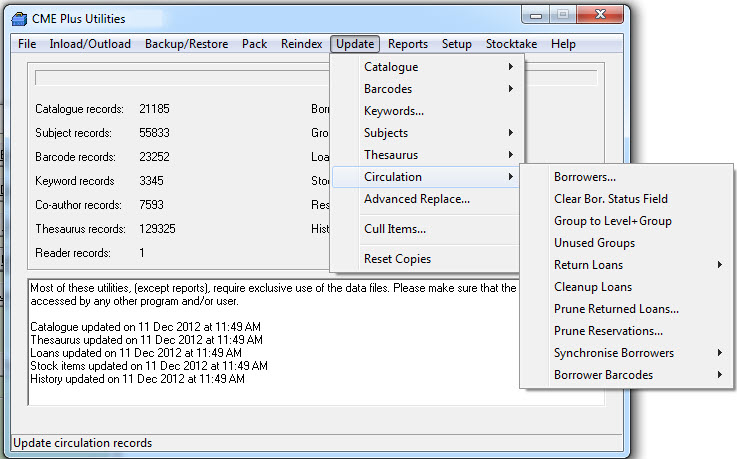
As you can see there are a number of options to choose from:

Each option will perform a global or bulk change of some description… always do a backup before bulk editing your data!

The options include:

  • Borrowers – To bulk change something about borrowers.
  • Unused Groups – To bulk delete all groups in the system with no members.
  • Return Loans – To bulk return loans for groups of borrowers.
  • Cleanup Loans – To bulk remove any orphan loans (borrowers or items already deleted).
  • Prune Returned Loans – Clear the Returned Loans list for today.
  • Prune Reservations – Bulk remove Reservations to a certain date.
  • Synchronise Borrowers – Inload / reconcile Borrower info with an external file / source.
  • Borrower Barcodes – Inload Student barcodes using a text file (this option is being expanded to allow you to inload various fields using the Borrower Number as the link).

 Tags: circulation bulk data edit inload and deleting

{ 0 comments… add one now }

Leave a Comment

Sometimes it is necessary to change borrower details in bulk.  Any time you need to do the same thing to lots of borrowers it might be possible to save yourself a lot of time by doing the changes in bulk via Utilities > Update.

Some examples:

Changing Group/Class in bulk:

Miss Smith the year 1 teacher gets married on the holidays and her group/class has changed from S01 to P01.

Steps…

Do a backup (Exclusive backup is not necessary for this purpose so you might like to intentionally leave a module open).  Go into Utilities > Update > Circulation > Borrowers.

Steps…

  • Set selection criteria as:

Selection field:   Group

Low value:  S01       High value:    S01

  • Click the Apply button.
  • Check the number and details of filtered records displayed and if you’re happy set the Replacement criteria as…

Replacement field:    Group

Replace with:    P01    and click the Replace button and then confirm.

  • Replace if details displayed seem reasonable.

Changing loan limits in bulk:

The librarian has decided that year 4 students can now borrower 3 books instead of 2.  Rather than going through each student and adjusting the limit field manually a bulk change is very handy.

Steps…

  • Do a backup (Exclusive backup is not necessary for this purpose so you might like to intentionally leave a module open).  Go into Utilities > Update > Circulation > Borrowers.
  • Set selection criteria as:

Selection field:   Level

Low value:   4 (or 04 depending on your data)  High value:    4 (or 04)

  • Click the Apply button.
  • Check the number and details of filtered records displayed and if you’re happy set the Replacement criteria as…

Replacement field:    Limit

Replace with:    3 (or 03 depending on your data)

  • Click the Replace button and then confirm Replace if details displayed seem reasonable.

Changing Levels in bulk:

It’s the start of the school year and you have decided to manually adjust the student details instead of Inload them from a file.  You decide to bulk update the Year

Steps…

  • Do a backup (Exclusive backup is not necessary for this purpose so you might like to intentionally leave a module open).  Go into Utilities > Update > Circulation > Borrowers.
  • Set selection criteria as:

Selection field:   Level

Low value:   4 (or 04 depending on your data)  High value:    4 (or 04)

  • Click the Apply button.
  • Check the number and details of filtered records displayed and if you’re happy set the Replacement criteria as…

Replacement field:    Limit

Replace with:    3 (or 03 depending on your data)

  • Click the Replace button and then confirm Replace if details displayed seem reasonable.

Changing Borrower No. to Borrower IDs in bulk:

Unusual but is happens! This is useful if you have all the student enrolment numbers in the Borrower Barcode field but nothing or dodgy details in the Borrower No. field…

REMEMBER:- The Borrower No. field is the one LibCode uses to match data when you bulk inload…

Steps…

  • Do a backup (Exclusive backup is not necessary for this purpose so you might like to intentionally leave a module open).
  • Call LibCode Office about the BC2BNUM.EXE utility to make this very painless!

Tags: borrower level limit, borrower level limits, borrower limit, bulk change borrowers, bulk edit borrowers, bulk update borrower info, borrower number, decrease borrower limit, editing borrowers, increase borrower limit, barcode to borrower number, move barcode to borrower number, move borrower barcode to borrower number, move barcode to borrower no.
{ 0 comments… add one now }

Leave a Comment

A couple of examples of Bulk Deleting borrowers…

  • At the end of a year there might be a whole Group or even Level of borrowers that need to be removed.
  • Removing Left students at the start or end of a year (keep students with outstanding loans).

*** NOTE:  Remember to BACKUP first in case you make a mistake and need to rewind the clock!

Deleting a whole Level of Students in bulk:

Steps…

  • Do a backup (Exclusive backup is not necessary for this purpose so you might like to intentionally leave a module open).  Go into Utilities > Update > Circulation > Borrowers.
  • If for a Level of Borrowers…
    • Set selection criteria as
      • Selection field:   Level
      • Low value:   12  /   High value:    12
  • If for the LEFT group…
    • Set selection criteria as
      • Selection field:  Group
      • Low value:  LEFT  /   High value:  LEFT
  • Click the Apply button.
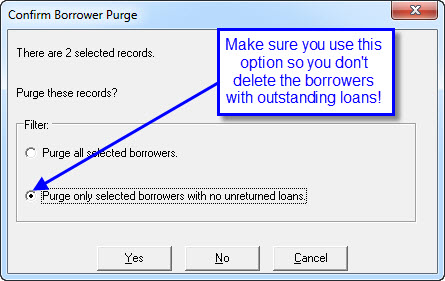
  • Check the number and details of filtered records displayed and if you’re happy click the Purge button and this screen appears…

Arrow

  • In most cases you would select the second option… Purge only borrowers with NO unreturned loans… but I guess there are circumstances when you’ll want to take the first option.

If you want to change to remaining Level 12 borrowers to LEFT2010 then after purging the Level 12s with no loans you could do a bulk change of the remaining Level 12s to change their group to be LEFT2010.

To do this:

  • Add LEFT2010 to Group list via Circulation > Groups > Add (F2).
  • Then to make the bulk data change go into Utilities > Update > Circulation > Borrowers…
  • Selection Criteria = Level / Low value – 12    High value – 12
  • Replacement Criteria Group LEFT2010.

and follow the prompts to complete the change…

Tags: bulk deleting borrower info, dealing with left kids, deleting borrowers, deleting level of borrowers, left borrowers, purging borrowers, purging left borrowers, removing left borrowers

{ 0 comments… add one now }

Leave a Comment

To delete any unused groups from the system:

  1. Open Utilities and do a backup
  2. Stay in Utilities and click on Update > Circulation > Unused Groups

This operation will not remove any group with borrowers still attached so you might like to use the Borrower update function to move borrowers into other groups or you could do that manually via Borrowers button in Circulation

Tags: unused groups

{ 0 comments… add one now }

Leave a Comment

This is option is used to bulk return loans in bulk AND to deal with Unreturned loans in bulk!

Not often used and you might like to discuss this option with the LibCode Office before using it… MAKE SURE you do a backup before using a function like this!

VERY HANDY! This option now marks bulk returned resources Missing.

(IE. Adds M to Barcode Status field and a date to the Status Date along with a NOTE that records Who and When it was lent)

WARNING!

- Once you use this bulk data change function the number of Copies in the records will need to be corrected… this will happen in your normal backup process BUT… if you are in a hurry you can use the Reset Copies function in Utilities > Update to make it happen straight away!

Idea: We are bouncing around the idea of a new Status called L for Lost specifically for this type of issue… let us know what you think. (I know you probably won’t but it is VERY motivational to think that you might take some note of the suggestions I make in this manual!)

All… Utilities > Update > Circulation > Return Loans > All

  • Will return all outstanding loans.
  • As mentioned above, bulk returned items are marked missing and a NOTE is added about the Borrower and Loan date.

Non-staff… Utilities > Update > Circulation > Return Loans > Non-staff

  • Will return all current non-staff loans.
  • Wipe the slate clean at the start of a year when you finally realise there is no point in holding onto loans that have been out for 5 years! Leave the record there if you like, just don’t clog up your Overdues process with the flotsam.
  • As mentioned above, bulk returned items are marked missing and a NOTE is added about the Borrower and Loan date.

Group… Utilities > Update > Circulation > Return Loans > Group

  • Select a specific group and return all their current loans.
  • As mentioned above, bulk returned items are marked missing and a NOTE is added about the Borrower and Loan date.

Borrower… Utilities > Update > Circulation > Return Loans > Borrower

  • To return ALL loans that a borrower has and mark them missing at the same time.  This function also adds a NOTE to the barcode that says… “Lent on 13th March 2009 to “Borrower” (Group)”.
  • This NOTE stays with the barcode until it is deleted.  If the resource is returned at some stage this NOTE will be displayed on the Return AND Lend screens.

Use Buffer File… Utilities > Update > Circulation > Return Loans > Buffer File

  • Used to Bulk return resources from a Buffer File or list of barcodes.
  • Very useful for dealing with VERY overdue resource across the board in one hit.
  • Create a Buffer File or barcode list in several ways.  The easiest for this example is probably via Circulation > Reports > Unreturned > Turn off Current Loans tick and set a date range that describes your “Probably not coming back anytime soon loans” and then sort the loans out on the screen by highlighting the ones you want to get rid of using Shift and Down arrow and CTRL-Click and Show Sel. Only button.
  • Once you’ve got the list under control click the Export Button and click No to create a Buffer File… PLEASE give the file a useful name and remember where you save it!
  • Jump into Utilities > Update > Circulation > Return Loans > Buffer File and follow the prompts. Records will be returned, Status will be M, Status Date will be todays date and there will be a NOTE on the Barcode record to remind you why this item was marked missing.
  • Very handy but sadly, mostly an unused function.

Tags: return loans, returning items, returning loans, returns

{ 0 comments… add one now }

Leave a Comment

  • This option will permanently remove any ‘orphan’ loans that no longer have a borrower attached or the title has been deleted.  This can occur when indexes are corrupted, a resource has been culled using a buffer file or the borrower has been deleted with loans still outstanding (possible in earlier versions).
  • Cleanup Loans is one of the housekeeping tasks carried out automatically when a full backup has been done i.e. Utilities > Backup-Restore > Backup so it is unlikely you will ever actually opt to run this function.

Tags: clean up loans

{ 0 comments… add one now }

Leave a Comment

  • Previously called Deleting Loan History in the old DOS LibCode, Prune Returned Loans will remove any reference to a returned loan prior to a selected date.
  • Used to cleanup Loan History when it gets to be usually over 5 years old…

Tags: deleting history, loan histor, prune returned loans, removing history

{ 0 comments… add one now }

Leave a Comment

  • It’s the beginning of the year and your ambitious readers were reserving books as if there was no tomorrow.  It’s now term 2 and there is a pile of uncollected reservations that continues to grow regardless of how many notifications you give out and other borrowers would like to read the book.
  • By using the prune reservations option you can remove outstanding reservations up to a specified date.

Tags: cancel reserves, deleting reservations, deleting reserves, prune reservations

{ 0 comments… add one now }

Leave a Comment

Synchronising Borrowers with an in-load file (In-loading borrower information from another computer system).

These are the Office Systems we have setup a standard process for:

*** IMPORTANT NOTE***

These instructions may have been created for old versions of Office Systems.

The important information is:

- The number of fields in the file you are creating for Synchronising Borrowers.

- The ORDER of those fields.

- The DATA that is in those fields… (ie. If you want to use MAZE format and you DON’T want address details, you still need to export the correct number of fields BUT you could export an empty field from your Office System instead of the real information! Make sense? Must still have 13 fields in the file you create if you want to use “MAZE…” Synchronise Borrower option).

OneSchool

    • The New office system found in Qld State Schools.
    • CSV text file format.
    • MUST be 8 fields… School_Centre,EQID,MSID,Last_Name,Preferred_First_Name,Middle_Names,Year_Level,Roll_Class.

SMS

    • The OLD office system found in Qld State Schools.
    • CSV text file format (comma delimited).
    • MUST be 6 fields… StudentID,Surname,Given_Name,Year_Level,Group,Class.

MAZE

    • The office system commonly found in Qld private schools.
    • Tab delimited text file format.
    • Must be 13 fields… Enrolment No.{tab}Surname{tab}Given or Preferred Name{tab}Gender{tab}YearLevel{tab} RollClass{tab}Address1 {tab}Suburb/Town{tab}PostCode{tab}EmailAddress{tab}HomePhone {tab}FaxNo.{tab}MobilePhone.

TEXT FILE – for ANY Office System, even the ones mentioned above

    • Needs to be a Tab delimited file OR a CSV (comma delimited file).
    • Can be in any order and contain any number of fields… you “map” the fields in LibCode to the fields in you data file during synchronise process.

Updating Borrower information from another computer system.

Updating the Borrower information is exactly the same as in-loading the information in the first instance except there are a few things you need to check before you start!

This is what happens when you synchronise existing borrower information:

The Pre-Synchronise Checklist…

  • Make sure you have done a Backup!

  • You MUST have the student’s enrollment number (or any other unique identifier) in the Borrower No. field of the Borrower’s details.  This number is used as a unique reference point for each student.

For example…

If John Smith has an existing Borrower No. of 1234 then any information attached to 1234 in your in-load file will replace John’s original details (which is why we suggest you make a backup BEFORE synchronizing borrower information).

If you need to enter your borrowers manually jump into Circulation > Borrowers OR Groups areas as necessary (see the Adding Borrower Details page.)

Tags: bulk change borrowers, bulk rollover, roll over, synchronise borrowers, synchronize borrowers, updating borrowers info, in-load, inload, in-loading, inloading, one school rollover, one-school rollover, roll-over, sms, maze, pre-synchronise, pre-synchronize, pre-syncronise, bulk student update, bulk borrower update

{ 0 comments… add one now }

Leave a Comment

This function can be used to import Borrower Barcodes from a different file if you get this information from a third party (like an ID card company).

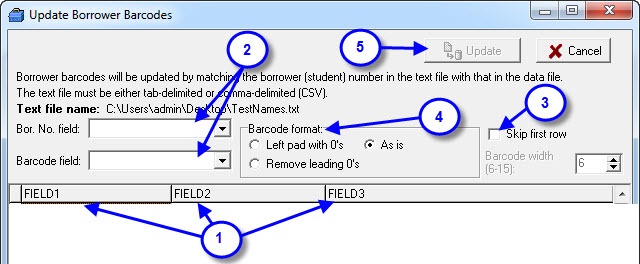
  • After selecting the Borrower Barcode function from Utilities > Update > Circulation > Borrower Barcodes > Text File you have to select a file that contains the details you will be using to inload.

Arrow

  1. The details of the fields and data will be displayed here.
  2. Set the correct filed number for the Bor. No. Field (usually enrollment number) and the Barcode field.
  3. You have an option to skip the first row of the file in case there is field header info.
  4. Select the format the final inloaded data will take when viewed as a barcode entry:
    • Left Pad will add zeros to the front of the inloaded data.
    • Remove leading zeros will do just that.
    • As is will not modify the inloaded data in any way.

You’ll need to check what the data looks like in comparison to the printed barcodes to help decide what needs to be done here!

Tags: borrower barcodes, print barcodes, printing borrower barcodes

{ 0 comments… add one now }

Leave a Comment