- Go into LibCode Suite and then load the Circulation module.
- Click on the Borrowers button on the Circulation screen.

- The Setup screen will appear. Click on the + button to add a new borrower…

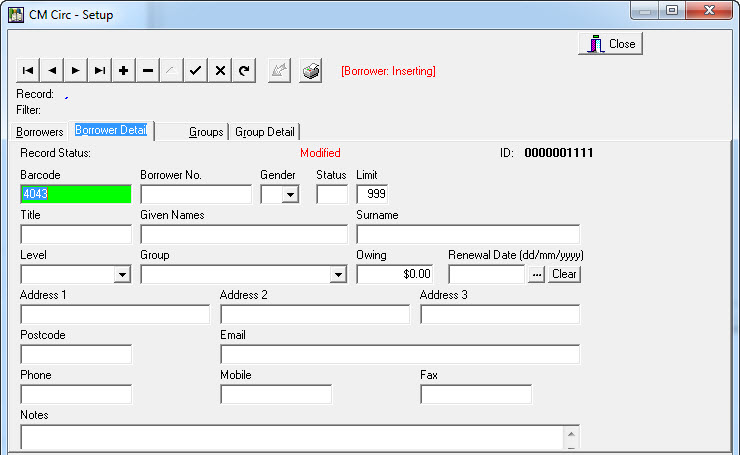
- The Borrower details screen will appear… go ahead and add necessary details.
(Each field on this screen is described below the screen shot)

- Press <F9> to Save changes after entering the necessary details and click the + again to add another borrower…
Description of fields on the Borrower Add screen…
Barcode:
This is where the Borrower Barcode goes. If you are using barcodes, simply zap (or type) in the barcode you want to attach to this borrower. The record number automatically appears as a barcode but you can replace this if necessary.
Borrower No:
This is usually the Student Enrolment number that is assigned to a student by an office system. You MUST enter this number if you want to be able to use the Synchronise Borrowers function in Utilities > Update > Circulation… to automatically update your borrower details at a later date.
Gender:
Select the gender of the borrower. This is not necessary but is useful later when doing statistical reports of borrowing history.
Status:
Status is a marker field that can be used for special purposes at a later date. Usually left blank during the data entry process.
Limit:
The number set here is the maximum number of loans a borrower can have out at one time. 999 means Unlimited. A warning is displayed if a borrower tries to borrower more than the number set. This can be over-ridden on the loans screen if necessary.
Title:
Leave blank or enter Mrs, Ms, Miss or Mr in this field. Some schools use this field for special info like Account No. information.
Given Names:
The first name of the borrower being entered is usually entered here.
Surname:
Enter the borrowers Surname into this field. The Surname is the one used to search for a borrower so if you are entering a Classroom as a borrower put the main details in here.
Level:
This is the Year Level of the borrower. It’s a good idea to use 2 digit mubers here so the sorted lists appear in the correct order and less than / greater than filters do the job… (ie. 01, 02, 08, 09, 10, 11, 12…).
Group:
Enter the Class or Group that the borrower belongs to. This is the main grouping or sorting field Circulation uses to sort Overdue and Loan History reports. Groups are added to the system via the Groups tab on the Borrowers screen.
Owing and Renewal Date:
These fields are used to store fine and subscription type renewal information if necessary. Mostly these fields are left blank.
Address 1, Address 2, Address 3, Post Code, Email, Phone, Mobile and Fax:
These are simply the contact detail fields for borrowers. Add as necessary.
Notes:
Special information about a borrower can be entered here. This information is displayed each time the borrower presents resources for loan. Handy for reminders about lost loans or access to restricted resources…
See also… Utilities > Update > Circulation > Synchronise Borrowers for instructions on how to import Borrowers in Bulk.
Editing or Changing Borrower details…
Adjusting a borrowers details is a common and basic operation.
- Go into Circulation.
- Click the Borrowers button.
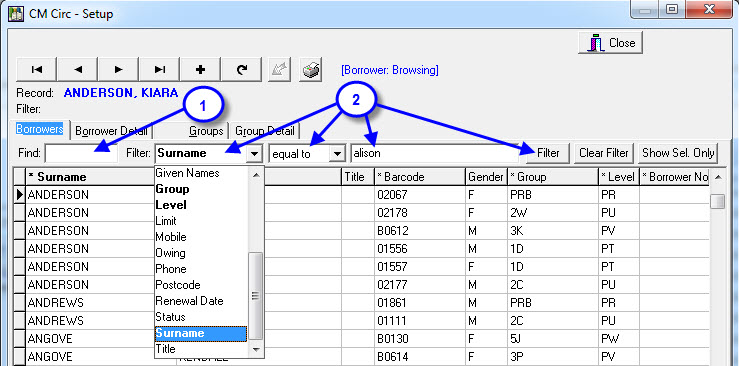
- Filter out the borrower using either:
- The find option by typing in the first few characters of the surname, OR
- Selecting another filter option from the list provided and typing in the search terms then clicking on the Filter button.

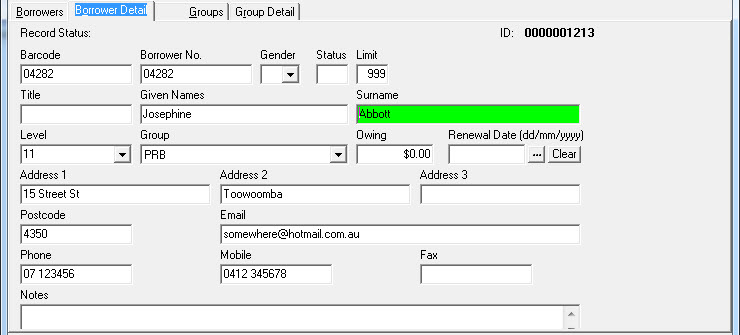
- Once you have located the required Borrower from the list provided double click on the entry to show the details screen.

- Make the necessary changes and <F9> or √ to save the changes.
Tags: add borrowers, add students, adding and editing borrower details, borrower detail, change borrowers, change students, edit borrower details, edit borrowers, edit details, edit student details

{ 0 comments… add one now }