02. Getting Started

Following is the information you will need to know to get started with LibCode Suite…

 Tags: installation, installing LibCode suite, set up options, customise LibCode, getting started, starting LibCode

{ 0 comments… add one now }

Leave a Comment

LibCode Suite is provided for use on an annual basis under the following conditions:

  • That you agree to the terms and conditions outlined in the Licence & Support Agreements.
  • Your software will function for a period of 12 months from the initial date of purchase.  After this time has elapsed you will receive an on-screen message requesting that you contact the LibCode Library Systems Office.  You can either give us a call or send us an email to request a new ID registration key.
    • Providing your subscription is current you will receive instructions and the relevant details to re-activate your software for a further 12 months
    • For those organisations who upgraded to LibCode Suite from the DOS version, your annual licence and support package will be payable at the same time each year, therefore the expiry of your program may not coincide with the payment of your support & licence.
  • You agree to the implementation of the LibCode Suite Backup Policy.  Should you wish to disregard this policy please contact LibCode Library Systems to discuss your concerns.
  • You will need to discuss Libcode installation with your school’s IT officer as there may be some limitations and concerns that will need to be addressed.  Feel free to pass on our contact details to your technical support people.
  • There are known problems combining Server 2003 and Windows 98 machines for use with LibCode Suite and other database applications.  Whilst this is purely a Windows incompatibility issue it can be overcome with alternate installation procedures. Please give us a call to discuss the alternatives.

 Tags: annual, expiry, id, licence agreement, license agreement, network, policy, re-activate, Server 2003, setup, subscribe, support, Windows 98, registration, renewal, support agreement, LibCode Suite backup policy, back up policy, subscription, id registration fee


{ 0 comments… add one now }

Leave a Comment

What suits you?

There are several setups of the LibCode Suite possible, you need to decide how you will use the software initially but don’t lose any sleep over it… it’s very easy to change at a later date!

LibCode does not use Registry Entries or any Special files installed in the System path.  The application can be moved by using Cut and Paste (obviously you would need to adjust the shortcuts that run the software)

Decision Time…

Are you going to run the LibCode Suite as:

A Server Based Application for everyone, with a local backup as a network fail-safe?

  • Before you can install to the File Server you need your network administrator to setup a CMEPLUS folder that gives Library Staff Read/Write/Change access and everyone else Read Only / Execute access (Please make sure permissions are correct to protect your data from more ‘inquisitive’ users).
  • You totally rely on network for normal operation.
  • More than one person can be adding data or circulating at the one time.
  • Everyone accesses the same database on the server so information is perfectly up-to-date.
  • Departments can have Circulation systems setup to circulate only their resources.
  • There are some bulk updating and setup functions you can’t use when others are using the database so you need to wait until morning or late afternoon to use them.
  • You need a 10/100 link to your server for speed to be satisfactory.

OR

A Local Application for Library staff with Server backup to provide general catalogue access?

  • Immune to unreliable or slow network.
  • Only one person can enter data OR circulate resources at one time (It is certainly possible to share a local installation with another workstation in the library if the technology is in place!).
  • Totally separate database from researchers so anything can be done to it at any time without having to consider peak use times.
  • Server data is only updated when an Alternate Backup is done.
  • Before you can setup the Alternate Backup destination (CMESAFE) on the File Server you need your network administrator to setup a CMESAFE folder that gives Library Staff Read/Write/Change access and everyone else Read Only / Execute access.

After deciding which installation best suits your organisation please go ahead and follow the appropriate instructions.

Note that there are a number of I.T. issues that will need consideration prior to the installation of LibCode Suite. Please refer to the Technical Information Section.

Tags: 10/100, local application, methods of installation, network, server based application, slow, speed, technical information, installation information, install, registry entries

{ 0 comments… add one now }

Leave a Comment

Installing Libcode Suite is easy!

See the following documents for details:

http://data.libcode.com.au/download/lc_tech.doc

Note that there is no need to pre-install the software before we get your data, but if you wish to pre-install the software into the CMEPlus folder, the address is:

http://data.libcode.com.au/download/LCSSetup6790a.exe – Check for the latest version

If you are having problems with exe’s, the following can be downloaded to your desktop and re-named:

http://data.libcode.com.au/download/LCSSetup6790a.ceo – Check for the latest version

Hint!  Keep your folder names consistent- it will help library staff interpret instructions and, hopefully, save you some effort later on down the track!

And remember, we are always happy to help!  Simply give us a call or send us an email if you require additional support.

Tags: installation requirements for the LibCode Suite, install LibCode suite, pre-install

{ 0 comments… add one now }

Leave a Comment

Customising Libcode Suite

Setting up Circulation / Borrower Details…

Before you can start Lending and Returning resources you’ll need to enter some Borrowers into the system.  This is done via the Circulation module…

Customizing Software settings and lists…

There are functions of the program that can be customised to suit your specific needs.

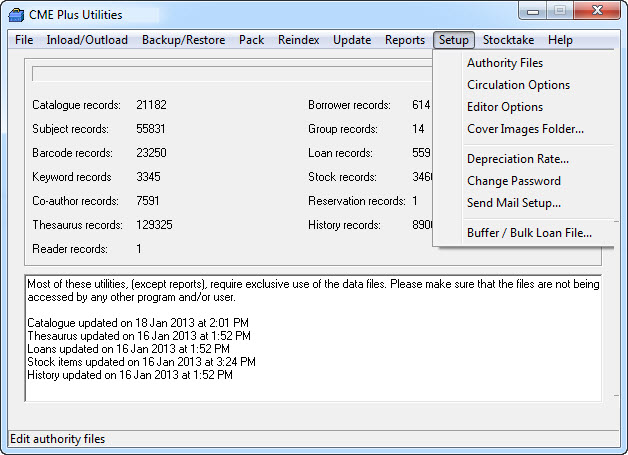
Go into LibCode Suite > Utilities > Setup (as shown below) to make changes to some of the basic functions of the software.


Arrow

The settings listed below are located under the Authority Files menu:

General Material Designation or Description pop-up table (GMD field)

  • Used to describe the type of a resource.
  • Only used for non-book resources.
  • Feel free to add entries to this list as necessary.
  • Generally the Enquiry (OPAC) does not display resources that have no valid Copies (ie. No barcodes that are not Written off, Missing or On Order).

Note that if you create a new GMD and you know there will be no barcodes on the items but still want them to appear in the catalogue, make sure you inlcude an asterisk (*) in the Code details (eg. VI*) as this overides the hide function.

Country

  • Default list of countries a resource was published in.  Not required information but can be useful to demonstrate bias in point of view on a controversial topic!

Site

  • Makes it possible to restrict / explain the sites of satellite collections around the school.
  • Add up to four letters as a Site code and type in a description so everyone knows what the codes stand for!

Location

  • Makes it possible to restrict / explain the locations within your collection.
  • Each Site may have several locations with them (sort of refined Site info for split collections).
  • Add up to three letters for a location code and type in a description so everyone knows what the codes stand for!

Department

  • Makes it possible to setup different Circulation Systems for each department in your school.
  • Add up to three letters for a department code and type in a description so that everyone knows what the codes stand for!
  • A Department is one step higher than a Site – Department -> Site -> Location.

Reading Level & Scheme

  • These two separate Authority files control the Reading Levels and Schemes that you can add to your resources in the Reader Module in Data Entry.
  • Add up to three letters for a Reading Level/ Scheme code and type in a description so that everyone knows what the codes stand for!

NOTE:  You have the option to print out lists of all authority files. This can be helpful for staff not familiar with the cataloguing process or as an aid in  ’cleaning up’ redundant codes.

These Circulation options can be found under the ‘Circulation Options’ menu.

Loan Period Default

  • Used to set the default loan period, which automatically appears on new resources.
  • Loan period is easily changed during Data Entry process for specific items.

Staff Loan Extension

  • Used to automatically extend staff loans.
  • Number of days entered here are added to normal resource loan period when an item is lent to a staff member eg when a book with a 14 day loan period is lent to a staff member (and a 14 day extension is set) the resource will be due back in 28 days.

Loan Period Extension and Cut-off Dates

  • Ensures loans are due back before a set date.
  • Can be used in conjunction with Staff Extension to eliminate staff overdues-  Set the Staff Extension to 365 days and set the Staff Loan Cut-off Date to 30th November of the current year… any resourceS lent to a staff member will automatically become due on this date.
  • How it works…
    • Item is presented for loan and scanned.
    • Circulation adds loan period of item to today’s date.
    • Also adds the Staff Extension if borrower is a Staff Member.
    • Looks at the Loan Cut-off Date for current borrower.
    • If the cut-off date is less than the calculated due date then the cut-off date automatically becomes the due date for this loan.
      Default Cut-off Date applies to all user “Levels” (eg level 08) not specifically assigned a cut-off date of their own.

Reservation Expiry

  • This function sets the number of days from the day of reservation that the record will automatically expire (be deleted).

Borrower Images Folder 

  • Allows you to change the default location of the borrower images folder.

Circulation Warning Sound

  • This function allows you to change the warning sound used by circulation.

Check for Overdues (Toggle)

  • This setting decides whether you normally would like to see a warning box displayed for overdue returns during the circulation process.
  • This option can temporarily be turned on and off when you are at the actual Returns screen.

Check Loan Notes (Toggle) (On is recommended)

  • When lending a resource you can attach a note specific to that loan.
  • When the Check Loan Notes is selected the note will appear when you return the resource.
  • This is particularly handy if the book needs repair… lend the book out and then while on the loans screen for the borrower you can right click on that particular loan and click Edit Notes… then type a message that will be displayed when the item is returned.
  • Another way to make a note appear automatically during the Loan / Return process is to add a note to the Barcode of an item in the catalogue.  This Barcode note will be automatically displayed when you Lend or Return the resource… which is really handy if you need to remember to give them a CD or something to go with the item!

Use Borrower Barcode

  • The function allows you to disable the Borrower barcode functions of the software.

Replacement Cost

  • This setting determines whether reports use the Replacement Cost or the Cost in the Barcode Details section of the record.

Other Settings

Depreciation Rate

  • Sets the percentage of depreciation for calculating current value of resources (this is calculated as percentage of original purchase price).

Change Password

  • This is where you set the system password (default is none so when you first go in to set the Level 1 password press Enter to move past the Enter password request… little trap for beginners!!!).
  • Password is case sensitive.
  • WARNING!!! Make sure your passwords are quick and easy to type!  You need to type them in each time you try to access a restricted area… (Supercalifragilisticexpealidotious does not make a good password!!!)
  • Level 1
    • Access to all areas (VIP backstage pass!).
  • Level 2
    • Locks the LibCode Suite Menu so you need a password to load the menu.
    • Allows you into all areas except bulk data changing functions.
    • Can still move around all modules the only restrictions are in Utilities.
    • People often set the Level 1 and Level 2 passwords the same.
  • Level 3
    • Allows you to open the LibCode Suite Menu but only lets you into Circulation for lending and returning.
    • Useful if you want to have an icon on the desktop to give direct access to the Circulation module from a shortcut on the desktop that you don’t want students accessing.
    • Also handy if you have a satellite collection in your school that is only allowed to lend and return and not permitted to change other data in the system.

Buffer File

  • You can use this function to create a list of resources by zapping in their barcodes.
  • This is particularly useful to do bulk edits or culls.

Change Date Settings

To make sure the date being used by Libcode is in the appropriate (ie.  Australian format) standard, follow these simple steps:

Right-click on the LCSuite shortcut, go to properties and look at the command line  …

Once you locate LCSuite.exe at the end of the line:

  1. Type a space
  2. Type a /  (Forward slash)
  3. Type au  (For Australia)

i.e.  ..CMEPlusLCSuite.exe /au

Tags:  Setting up – customising LibCode Suite, change date settings, depreciation rate, password settings, GMD, General Materials Designation, Country, Site, Location, reading level, reading scheme, loan period cut off date, loan cut off dates, loan period extension, loan extension, extend loan, reservation expiry, borrower images, circulation warning sound, check for overdues, overdue, replacement cost, borrower barcodes, change password, buffer file, authority files, Australian date format

{ 0 comments… add one now }

Leave a Comment

The biggest expense and effort involved in setting up a library management system is Data Entry.

Existing data can be transferred from most existing systems so please get in touch with us if you are starting from scratch and already have data in a spreadsheet or other database!

Things to consider…

Cull before you start

It’s a good idea to go through your collection and make sure you remove any resources past their use-by-date before starting Data Entry.  Some basic criteria used for selecting resources to cull include:-

  • Age of resource.
  • Appearance / Appeal.
  • Currency / Accuracy.

SCIS

This stands for School Cataloging Information Services which is an arm of the Curriculum Corporation.  This organisation has a huge database of catalogue information for resources likely to be found in schools.  Data is downloaded simply by scanning or typing in the ISBN number of each resource.  This is a very fast and easy process once you know what you’re doing, definitely worth looking into!

Barcoding…

The Barcodes

We suggest you use Code 39 barcodes for both resources and borrowers, but it doesn’t really matter as long as your barcode scanner is configured to read the symbolgy you use.

Two suppliers we have found helpful are:

  • AB Note – (03) 9556 9111
  • All Barcodes Australia -  (07) 3832 7383

Both are familiar with what’s required for LibCode.

The Scanners (Barcode Readers)

There are several brands and models of scanners available through LibCode Library Systems.  Please check http://www.libcode.com.au/clients/Default.asp under Barcode Scanners for details of popular models though there are heaps of others available.

Deciding on the order of Data Entry

  • Fiction and non-fiction are the most popular sections for student borrowing, so if you would like to speed up the lending and returning issues for students to free up time it’s good to start here.
  • If you’d prefer to fire the staff up first, start with the Teacher Reference and get lots of input from staff for appropriate subject headings and keywords. (Teacher Reference is probably the most difficult and time consuming of any section to process)
  • Sections you’ll be entering will include:
    • Non-fiction (usually no location).
    • Fiction (Junior, Middle and Senior if appropriate).
    • Reference.
    • AV Resources.
    • Equipment.
    • Vertical files.
    • Maps.
    • Big Books.
    • Kits.
    • CD’s.
    • Software.
    • Teacher Reference.
    • Satellite collections (things stored outside the library).
    • To list a few of the common ones….

Consider the work flow of your setup

Setting yourself up in a functional and comfortable work area as well as streamlining the way you go about your work will save a huge amount of time.

Little things such as:-

  • barcoding resources before data entry (several people can help with this).
  • barcodes on the front cover (inside barcodes last longer but outside makes stocktaking super fast… most schools choose to stick them on the outside… front is good because it reduces the chances of people zapping the ISBN barcode instead of the library barcode).
  • Desk setup…
    • How many movements are there from the beginning to the end of the cataloguing process?
    • Do you need to get up between resources?
    • How far do you have to lean?
    • Can someone read out the details for you? (If you are not a touch typist then this will be more than twice as fast as finding and typing the details yourself.)
    • When you stack them are they in the correct order to be put straight back onto shelves? (Or have you reversed them!?!)
    • Could you use a trolley to move books?
    • Can someone help to move resources?
    • How many books can you do in an hour?
    • How many can you do after breaking it down to single movements?
  • Try to make tasks as repetitive as possible as this will speed things up amazingly!

Don’t just enter data…get into Full On Data Entry! (FODE in Education)

  • It’s a talent.
  • There are libraries all over the world who need people to do this this properly.
  • Stop, break it down to individual movements…once you’ve got it right it is really not such a bad task, time flies and it can be done quite quickly.
  • 1 item per minute start to finish is a reasonable goal if you are using SCIS downloads.
  • 2-3 minutes per item is fine if you are searching for Dewey numbers and your own subject headings… don’t forget the table of contents as a topic source for non-fiction resources…

Tags: preparation for data entry, entering data, enter data, entering information, preparing data, existing data, cull, scis, schools cataloguing information service, barcode scanner, barcodes, barcoding, code 39 barcodes, teacher reference, work flow, workflow, desk setup, fode, full on data entry

{ 0 comments… add one now }

Leave a Comment

Tool bars and Shortcuts

A number of tool bars and shortcut keys have been incorporated into the LibCode Suite to speed up various processes and assist in database management.  Throughout this guide you will be shown a number of specific shortcut keys to use during specific tasks.  The availability of functions and shortcuts varies depending on the screen you’re working with.  As you can see from the list below shortcuts are mentioned beside functions in drop down lists and also usually presented in the pop-up tool tip that is displayed when you point to a button.

The Bar Menu…


Arrow

  • Common to all Windows applications
  • Contains lots of shortcuts (and corresponding shortcut keys) to various functions
  • Each module has a slightly different bar menu
  • Well worth browsing through all the bar menus when you get new software or install an upgrade to see if there are new functions you knew nothing about!

Record Drop Down Menu…

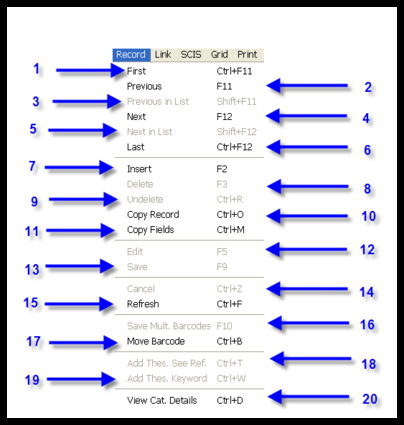
  • The record bar menu contains a number of functions as it lists all the things you can do to, or get from a record
  • Again, it is worth taking a good look for shortcut keys and functions you might not have been aware of previously
Arrow
First (Ctrl+F11) – Jumps you to the first record in a filtered list.  For example, If you set a filter on the Data Entry grid of Author begins with ‘A’ then press Ctrl+F11 you would jump to the first record in the list.

Previous (F11) – Goes to previous record in a filtered list.  See Next (F12) description only this would assume you have started at the end of the list and are working backwards.

Previous in list (Shift+F11) – Jumps to the next record in the list prior to saving the changed record you just edited.

Next (F12) – Goes to next record in a filtered list.  For example, you have set a filter for Author begins with ‘A’ and you have discovered several items that need adjusting (but there is not enough to justify a bulk update )… after editing the first record you will be sitting in the Author field of the fixed record and an F12 – Next will save your changes and take you to the Author field of the next record.  Saves time!

Next in List (Shift+F12) – Same idea as Previous in List only this goes to the next record… probably more commonly used than the Previous in list function.  These Shift+ F11/F12 functions are great for cleaning up data using the column layout and sorts on the display grid in Data Entry… test them out after editing and saving a record and you think to yourself… “gee I wish I could go back to the next record in the list that was after this record before it moved!”… that’s what they do!

Last (Ctrl+F12) – Jumps you to the last record in a filtered list (See First example).

Insert (or Add) (F2) – Is the same as clicking the + button. Depending on the screen this option will add a new item/record.

Delete (F3) – Is the same as clicking the – button, it marks a record for deletion.  The record is not actually deleted from the database until a Backup or Pack is done meaning you can change your mind before the end of the day!

Undelete (Ctrl+R) – Changing your mind about deleting a record… can only be done before a Backup or Pack is done.

Copy Record (Ctrl+O) – Makes a duplicate record so you can adjust details for a new entry.  This is not for multiple copies of a resource… it should only be used if a copy of a resource is to be stored in a different shelf location.  eg. three copies of the Diary of Anne Frank could be shelved in three different places to encourage readers… Fiction, Diaries, History which would warrant three different catalogue entries.  Copy Record Ctrl+O makes this nice and easy.  Look up the original entry on the Catalogue tab then go into Cat. Detail tab and press Ctrl+O to make a copy of the current record as a new entry.

Copy Fields (Ctrl+M) – Stores the information contained in each field in the currently displayed record so you can call it up from a new Data Entry screen to save re-typing the same details.  For example. you are entering several resources in the same series… they are written by the same Author, have the same Publisher, Publication Date, Site, Location, Dewey, Main Entry.  You can look up an existing record from that series on the Catalogue tab then go to the Cat. Details tab, press Ctrl+M to remember the details.  After clicking the + button (or pressing F2) to add a new record, you can press F4 to recall the details for the field you are in from the remembered record.  This F4 – ‘call up remembered details’ function is automatically available during the normal data entry process.  The Copy Fields function is a way to ‘prime’ the F4 with details.

Edit (F5) – Not necessary to press F5 to make changes,  just clicking in a field automatically activates the Record Edit function.

Save (F9) – Saves the details on the current data entry screen.  If you forget to save before you change screens the program will remind you.

Cancel (Ctrl+Z) – Cancels any changes made to current Data Entry screen as long as F9 has not been pressed.  Useful when you accidentally make changes and can’t remember what was there previously.

Refresh (Ctrl+F) – Re-loads the current information in again from the data file. Theoretically useful but practically never used.

Save Mult. Barcodes (F10) – If you have purchased several copies or a class set of the same resource and they will be stored in the same location, you can use this function to very quickly add the several barcode entries.  To use this function you need to be careful that you have sequential barcodes and that the accession numbers change sequentially (parallel) along with the barcodes.

ie. First item barcode is BC10012 and accession number is 05-10234 to use the Save Multiple function the next item would need to be BC10013 and acc no. 05-10235… let’s say there were 10 copies to be added the last would be BC10022 and acc no. 05-10244.  All details entered in the first item (order no., invoice no., date, supplier etc) would be duplicated for subsequent records.

Move Barcode (Ctrl+B) – This is handy when you discover you have added a barcode to the wrong record or you just want to move one (or more) barcodes from an old copy of a record to another record (ie. you are moving a second copy of the resource to a new location and have used the Ctrl-O option to make a new record…If you’ve ever tried to do either of these operations you’ll know why we’ve added this option!) To use it, call up the record you want the barcode to be attached to on the Catalogue tab in data entry, highlight it then Click Record and Move Barcode (or Ctrl+B) then zap or type in the barcode… done.

View Cat. Details (Ctrl+D) – At any stage while working on a record you can press Ctrl+D to pop up a screen that contains all the cataloguing details of the record currently being edited.


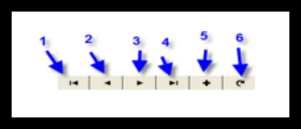
Navigation Bar… (see Record Drop Menu above for descriptions)

Arrow

  1. First Record (Ctrl+F11)
  2. Previous Record  <F11>
  3. Next Record   <F12>
  4. Last Record  (Ctrl+F12)
  5. Add a new record<F2>
  6. Delete current record   <F3>
  7. Edit current record  <F5>
  8. Save current record<F9>
  9. Refresh View (Ctrl+F) (Yes… that’s F… I didn’t miss the number!)

Special Buttons…

Point to buttons in the LibCode Suite and you’ll see a popup description of what they will do!
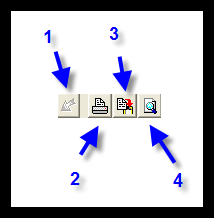
Arrow

  1. Undelete button
  2. Print form or report generator (depending what screen you are on)
  3. Copy record (Ctrl+O) – Makes a duplicate record so you can adjust details for a new entry.  This is not for multiple copies of a resource… it should only be used if a copy of a resource is to be stored in a different shelf location.  eg. three copies of the Diary of Anne Frank could be shelved in three different places to encourage readers… Fiction, Diaries, History which would warrant three different catalogue entries.  Copy Record Ctrl+O makes this nice and easy.  Look up the original entry on the Catalogue tab then go into Cat. Detail tab and press Ctrl+O to make a copy of the current record as a new entry.
  4. View record details / print preview

Tabs on the screens…

Tabs can be accessed by either clicking on them or using a combination of ALT+ the underlined letter.

Example:
Arrow

  • To access the Catalogue tab in Data Entry you can either click on the tab or use a combination of Alt+A.  All tab screens have this function, look for the underlined letter as your cue.
  • To access the Subjects tab you can click it or press Alt+S (makes data entry much quicker).

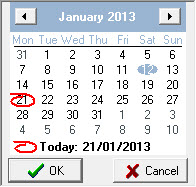
Using Pop-up Calendars…

  • When ever a date is required you will encounter the Arrow button.
  • When you click the Arrow button a pop-up calendar will appear.

Arrow

  •  To move from one month to another sequentially click on the t or u.
  • To pick the month you want from a drop down list click on the month then choose from the list.
  • If you need to move between years click on the year and you will be able to scroll up or down.

Resorting Data…

Many of the reports and data tables can be resorted by clicking on the top of a column.
Arrow

1. The list of resources above is currently sorted by Title.

  • By clicking on the Site column header the resources can be sorted in shelf list order.
  • The BOLD heading indicates the current method used for sorting.

2. If there are any Column headers with an * (asterisk) then these are the only columns that can be used to resort data.
Arrow

Some data display views like the Current Loans report view (displayed below) have all columns click sortable…although you won’t see any asterisks, the column header will still turn bold to indicate which sort is currently active.

Arrow

It’s definitely worth looking around the screens with your mouse for popup hints and shortcut keys to speed up things you need to do regularly… we have had lots of suggestions over the years from data entry speedsters and we’ve added plenty of shortcuts!

Tags: calendar, menus, toolbars and shortcut keys, resorting, shortcut, sortable

{ 0 comments… add one now }

Leave a Comment