14. Installation, Upgrades, Renewing Licence & Technical Information

Installation:

Whilst LibCode suite is completely self contained and relies on no registry entries there are a couple of simple requirements to keep your software running smoothly – see Minimum Hardware Specifications.

LibCode Suite Upgrades:

Upgrades are free and downloadable from our website. Simply jump onto www.libcode.com.au/support login and select ‘LibCode Suite Upgrades’ and follow the steps through. If you have any trouble simply give us a call.

Backups:

Library staff must be responsible for their own backups.  DO NOT RELY ON SERVER BACKUP TAPES as these are rotated on a frequent basis and if you make a mistake and don’t notice it for a week or more YOU WILL NEED TO MANUALLY FIX THE PROBLEM taking up hours of precious library time.  No-one knows or appreciates the amount of time and effort invested in a library catalogue the way library staff do.  The more you backup the more comfortable and proficient you will become so start learning.

UPS – UN-interrupt-ible Power Supply:

Data corruption will occur if the power dips significantly or is turned off whilst LibCode Suite is open.  To overcome this problem it is highly recommended as well as being part of the Education Departments Standard that any computer containing a database should be connected to a UPS.

{ 0 comments… add one now }

Leave a Comment

Specifications:

Server:

Operating System                Windows NT4/ 2000/ 2003 or better

Processor                        Pentium 4 or better

Memory                        512 MB

Disk space                        1GB

Data entry/Circulation Machines  (Single Machine Setup):

Operating System                2000 / XP Professional/ Vista

Processor                        Pentium 4 or better

Memory                        256 MB

Disk space                        500 MB

CD Burner                        (or USB 2.0 port accessible)

Basic Windows Sound                For the Voice Tutorials and warnings

OPAC (HYG Machines):

Operating System                Windows  NT4 / 2000 / XP Professional/ Vista

Processor                        Pentium 3 or better

Memory                        256 MB

Disk space                        100 MB

Please make sure of the following:

  • If you have your CMEPlus folder on a Server using 2003 make sure that there are NO Windows 98 machines accessing this folder (including student access machines).
  • We highly recommend the connection of an Un-interruptible Power Supply to any computer that uses read/write/change permissions.  This includes all main Library machines ie Circulation & data entry machines to avoid corruption of indexes and database files.

{ 0 comments… add one now }

Leave a Comment

Are you rolling over from SiMS to OneSchool?  No problems!

Follow these steps:

1. Upgrade LibCode and Check Student Data is ready:

You need to upgrade to the latest version of LibCode and check the student borrower data.

To do this, go to the www.libcode.com.au and look for the upgrade option (you must have 6.79 to use OneSchool).

Note that in order to enter our support area you will need to login using the following details: Username = libcode  Password = super

Print and follow the instructions ( Backup  /  Download / Upgrade / Restore).

Check that the SMS school enrolment number (Student ID) is in the Borrower No. field of ALL the students (This number provides the link for the conversion to EQ numbers: if it is BLANK or WRONG, it will NOT be converted ).

2. You will need to export the Library migration file containing the Enrolment and EQ numbers:

(If you are not a OneSchool User, please get the administration officer to complete these steps for you!)

Enter the OneSchool main menu:

  • Select Reports.
  • Data Export Reports.
  • Library Migration Export.
  • Save the file to a USB flash Drive.
  • (J:{filename}.csv … whatever the name is that OneSchool exports!)

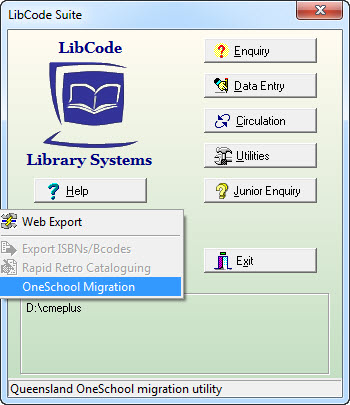
3. You will need to convert the Borrower numbers from SMS to EQ using the OneSchool migration option as illustrated below:

Click on Imports/Exports and then OneSchool migration

Arrow

4. Then you will need to make the Student Barcodes equal to Borrower number (i.e. EQ number) so you can use the ID cards produced for the school.

(Before migration, the SMS enrolment number should have been used for the barcode .. but that is now irrelevant.)

  • Do your backups
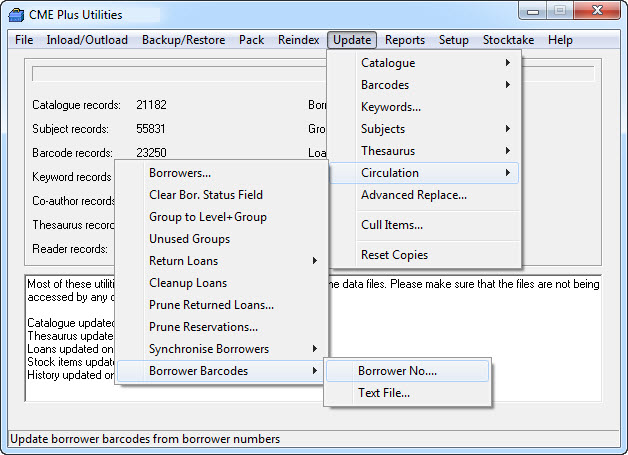
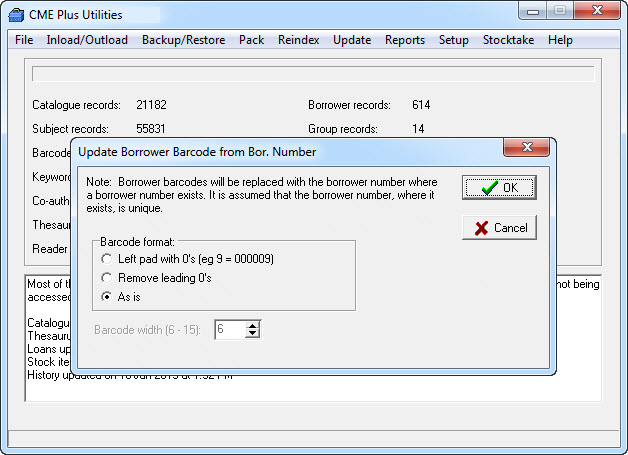
  • Follow the steps below to make the Student Barcode equal to the EQ number

Arrow
Arrow

Note: As of this date, the OneSchool Library Export has not been included (or has been removed from) the OneSchool Program.

You cannot do further the usual automatic student rollover until that library export has been reinstated by Education Queensland.

To download a copy of these instructions go to:

http://data.libcode.com.au/download/oneschoolrollover.pdf

{ 0 comments… add one now }

Leave a Comment

1. Preparation of LibCode

  •     Go to www.libcode.com.au
  •     Enter the support section.
  •     Find section on updating your LibCode  (and/or Text Tracker).
  •     Check your version as per instructions.
  •     Download and update if necessary (After backing up, of course).

2. Preparation of data for conversion

  • Go into OneSchool.
  • Reports > Data Export > Library Migration  –>  default file.
  • (where you can find it (e.g. USB in J Drive))

3. Conversion of Borrower numbers to EQ Numbers

  • Enter LibCode main menu.
  • Imports/Exports.
  • OneSchool Migration.
  • Update / Browse to your migration file exported from OneSchool.
  • … and update the numbers.

4. Conversion of Barcodes to EQ numbers

  • Use the Utilities module.
  • a)  Backup (Both first backup and an external backup please).
  • b)  Update  >  Circulation >  Borrower Barcodes  > Borrower number > Yes to proceed.
  • Exit from Utilities and Enter Circulation module.
  • Choose Borrowers and check to see that you have chosen the correct option.
  • If you have checked thoroughly and are happy, please backup again.
  • If you get unexpected results and are NOT happy, please restore the data.

{ 0 comments… add one now }

Leave a Comment

SMB1 and SMB2 and SMB3 are transfer protocols used by Windows networks, the higher numbers reflecting Microsoft’s attempts at increasing security.

Windows Server 2003 used the SMB1 protocol and allowed the successful operation of data transferring and indexing etc. with no problems.

The introduction of SMB2 as the default protocol between Vista or Windows 7 and Windows Server 2008 has impacted the performance of the Current versions of LibCode and Text Tracker on a Windows Server 2008 where data entry occurs from a Vista or Windows 7 workstation  i.e. Data Entry, Circulation and Utilities. Your tech must change the registry settings on these computers, manually or using the text file available from our web site.

Many programs use flat file database structures and will be impacted by Microsoft’s changes. Other programs including some aspects of Microsoft Office 2010 are also impacted adversely.

CMEPlus, the Enquiry Module, and HYGL1, the Junior Enquiry are OK, as they are read-only.

LibCode and Text Tracker will be altered to check Vista or Windows 7 machines running the programs from a network drive  to see if this has been done.

Note: The following information is for the help desk or the system administrator only

If the administrator downloads http://data.libcode.com.au/download/smb1.zip and extracts it, the text file win7_2008_SMB1.txt will be created in a folder smb1.

The administrator can click on it to load the text file and then save it to smb1 win7_2008_SMB1.reg and run it on the data entry computers to force the protocol back to SMB1.

The administrator should then get the Library staff member to log on and check that the system runs correctly.

Versions  6.8 (and above)of LibCode Suite and 6.6 (and above) of Text Tracker Suite will present a message and terminate if the registry of any Vista or Windows 7 computer accessing a network server does not contain the required values.

Note: Re-imaging of Library and Text Hire Vista or Windows 7 computers should include this registry fix.

{ 0 comments… add one now }

Leave a Comment

A manual for the DLC Touch Barcode Scanner is available on the Data Logic Website at:

http://www.scanning.datalogic.com/sitefiles/touch.aspx

In the meantime, here are a few troubleshooting ideas for you!

“I’m getting double beeps and nothing is appearing on screen!”

Our suggestions!

  • Try unplugging your scanner and trying another USB port.
  • Try another computer.

Does it come up with HID (Human Interface Device) prompt?

  • Use your Note Pad function for further testing, try scanning items and see if the barcode you are scanning appears.

{ 0 comments… add one now }

Leave a Comment

Registering your Software for the first time:

If you are a new client simply contact our office (www.libcode.com.au/contact-us) and we will step you through registering your brand new LibCode Suite. Please ensure that you have read our Licence Agreement before contacting us.

Renewing your Licence:

Each year your software will give you notification that your program licence is about to expire and requires a new ID file.

You may have already paid for your annual licence and support package and you’re about to head to the office and reprimand those responsible for paying the accounts but PLEASE STOP!

Note that the re-activation of LibCode Suite requires you to contact our office by either email, fax or telephone.

We will talk you through renewing your licence or email through instructions on how to renew your licence.

To re-register your LibCode software, the following steps will apply.

  • Enter LibCode main menu.
  • Help.
  • Register.
  • Renew licence.
  • Type in the code we provide when you contact us.
  • Click “Renew”.

We will also check with you if you are doing the following:

  • Check to make sure you’re carrying out your backups properly and send a copy of your backup to LibCode if you would like us to keep a safe copy for you.
  • Check the version of the software you are currently using.
  • Find out if you have any questions you would like answered.
  • Remind you to register for newsletter and upgrade notifications.

{ 0 comments… add one now }

Leave a Comment

Creating shortcuts for various users

Once LibCode has finished installing, using My Computer load up the new CMEPlus folder, locate LCSuite.exe, right click and select ‘Send to’ – Desktop (Create Shortcut) or Create a Desktop icon that points to …CMEPlusLCSuite.exe

  • To Setup icons for Teachers follow the same steps as above except select CMEPlus.exe instead of LCSuite.exe. The icon path should have a ‘ /t’ after CMEPlus.exe
  • To Setup for Students follow the same steps as above except select CMEplus.exe instead of LCSuite.exe. The icon path should have a ‘ /t /np’ after CMEPlus.exe
  • If you school owns HYG Junior follow the same steps as above again but select HYGL1.exe instead of LCSuite.exe. The icon path should have a ‘ /t’ after CMEPlus.exe

Making a loans shortcut for teachers – to be done on the CIRCULATION machine/terminal only and there are 2 parts to this…

1. Make a LOANS shortcut for your own desktop

2. Copy and Paste that shortcut into special folder that makes in available to EVERYONE who logs in to this workstation (so I’m assuming you are sitting at Circulation machine when you do this… if not, better move now!)

Part 1. Making a LOANS shortcut… same for XP and Windows 7

  • Right Click on the LibCode Shortcut.
  • Click Copy.
  • Right click in middle of nowhere… and click Paste.
  • Right Click on the new shortcut and click Properties.
  • Click in the Target line and change the LCSUITE.EXE bit to CMCIRC.EXE.
  • Click Apply and OK.
  • Right click on the same shortcut and click Rename… Call it Loans…
  • Now you have a shortcut that jumps straight into Circulation.
  • Right click the Loans shortcut and click Copy.

Now it gets a bit trickier… XP and Windows 7 have different places you need to put shortcut so it automatically appears for everyone who logs in to the Circulation machines…

Part 2 for Windows XP machines:

(Special place for XP shortcut is “C: Documents and Settings All Users Desktop” folder)

  • Open My Computer and go into the C: drive, find and click Documents and Settings folder.
  • Find and double click All Users folder and in there right click on Desktop and Paste.
  • A second shortcut should appear for Loans on your desktop… Delete the first one and you’re DONE!
  • Everyone who logs on to this terminal will see the Loans shortcut and if they have server permissions they can lend and return.

Part 2 for Windows 7 machines:- Same idea just a bit trickier… you might need IT Guru help!

(Special place for Windows 7 shortcut is “C: Users Public Public Desktop” folder)

  • The folder you need is usually “Hidden” which means you can’t see it!
  • First, let’s make it so you can see it…
  1. You need to open Windows Explorer (Hold down Windows button (between Ctrl&Alt on the left) and tap E) and go to C:UsersPublic folder…
  2. Now press the Alt button once and your bar menu will appear… click on Tools / Folder Options / View… and you should see a setting in the list about Show Hidden files and folders… it’s probably on “Don’t show…” change that to Show option…
  3. Click Apply and Ok… and the Public Desktop folder should now be visible…
  • Now we just need to Paste the Shortcut in there… To paste a shortcut you will need Administrator privileges.  If you do have the appropriate rights Paste will work… if not, find an IT Guru for help!
  • A second shortcut should appear for Loans on your desktop… Delete the first one and you’re DONE!
  • Everyone who logs on to this terminal will see the Loans shortcut and if they have server permissions they can lend and return.

{ 0 comments… add one now }

Leave a Comment