07.13 Borrowers…

Go into the Circulation module and click the Borrower button…

Find

  • To locate a borrower by surname start typing in the first few characters of the name.
  • As each character is added the list is adjusted accordingly to match the name to the search.

Filter

  • The filter option allows you to locate a borrower by using any of the fields in the borrower details screen.
  • Select your filter option from the drop down list and in the next field select the type of search you want to do… then type in your search string.  Now click the Filter button.
  • If you need to search using a different filter you need to click on the ‘Clear filter’ button.

Resorting data by clicking on the columns

  • Once you have generated your list to screen you can sort your data by shifting the columns.
  • Any column with a * in the column name, eg * Group, can be sorted using the data in this field by simply clicking on the column name.

Resorting Columns

  • Columns can also be moved to make viewing information easier.
  • Select the column you wish to move, click on it and hold down using the left button of the mouse then drag the column to the new location.
  • Any column can be moved to either the left or right of screen eg.
    Arrow

Deleting Borrowers

  • In Bulk…
  • Individually…
    • Find the borrower you would like to Delete, click on the borrower in the list and click Borrower Detail tab.
    • There is now a – button up the top…

Arrow

  • YES to confirm and borrower record will turn red and be deleted next time you do a Backup… OR if you are in a hurry you can jump into Utilities > Pack > Circulation to remove deleted Circulation records/items.

Tags: add borrowers, add students, change borrowers, clients, edit borrowers, edit students, setup borrowers

{ 0 comments… add one now }

Leave a Comment

  1. Go into LibCode Suite and then load the Circulation module.
  2. Click on the Borrowers button on the Circulation screen.

Arrow

  1. The Setup screen will appear.  Click on the + button to add a new borrower…

Arrow

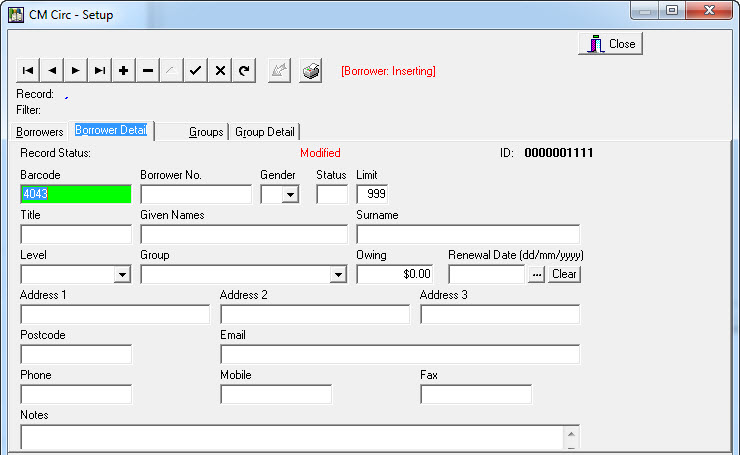
  1. The Borrower details screen will appear… go ahead and add necessary details.

(Each field on this screen is described below the screen shot)
Arrow

  1. Press <F9> to Save changes after entering the necessary details and click the + again to add another borrower

Description of fields on the Borrower Add screen…

Barcode:

This is where the Borrower Barcode goes.  If you are using barcodes, simply zap (or type) in the barcode you want to attach to this borrower.  The record number automatically appears as a barcode but you can replace this if necessary.

Borrower No:

This is usually the Student Enrolment number that is assigned to a student by an office system.  You MUST enter this number if you want to be able to use the Synchronise Borrowers function in Utilities > Update > Circulation… to automatically update your borrower details at a later date.

Gender:

Select the gender of the borrower.  This is not necessary but is useful later when doing statistical reports of borrowing history.

Status:

Status is a marker field that can be used for special purposes at a later date.  Usually left blank during the data entry process.

Limit:

The number set here is the maximum number of loans a borrower can have out at one time.  999 means Unlimited.  A warning is displayed if a borrower tries to borrower more than the number set.  This can be over-ridden on the loans screen if necessary.

Title:

Leave blank or enter Mrs, Ms, Miss or Mr in this field.  Some schools use this field for special info like Account No. information.

Given Names:

The first name of the borrower being entered is usually entered here.

Surname:

Enter the borrowers Surname into this field.  The Surname is the one used to search for a borrower so if you are entering a Classroom as a borrower put the main details in here.

Level:

This is the Year Level of the borrower.  It’s a good idea to use 2 digit mubers here so the sorted lists appear in the correct order and less than / greater than filters do the job… (ie. 01, 02, 08, 09, 10, 11, 12…).

Group:

Enter the Class or Group that the borrower belongs to.  This is the main grouping or sorting field Circulation uses to sort Overdue and Loan History reports.  Groups are added to the system via the Groups tab on the Borrowers screen.

Owing and Renewal Date:

These fields are used to store fine and subscription type renewal information if necessary.  Mostly these fields are left blank.

Address 1, Address 2, Address 3, Post Code, Email, Phone, Mobile and Fax:

These are simply the contact detail fields for borrowers.  Add as necessary.

Notes:

Special information about a borrower can be entered here.  This information is displayed each time the borrower presents resources for loan.  Handy for reminders about lost loans or access to restricted resources…

See also…  Utilities > Update > Circulation > Synchronise Borrowers for instructions on how to import Borrowers in Bulk.

Editing or Changing Borrower details…

Adjusting a borrowers details is a common and basic operation.

  1. Go into Circulation.
  2. Click the Borrowers button.
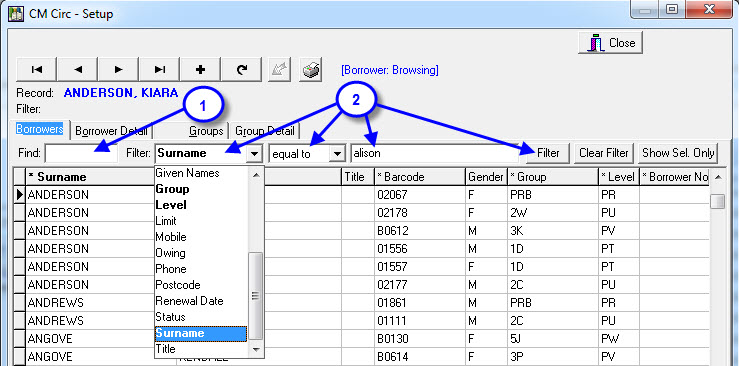
  3. Filter out the borrower using either:
    1. The find option by typing in the first few characters of the surname, OR
    2. Selecting another filter option from the list provided and typing in the search terms then clicking on the Filter button.
Arrow

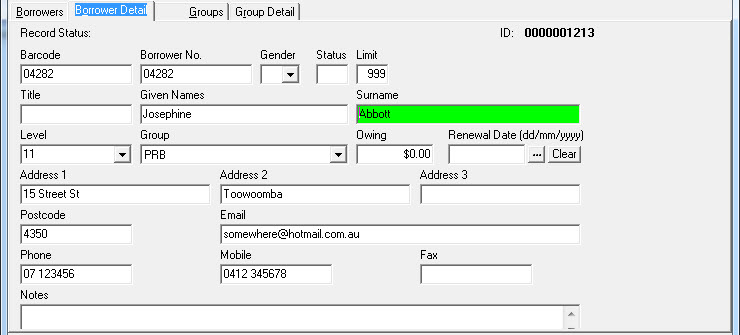
  1. Once you have located the required Borrower from the list provided double click on the entry to show the details screen.
Arrow

  1. Make the necessary changes and <F9> or √ to save the changes.

Tags: add borrowers, add students, adding and editing borrower details, borrower detail, change borrowers, change students, edit borrower details, edit borrowers, edit details, edit student details

{ 0 comments… add one now }

Leave a Comment

Pictures can be added to Borrowers to help staff recognise borrowers

***Please Note – Circulation can handle jpg, jpeg, bmp, gif, emf, wmf files***

If images have the same name as the Borrower Barcode

AND

are in the Images folder that has been setup in Utilities the pictures will automatically appear every time a borrower is called up in Circulation.

Automatically hooking up Borrower Images…

Circulation automatically looks in the Images folder under the working folder for borrower pics:

  • i.e. If the software runs from P:\CMEPlus then the borrower images should be in P:\CMEPlus\Images.

Setting Up / Changing the location of the Images folder used by Circulation:

  1. Load Utilities.
  2. Select ‘Setup’ & ‘Circulation Options’.
  3. Choose ‘Bor. Images Folder’ and type in the location of your borrower images.

Note: If the borrower photos are already stored on the file server and accessible via network from the Circulation computer, then the Images folder could just be setup as the path to the existing photo folder. For example P:\STUDENTPHOTOS. If the filenames of the photos are the same as the Student Enrolment numbers (which should be the same as the Borrower Barcode in LibCode Circulation) then the photos will appear automatically each time a borrower is called up.

Assigning Borrower Images Manually…

If you need to assign Borrower Images manually (ie. Photos are not named the same as the Borrower Barcodes).

  • Make sure you make a copy of the images into a new folder (eg. CMEPlusImages) because Circulation will rename the photo files to be the same as the Barcode info when you assign an image to a borrower. (eg. A Photo file is in the Images folder and is named 10-TrinaFord.jpg and you assign the image to Trina Ford via Circulation… after you save the record the photo file name will now be the same as Trina’s Barcode which in this example is 12345.jpg.)
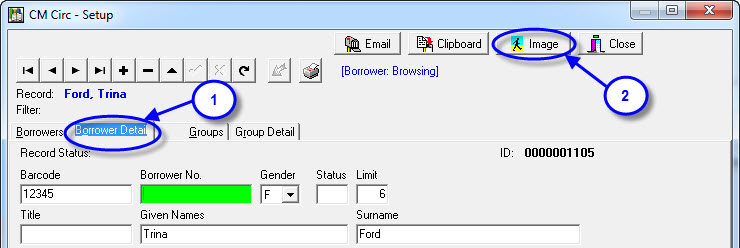
  1. Load Circulation and go into Borrowers.
  2. Highlight the borrower you want to hook a picture to and click into the Borrower Detail tab (see Step 1).
  3. Click Image button to hook image to Borrower (See Step 2).

Arrow

  1. Highlight the picture on the Select Image File page and then click Open.
  2. Save the record by pressing F9 or clicking the Tick button   on the navigation bar menu and that’s it… the picture  will now appear each time this borrower is selected.

Obviously it’s much quicker if you can arrange the photos to have to correct filename to start with!

Tags: add borrower images – pictures in circulation

{ 0 comments… add one now }

Leave a Comment

Follow the below instructions to add notes to a borrower.

  1. Double click on LibCode Suite icon.
  2. Click on Circulation.
  3. Click on Borrowers.
  4. Type Borrower’s name.
  5. Click on Borrower and Borrower Detail.
  6. Click in Notes Field.
  7. Type note (student able to borrow three books for two weeks).
  8. Save the record.
  9. The note will appear when the borrower’s name is next entered in loans and may be edited when no longer needed.

Tags: add notes to borrowers, adding notes to borrowers

{ 0 comments… add one now }

Leave a Comment

  • Individually…

    • Find the borrower you would like to Delete, click on the borrower in the list and click Borrower Detail tab.
    • There is now a – button up the top…

Arrow

YES to confirm and borrower record will turn red and be deleted next time you do a Backup… OR if you are in a hurry you can jump into Utilities > Pack > Circulation to remove deleted Circulation records/items.

Tags: deleting borrowers, delete borrowers, deleted students, delete staff, delete individual

{ 0 comments… add one now }

Leave a Comment