04. Enquiry

The Enquiry module should be the main reason your school has a library system…

We believe research skills are important… very important. So important we’ve given our OPAC a strange name.  CMEPlus… Concept Map Explorer and more (Plus!)…

It’s an ideas explorer.  Teachers can use it just to generate ideas lists to help with class discussions, I could waffle on for pages about the potential  but that all presents itself if researchers get a good introduction and a helping hand from time to time (I’m looking around for a soap box but there’s none about).

Each and every time a student (or teacher for that matter) walks into your Resource Centre, you have an opportunity to help them develop better research skills:-

  • How many Teachers grew up with access to computers?
  • How can Teachers help Students if they don’t know themselves?
  • How can you help anyone if you don’t understand what’s available to you?
  • How many different research tools can you show them?
  • Is it possible that each time someone leaves the Resource Centre, they have a little more to think about than when they walked in?
  • Can your Resource Centre help growing minds develop a better understanding of the world they live in?

A Research Tool!

Where you’re able to search for resources and ideas…

The research tool we have created is not just a “here’s what you are looking for…” tool

It has been designed:-

  • To make sure people are thinking about what they are doing.
  • To teach people how to search by thinking about what they know and how to find resources and other ideas.
  • Not to be like an internet search where you punch in a topic then troll through thousands of entries, maybe or maybe not finding what you need… the Enquiry module asks you to think and gives researchers the opportunity to explore ideas.
  • Developing research skills is what a school resource access system should be about.

The screen that does a little more than you’d guess…

The Subject Search screen is the interesting one.  All the other search screens are simply alphabetical searches… type in some details, check out a list of resources.

The Subject search has so much more to offer if you take the time to look around.

Please, please, please take the time to experiment with this screen… work through some examples and have a look at what you can offer people who use this research tool.  We’ve built the tool, you need to show young people how to use it!

Spend a bit of time getting to know this part of the Libcode Suite.  As mentioned earlier… this is the “front end”.  This is the reason why so much time and effort has been put into typing in thousands and thousands of records…

If you are actually looking for resources and not just using CMEPlus as an ideas explorer or a brainstorming tool you’ll probably end up with a list of resources on the screen… in this case you’ll want to know more about Using the Results Screen (Resource Lists)

Tags: concept, Dewey, Enquiry, related, sorting, subdivisions, toolbars, used,  valid

{ 0 comments… add one now }

Leave a Comment

The Subject Search is the most interesting part about our entire software package.

  • This is the bit that gets us all fired up about the amazing potential for people to gain knowledge by simply walking up to a “Library System”.
  • This is the bit that we believe every library system in Australia should be bashing down our door to organise a data framework for, so they can include it in their OPACs (Online Public Access Catalogues) so all students and even adult researchers have access to the lateral thinking and brainstorming potential of this software…

Some questions for the researchers…

  • What is a subject?
  • Are there any other ways / words to describe a “Subject” of a resource / book?
  • Do Fiction books have Subjects too?
  • What’s the difference between a Subject on a non-fiction book and a Subject on a Fiction book?
  • How many Subjects can a resource be about?

Doing a Subject Search…

Searching by subject heading is the most commonly used and, by far the most interesting method of searching for resources

You can predetermine the default search method by selecting from the options tab.  To locate a list of resources by subject:
Arrow

To include show sub.divisions and explain each tick box and how to set the OPTIONS. (KLA v Concept CODES)

  • Type in a few letters of your search idea in the ‘Search for:’ field.  For this example we will use Air.  Remove the tick from the Used Only box an press the <enter> key.
  • A list of subject headings starting with the word Air appears in the results screen.  There are several types of headings you will encounter:
    • Air Pollution (with a lightbulb) this is a valid subject heading currently attached to resources.
    • Air Crashes → Aeronautics – Accidents.  This is a ‘See also‘ heading and is displayed in green type.  If there is a lightbulb at the front of it, the valid heading is currently attached to a resource.  If you click on this heading you will be shown a list of resources that have this valid  heading attached.
    • Air forces in Art (without a lightbulb) this is a valid subject heading that has not been used to catalogue resources.
  • You would have achieved the same search result if you had clicked on the <Begins with> but if you had clicked on the <Contains> a number of additional subject headings would be shown, such as:-
    • Soviet Union. Air force
    • Silverchair (Band)
  • Right click on one of the ‘see also’ references and you have the choice of looking for resources in the same ‘Concept Code’, Dewey range or  you can be shown the valid subject.
  • Every subject heading and ‘see also’ reference has been given codes in order to widen your terms of reference.  Click on various subject headings and you will notice that a number of Related topics will appear for each heading, all with the corresponding Concept Code.
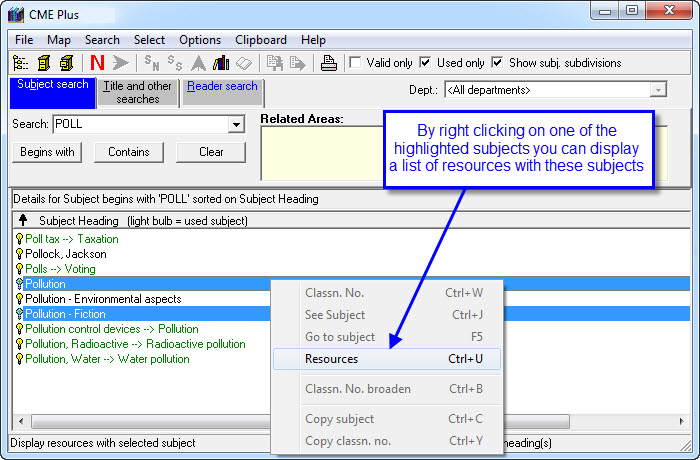
  • Double click on one of your selected subject headings (or right click and select Resources) to have the list of resources shown.
  • If you’re interested in more than one of the subjects, hold down <Control> and select all of the subjects that you would like to use. Once the selected subjects have been highlighted right click on one and select Resources.  You will now be shown a collective list of resources that can be displayed in any order.

Hint – do not tick the Valid only box as this is useful when users, who may not be familiar with the valid set of subject headings are trying to locate resources eg. if Cars was used as a search term you would be given the ‘see also’ reference of Motor cars displayed as:

Cars → Motor cars
Arrow

Understanding the Toolbars…

At the top of the Enquiry module are a number of toolbars.  To dig around and get interesting results from your search, you need to know what you can do by a simple click of a button

After doing a…

  • Valid only – by selecting this option you will only be shown a list of valid subject heading and no ‘see also’ references.  ‘See also’ references are displayed in green.
  • Used only – this option is set as a default and when chosen will only show a list of subject headings that are currently used to catalogue resources.  If you take the tick off this option you will notice that there are a large number of subject headings without a ‘lightbulb’ beside them.  These are the subject headings that are not currently being used.
  • Show Subj. Subdivisions – selecting this option will expand the valid subject headings to show subdivisions.
  • Concept Code Schedule – this map can be displayed on the left hand side of the results screen by clicking on the XXX icon.  This ‘tree’ illustrates the logical order of subjects and how they are related to other subject headings.  It can be very handy if you’re slightly off target with your original search term or you might like to explore an area you hadn’t originally thought of.
  • Expand and Collapse Map – this will provide you with either a fully expanded version of the Concept Code Schedule or only the main topic areas.
  • Dewey Search – by searching for resources using this option you can locate resources that have been catalogued using similar Dewey numbers.  This is often handy when you’re cataloguing items that could potentially be given more than one Dewey number.  By viewing what is currently in a particular Dewey area you can gauge whether it is likely to be found by your borrowers.
  • When using the Enquiry module to search for resources by Title, the following words are not used a, an, the.
  • Related Topics – Gives you the opportunity to view other resources with the same concept code.  In the screen shot above ‘Poll’ was typed in as the subject search.  I was interested in Pollution, but looking at the Related Topics, I am now leaning more towards resources on World Problems.  By double clicking on the Related Topic a list of relevant subjects with this concept code are displayed.  The Valid only option has also been selected to exclude the ‘see also’ references.

Arrow

Sorting your results…

A number of the subjects can be highlighted and only resources dealing with these subjects can be displayed.
Arrow

When you have a list of resources displayed you can click on any column header to resort the list in that order.

 Tags: subject search

{ 0 comments… add one now }

Leave a Comment

The facility to search for resources using Key Learning Areas or KLAs is often more appealing to staff and students rather than by subject heading.

To set your enquiry search and display to KLA’s :

  1. Load the Enquiry module.
  2. From the Options tab at the top of the screen highlight the Use KLA Schedule.
  3. This will place a tick beside this option and all further searches on this computer will default to the KLA preference.
  4. In the Search field type, in the subject you’re interested in and click on the Begins with or Contains button.
  5. Highlight the subject or Related Topic of interest.
  6. If there are a number of subjects simply highlight those you would like to view resources for by using the SHIFT + CLICK option.  Once all of the relevant headings are highlighted, right click on one of the headings and select Resources.

Tags: KLA, searching using KLA’s, Key Learning Areas

{ 0 comments… add one now }

Leave a Comment

This search tab allows you to search by:-

Type in the your search string and then click on the relevant button to start the search

  • e.g. Type in Marsden then click on Author
  • Your results will appear towards the bottom of the screen
  • These results can be resorted and multi-selected for viewing and/or printing

Again, if you end up with a big list of resoruces on the screen you’ll probably want to know more about Using the Results Screen (Resource Lists)

Tags: title and other searches

{ 0 comments… add one now }

Leave a Comment

The Reader Search Tab offers three different forms of searching any Reader details.

  • By Reading Scheme.
  • Multifield search of any reader fields.
  • A range search of the Reader Details fields.

1. The first Reader Search option – ‘Select Reading Scheme’ is basically just a filtering mechanism. This allows you to view resources that have a certain Reading Scheme. This filter can come in useful when you are trying to ascertain how many resources you have for a particular Reading Scheme.

2. Multi-Field Reader Search.

As the name suggests by using this option you can refine your search string to provide a more specific result.

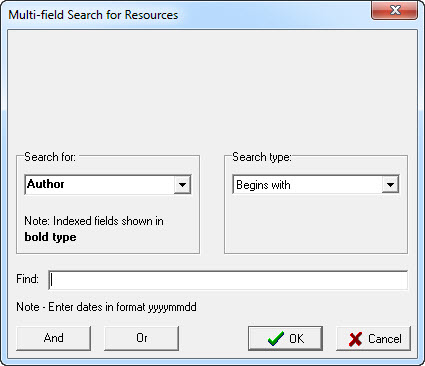
Type in your search string in the Find box and then select from the Search for: field, the first Reader field you wish to use in your search.  Then in the Search Type: field, select from the drop down list the term that best describes the search string you’re using.  By clicking the ‘And’ or ‘Or’ button you can add a second set of criteria by repeating the above process.

Arrow

3. Reader Range Search

Use this search when you want to filter out resources by a range of criteria.

Tags: searching readers collection

{ 0 comments… add one now }

Leave a Comment

No matter what method of searching is used your final result will be a list of resources in Title order.

There are several things you can do with this list:

  • Click on any column header to resort eg. click on the call number header to create shelf list.
  • Selectively highlight items by using the standard Windows <Control> and <Shift> click functions.  This takes a little getting used but is well worth mastering as it’s useful in all Windows applications not just LibCode.
    • Try holding down <CTRL> and click on items to select them (click a second time to de-select).
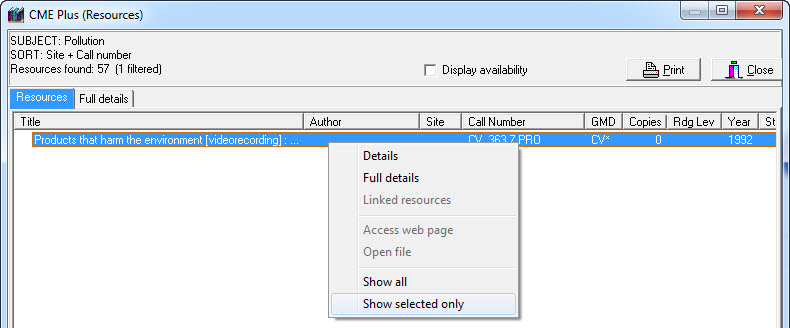
    • Once required items have been highlighted, right click on one of the highlighted items and click Show Selected Only to reduce the list.

Arrow

  • These resources can now be put into a shelf list for easy gathering or shelf browsing

Arrow

Tags: using resource lists

{ 0 comments… add one now }

Leave a Comment

Teaching students and staff how to use LibCode Suite efficiently can not only save value library staff time but assists in the teaching of independent learning.

Knowing your way around the Enquiry Module is great way to improve research skills.

It is not uncommon for a teacher or student to approach the Library staff and ask for a list of resources on a specific topic.

Searches can also assist the library staff in the culling of resources.

Tags: example uses

{ 0 comments… add one now }

Leave a Comment