Teaching students and staff how to use LibCode Suite efficiently can not only save value library staff time but assists in the teaching of independent learning.
Knowing your way around the Enquiry Module is great way to improve research skills.
It is not uncommon for a teacher or student to approach the Library staff and ask for a list of resources on a specific topic.
Searches can also assist the library staff in the culling of resources.
Tags: example uses
Brainstorming a topic with LibCode’s Enquiry Module
A Tutorial (Part 1)
When a class begins a new topic, it is common practice to elicit ideas from the class:
- To establish where the students are ‘coming from’.
- To pool current knowledge as a starting point.
- To discuss and elaborate on ideas suggested by class members.
- To extrapolate from current ideas by suggesting new related ideas from the subject area.
No matter what the size of your school library, you can use Libcode to assist in this process:
- To produce a list or ‘cheat sheet’ for the teacher.
- To encourage independent research by your students.
- To assist in development of concepts and relationships within and beyond the scope of the topic.
If you have the voice tutorials for the Windows™ version of LibCode, please refer to the sections under Enquiry to assist in beginning this process…
- ’4. Enquiry’
- Looking for Resources.
- Resource search.
- Subject search.
- Producing Resource Lists.
- Using the Results Screen.
Procedures:
Step 1
The smoke and dust have been bad and the topic for the day starts with air pollution.
- Load the Enquiry Module (CMEPlus or Senior Catalogue).
- Type air in the <Search for: > box and press <Enter> for the default subject search.
- Highlight Air pollution in the Subject Heading column.
- Observe the entry in the <Related topics> area.
- These are general topic areas (From 1 to 4 for each subject heading).
- 3-letter Codes in front of each are “Concept Codes” and are used to map concepts.
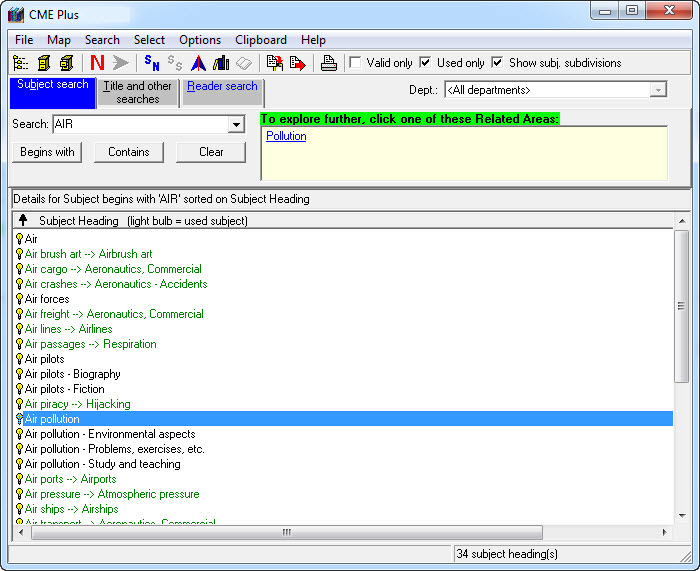
- Double click the general area GFB Pollution in the yellow Related Topics box.
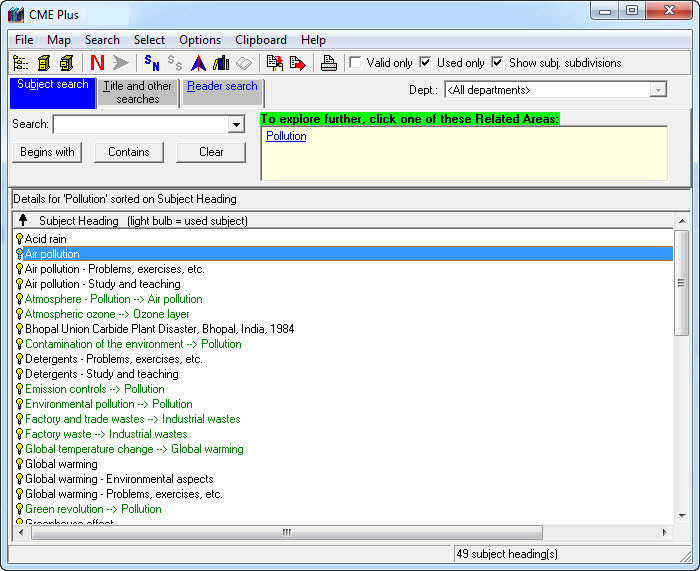
- Notice the list of headings in the Subject Headings column below.
- The green ones are “see References” – may be excluded by ticking the “Valid only” box.
Step 2
- Then the number of related ideas may be expanded beyond those used in your library.
- Untick the “Used only” box to show all related headings.
- Note that the list contains many sub-divisions – sub ideas with dashes.
- To condense the list to main ideas only (excluding subdivisions).
- Right click anywhere in the list.
- Untick the “Show Subject Subdivisions” option.
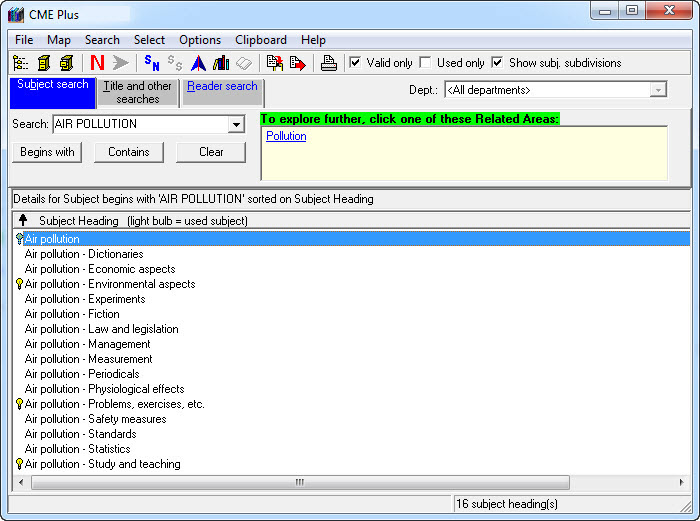
- Click on the Printer symbol to preview and print the list of ideas.
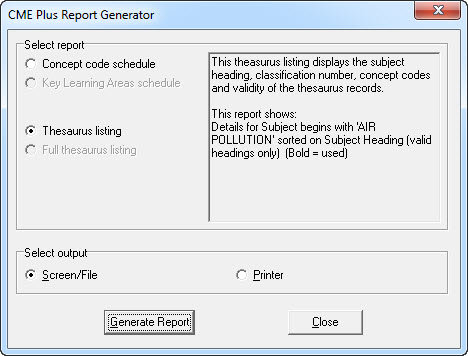
- Generate the report to screen, noting the number of pages, and then print the preparation sheet for the teacher and class. Headings used in this library are in bold type.
This list is ready for use.
Tags: list of resources ordered by topic
To create a list of resources for staff and students is very simple -
Example:
A Teacher is about to begin a unit of work on Mammals. Rather than trying to search for resources on individual animals eg dogs, cats, cows (which is very limited and time consuming) you can locate all resources in the library collection that have been given relevant subject headings.
Load the Enquiry module
- Type in the subject you’re interested in, our example will be cats.
- Select the appropriate heading from the list of subject headings.
- Used only is the default selection – no point looking for resources that don’t exist.
- Check the Related topic area at the top of the screen as quite often it is better to look a broader range of topics than specifics.
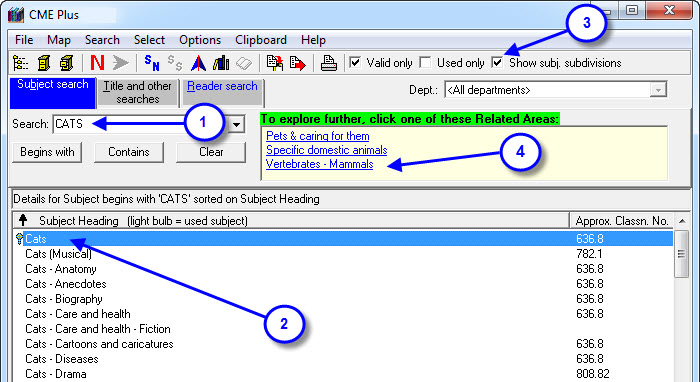
- Double click on the Related topic Vertebrates – Mammals. A list of all subject headings relating to Vertebrates – Mammals appear in the subject Details area.

- Tick the Valid only box to reduce the list of headings.
- Hold down the CTRL key and using the left mouse button click on the headings you would like to investigate. If there is a block of subject headings you would like to look at hold down the SHIFT key and click on the first subject heading then click on the last subject heading in the block. This will highlight all of the headings in between.
- Once you have highlighted all of the headings RIGHT click on one of the subject headings and then click on Resources.
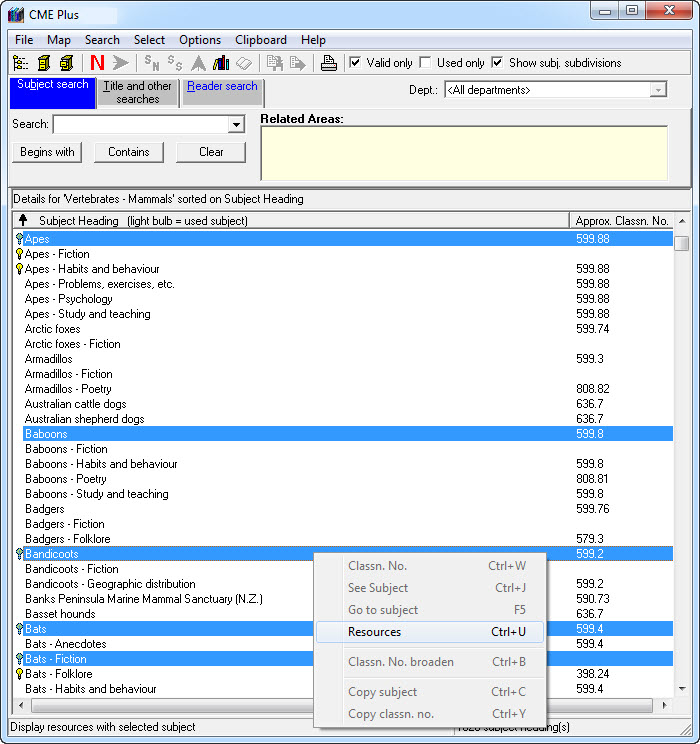
- A list of resources will appear that have these subject headings attached. This list can be resorted in the following ways.
- Scroll to the right and locate the Year column and click on the heading this will sort your resources according to age. Scroll down the list until you get to resources that are more current eg anything older than 25 years should probably be considered for culling and replacement. Highlight the first current resource then scroll to the last resource in the list and using SHIFT + left mouse click, highlight all of these resources.
- Right click on the selected resources and click on Show selected only.
- Locate the GMD column and click on the header. This will resort the list of resources according to their GMD.
- If you only wanted books you would highlight all of the resources with no GMD by using the SHIFT + left mouse click option.
- Right click on the selected resources and click on Show selected only.
- Once you have refined your list you can then click on the Call Number heading to produce a shelf list of resources, again you can reduce this list by selecting only the non-fiction. Simply follow the instructions outlined above.
- Click on the Print button.
Tags: list of resources ordered by subject
This function allows you to prepare a shelf list of resources according to age for possible culling.
- Load the Enquiry Module.
- Select Title and other searches.
- Click on the Range Search in the Advanced Searches box.
- In the Selection field select Publ. Year.
- Any resource older than 20 years should seriously be considered as a possible cull. Enter 1900 in the low value and in the high value enter 1985…Click OK.
- Once the list of resources has been generated check the number of Resources found (top left hand of screen).
- You can re-organise these resources into managable lists by clicking on the Call Number column, use the SHIFT + Left mouse click to select only the Non-fiction (or any other location) you would like to start on.
- Take your list and a book box to the shelves and locate the resources. Carefully consider each item for relevance and content, and if necessary toss it into the book box.
- Once you have a box full take them back to the computer and scan the barcodes into a Buffer file (see Utilities > Setup > Buffer File).
- To cull the items refer to Utilities > Update > Cull Items.
Tags: age of resources, resources ages


{ 0 comments… add one now }