The below settings are located under the Authority Files menu.
General Material Designation or Description pop-up table (GMD field)
- Used to describe the type of a resource.
- Only used for non-book resources.
- Feel free to add entries to this list as necessary.
- Generally the Enquiry (OPAC) does not display resources that have no valid Copies (ie. No barcodes that are not Written off, Missing or On Order).
If you create a new GMD and you know there will be no barcodes on the items and you still want them to appear in the catalogue… make sure you include an asterisk (*) in the Code details (eg. CV*) because this overrides the hide function.
Country
- Default list of countries a resource was published in. Not required information but can be useful to demonstrate bias in point of view on a controversial topic!
Site
- Makes it possible to restrict / explain the sites of satelite collections around the school.
- Add up to four letters as a Site code and type in a description so everyone knows what the codes stand for!
Location
- Makes it possible to restrict / explain the Locations within your collection.
- Each Site may have several Locations with them (sort of refined Site info for split collections).
- Add up to three letters for a Location code and type in a description so everyone knows what the codes stand for!
Department
- Makes it possible to setup different Circulation Systems for each department in your school.
- Add up to three letters for a Department code and type in a description so everyone knows what the codes stand for!
- A Department is one step higher than a Site: Department -> Site -> Location.
Reading Level & Scheme
- These two separate Authority files control the Reading Levels and Schemes that you can add to your resources in the Reader Module in Data Entry.
- Add up to three letters for a Reading Level/ Scheme code and type in a description so everyone knows what the codes stand for!
When you start typing in resource information, you will notice the GMD field has a drop-down list of options regarding the type of resource being entered. This list can be adjusted to suit your resource collection.
Note:
- DO NOT put a GMD on normal books this just adds clutter to the screen and makes the field less significant and eye catching when it’s used on special resources.
- Think ahead if you are adding new GMDs. If there are several related groups of resources that you will be adding, use a common prefix so the items can be called up / identified easily (eg. For Electrical and Mechanical Equipment you might use EQE and EQM as the codes… EQ being the common identifier (it’s handy at times!)).
- You have only 3 characters for the GMD code.
- You have 26 characters for the Description.
- You can’t delete or change a GMD that is in use.
- If you need to change an In Use GMD then you need to add a new GMD that suits your needs then use Utilities > Update > Catalogue > Update… to bulk change the old GMD to the new GMD on all the existing records (See Utilities > Update > Catalogue for a GMD example).
- Normally when you delete things you have to Pack the database to remove them. If you delete a GMD you don’t need to pack the database straight away because the Data Entry module won’t display any deleted GMDs in the drop down list. This means you can leave them floating around until you do a Backup at the end of the day.
Steps for adjusting the GMD list…
LibCode Suite > Utilities > Setup > Authority Files > GMD > click on item and change details or click + to add.
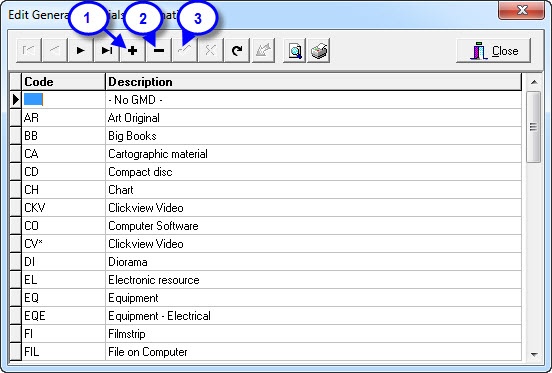
- + or <F2> to add.
- − or <F3> to delete.
- √ or <F9> to save changes
Standard GMDs…
There are a number of standard GMD’s used for resource collections including:-
- No GMD -
AC Audio cassette
BB Big Book
BK Booklets
BM Blackline Masters
CA Computer software Apple
CDM Compact Disc Music
CDR CD-Rom
CH Charts
CI Computer software IBM
CS Card Sets
CX Compact Disc
DO Dioramas
DU Duplicating Masters
DVD Digital Video Discs
FIL File on computer
FL Flash Cards
FS Filmstrips
FY Floppy Discs
GA Games
GL Globes
IM Interactive Multimedia
LP Large Print Books
MA Maps
MI Microforms
MO Models
MU Music
OT Overhead Transparencies
PA Pamphlets
PI Pictures
RE Realia (Specimens)
SL Slides
SX Slides (Biological)
VAR Variable Loan
VF Vertical file
VH Videocassette
WWW World Wide Web
Special GMD’s…
- Generally the Enquiry (OPAC) does not display resources that have no valid Copies (ie. No barcodes that are Written off, Missing or On Order)
- Some GMD’s will allow a resource to be displayed in the Enquiry Module having a copy count of zero. If a resource cannot be barcoded it will need to have one of the GMDs listed below. GMD’s that do not require barcodes are:
- WWW World Wide Web
- VH Videocassette
- IM Interactive Multimedia
- FIL File on computer (*Note: This also works if you want a Folder to open!)
- The same “open file with a click” function is now hooked up to GMDs of:- AVI, CHM, DOC, EXE, HTM, JPG, MHT, MP3, MP4, PDF, PPS, PPT, RTF, SWF, TXT, WAV, WMA, and XLS. There is an Open File button that becomes live in CMEPlus… the offline search tool
- VF Vertical file
- CV ClickView Video
- *.. Your new entry
- If you create a new GMD and you know there will be no barcodes on the items and you still want them to appear in the catalogue… make sure you include an asterisk (*) in the Code details (eg. EC* or *EC) because this overides the OPAC hide function
- Hiding Resources is possible if you use a GMD that contains a # OR a GMD of NFP. These resources will NOT be displayed in Enquiry even if it does have copies:
- #… New item description
- NFP Not For Publication (Hides item from search view)
This table is rarely, if ever, changed.
When you start typing in resource information, you will notice the Country field has a drop-down list of options regarding where the resource being entered was published. The Country of origin can be useful to point out possible bias of resources regarding a controversial topic. This list can be adjusted if necessary.
Steps for adjusting the Country Table…
LibCode Suite > Utilities > Setup > Authority Files > Country… > click on item and change details or click + to add.
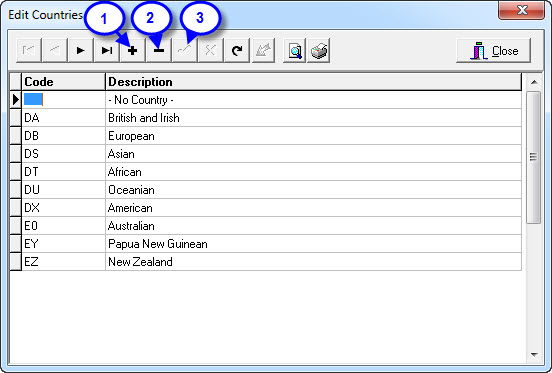
- + or <F2> to add
- − or <F3> to delete
- √ or <F9> to save changes
Note:
- You have only 3 characters for the Country code.
- You have 25 characters for the Description.
When you start typing in resource information, you will notice the Department field has a drop-down list of options to describe the department to which these resources belong. This list can be adjusted to suit your resource collection.
Note:
- You have only 4 characters for the Department code.
- You have 30 characters for the Description.
- You can’t delete or change a Department that is in use.
- If you need to change an In Use Department then you need to add a new Department that suits your needs then use Utilities > Update > Catalogue > Update… to bulk change the old Site to the new Site on all exisitng records (See Utilities > Update > Catalogue for a GMD example).
- Normally when you delete things, you have to Pack the database to remove them. If you delete a Department you don’t need to pack the database straight away because the Data Entry module won’t display any deleted Departments in the drop down list. This means you can leave them floating around until you do a Backup at the end of the day.
Steps for adjusting the Department list…
LibCode Suite > Utilities > Setup > Authority Files > Department > click on item and change details or click + to add.
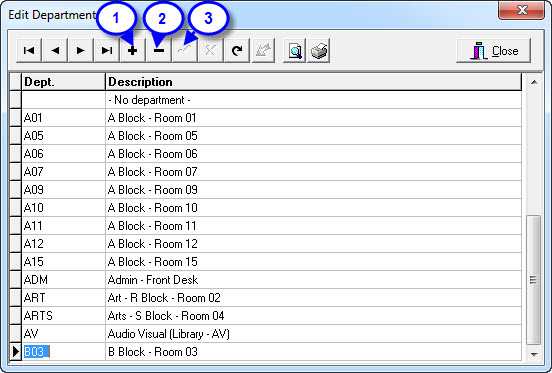
- + or <F2> to add
- − or <F3> to delete
- √ or <F9> to save changes
When you start typing in resource information, you will notice the Site field has a drop-down list of options to describe the building where the resources are housed. This list can be adjusted to suit your resource collection.
Note:
- You have only 4 characters for the Site code.
- You have 30 characters for the Description.
- You can’t delete or change a Site that is in use.
- If you need to change an In Use Site, then you need to add a new Site that suits your needs then use, Utilities > Update > Catalogue > Update… to bulk change the old Site to the new Site on all existing records (See Utilities > Update > Catalogue for a GMD example).
- Normally when you delete things, you have to Pack the database to remove them. If you delete a Site you don’t need to pack the database straight away because the Data Entry module won’t display any deleted Sites in the drop down list. This means you can leave them floating around until you do a Backup at the end of the day.
See below for Screen layout.
Steps for adding new sites:
- Double click on LibCode Suite icon.
- Click on Utilities > Setup > Authority Files > Site.
- Click on + (plus).
- Type Site eg Rm 1.
- Tab to Description.
- Type Description eg Room 1.
- Save the record.
Steps for editing sites:
- Double click on LibCode Suite icon.
- Click on Utilities > Setup > Authority Files > Site.
- Click on Site to be edited e.g. Rm 1.
- Click in the Description & make changes.
- Save the record.
Steps for deleting sites:
Sites can only be deleted if no resources are using the site.
- Double click on LibCode Suite icon.
- Click on Utilities > Setup > Authority Files > Site.
- Click on Site to be deleted eg Rm 1.
- Click on - (minus).
- Click on OK.
Authority File / Site Screen Layout
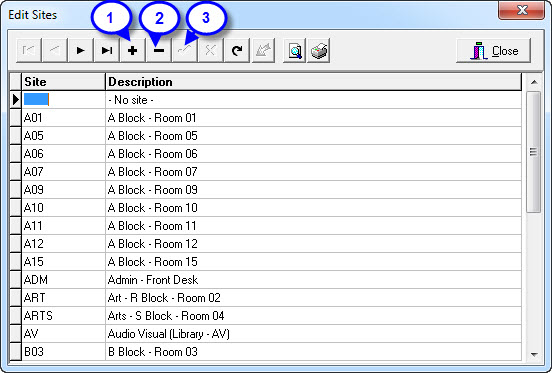
- + or <F2> to add
- − or <F3> to delete
- √ or <F9> to save changes
When you start typing in resource information, you will notice the Location field has a drop-down list of options regarding the location of the resource within a Site. This list can be adjusted to suit your resource collection.
Note:
- You have only 3 characters for the Location code.
- You have 30 characters for the Description.
- You can’t delete or change a Location that is in use (ie. is attached to resources).
- If you need to change an In Use Location then you need to add a new Location that suits your needs, then use Utilities > Update > Catalogue > Update… to bulk change the old Location to the new Location on all exisitng records(See Utilities > Update > Catalogue for a GMD example).
- Normally when you delete things, you have to Pack the database to remove them. If you delete a Location you don’t need to pack the database straight away because the Data Entry module won’t display any deleted Locations in the drop down list. This means you can leave them floating around until you do a Backup at the end of the day
Steps for adjusting the Location list…
LibCode Suite > Utilities > Setup > Authority Files > Location > click on item and change details or click + to add.
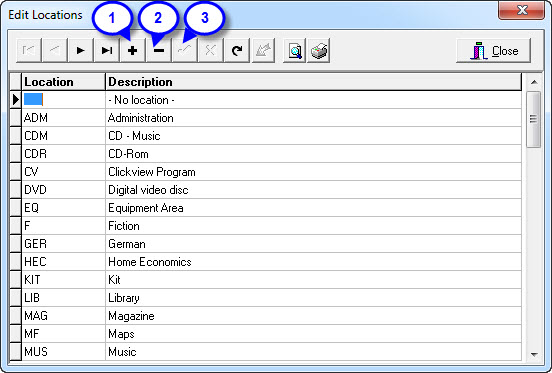
- + or <F2> to add
- − or <F3> to delete
- √ or <F9> to save changes


{ 0 comments… add one now }