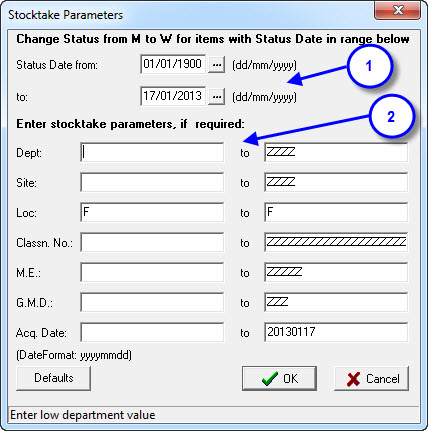
This is NOT a necessary thing to do.
You can always just treat items that have been missing for a long time as written off… eg. Use the Cull Items function (see below for instructions) to print and then delete all items that have been missing for over 3 years.
This function is for those who just HAVE to do it this way!
(Although it does mean that the OLD missing stuff does not appear on the Stocktake > Missing reports…)
ALWAYS backup before you globally update any information. It is easier to restore from a backup than go through your entire collection and make manual changes. (Don’t forget you can do Bulk Updates of data!)
- Writing off a resource does not remove the items from the library catalogue, it only sets the status of ‘W’ and a current date to each barcoded resource.
- If a resource has had a status of ‘M’ for more than 2 years you would assume that you will never see it again. Therefore, these resources can now be given the status of ‘W’.
- To change an item to ‘W’ all you need to do is go to the Data Entry module and click on the “Barcode Details” tab. From there, go to the “Status” box and enter a ‘W’.
- As soon as the item is marked ‘W’ it will no longer appear on the catalogue (if it was the last copy).

- Set the date parameters. The dates that pop up automatically are the lowest and highest possible dates. When changing the higher date range it is a good idea (for logical reasons) to use a date that has some significance eg 31st December (end of year) or 30th June (end of financial year) and leave the lowest date range as is.
- If you only want to do a section of your collection at a time change the parameters accordingly and remember if it is all a bit confusing just jump into Data Entry and look at the data in the various fields of an example record to work out what should go in each “parameter” field. (Click here for a Stocktake Parameters explanation).
And THAT is about all I know about Stocktaking! (Assuming you have checked out ALL the documents and pages and links and this is the last page you happen to be reading!)
What if I want to do a bulk cull?
1. Use Utilities > Setup > Buffer File
2. Scan in the books to be culled.
3. Save the buffer file as something meaningful e.g. Cull2011a.buf
4. You can load, add more, and save again until the file is complete.
Next Step:
1. Utilities > Update > Cull
2. Use buffer file (Find Cull2011a.buf) and apply.
3. Check the number selected.
4. Print a shelf list of the items to be culled (Either to printer or save as a QRP e.g. Cull2011a.QRP, text file e.g. *.txt or comma separated file *.csv).
(Note: A QRP report can be kept on the system and loaded for an auditor whenever required.)
5. Cull the items in the buffer file, taking care to check again the number to be deleted.
6. Check your data before backing up again.
- – - – - – - – - – - – - – - – - – - – - – - – - – - – - – - – - – - – - – - – - – - – - – - -
Stocktake Related Instructions (General Stocktake Page)
- Step by Step guide to doing a stocktake
- Stocktaking Tips & Warnings
- Cleaning up Data for a Stocktake
- Using the Stocktake Checksheet (If you want to edit the details you can Download DOC)
- How to Start a New Stocktake
- Setting Stocktake Parameters
- Adding Barcodes to your Stocktake
- Stocktake Using a Memory Scanner
- Using Files to add your to Stocktake
- Exporting your Stocktake Data
- View your Stocktake
- Stocktake Reports
- Reconciling your Stocktake
- Marking Items as Missing
- Writing Resources off that have been Missing for a Long Time

{ 0 comments… add one now }