This is where you do all your backing up and any restoring of data that may be required.
Below is a quick outline of good backing up procedures, for more information on any of the backups or restore click the links below…
Backup Outline
Backing up your database is a must and you should NEVER rely on anyone else to do it for you!!!!!
If your IT experts say “Don’t worry about it… we’ve got you covered” then just say “Thanks!” and do your own backups anyway. Things go wrong with automatic backups… if your daily backup fails in any way… call us and we’ll find out why!
What do we recommend?
If I was running the system I would do 3 backups every day I changed the database.
- Utilities > Backup-Restore > External Backup – and I would make a new folder everyday for my data by clicking the Add Date button on the External Backup screen. This sends only valuable data to an external drive. We suggest USB memory sticks are a solid choice. The Date folders mean that we can trace problems back and repair things that were unnoticed for a long time.
- Utilities > Backup-Restore > Alternate Backup – copies data AND software to a hard drive NOT on the server (local hard drive of main computer used for lending and returning… this is a network “failsafe” that can be used if server or network is down for a long time… Obviously it needs to be up-to-date AND you’ll need to know how to get the new data back to the Server copy when it’s up and running!).
- Utilities > Backup-Restore > Backup – does a system tidy up and makes backups within the working folder.
General Principles for data security…
- Assume every time you turn off your computer that it will not work next time you try to use it!
- Your computer is absolutely sure to fail. It’s not an if… it’s a when!
- Several types of backup media should be used:
- Server Hard drive.
- Local Hard Drive.
- USB drives, CD-R, CD-RW, DVD.
- Get familiar with as many ways to backup your data as you can find… if you hear someone talking about a backup method you’ve never heard of… find out more! (Ring us if you like!)
- Some form of backup archive should be kept.
- It’s all very well to backup every day but if something goes wrong and you don’t notice for a month or two… do you have a long term backup policy in place that will allow us to rescue database details from months ago?
- Single use CD-Rs are the best option for making backup archives… turn off the Multi-session feature of your CD burner, make the CD, Date it and store it… at least once a year! (Once a term is probably a better suggestion but my guess is you won’t do it that often).
Tags: alternate backup restore, back up, backing up, backup-restore, external backup, main backup, restoring, backups
The Library/Resource Centre houses the largest single database in the school, and certainly the most costly to replace or repair.
Special care needs to be taken with archiving backups to cater for crises such as “global misadventures”, where an incorrect global change could go unnoticed for an entire backup cycle, destroying all unaltered instances of the database.
For this reason, we do not wish to supply the software to institutions where the library staff does not have access to USB Memory sticks or a CD/DVD Burner to make weekly archives for long term storage. If you lose data because of poor backup procedures… our software looks bad.
There are 3 backup options built in to LibCode: (In Utilities > Backup-Restore…)
- Backup.
- Alternate Backup.
- External Backup.
We highly recommend you do all three every day you change your database.
Notes:
- The library should not rely on normal server tape backup alone for its security. If an incorrect global change goes unnoticed for a week or corruption caused by a spike, then the correct data may not be able to be retrieved.
- Even if the server is the only backup in an emergency, the Backup and alternative backup should be conducted on a daily basis, as this performs re-indexing and other housekeeping tasks.
- If Re-writable CDs, Flash Drive or Zip disks are to be used, use them each day you make changes.
- Use a CD-R for long term archiving once a term. Carefully date and store each.
Tags: alternate backup, back up, backing up, backup policy, external backup, main backup, backups
DO NOT interrupt this Backup mid process!
(If you do, you will need to call us to fix it)
This option also performs necessary housekeeping tasks to ensure that your database is happy. The tasks include:
- Packing and Re-indexing the entire database.
- Updating used thesaurus records so search program can only show Subject Headings with resources attached.
- Cleaning up loans.
- Checking for orphan records – things that should be gone but are not.
- Adjusting copy number to match number of active barcodes.
- Backing up all data and index files.
- Makes a copy of important files into a BACKUP folder under the software working folder and an Archive and a Compressed copy.
When?
This should be done every time the database is used to ensure the security and integrity of your database.
A database tidy up cannot be done if other people are using your catalogue. If someone is using the databse when you try to backup, you will get an error message… if you cannot shut down the other users easily then go ahead and do a backup anyway… it’s still a backup, it’s just not a tidy up!
WARNING!!!
DO NOT simply copy the database to another form of backup media without performing a Utilities > Backup-Restore > Backup.
Instructions for Performing the Main Backup:
- Load the LibCode Suite (double-click on the icon) and go into Utilities.
- Type password if necessary and / or click OK.
- Click on Backup / Restore on bar menu.
- Click on Backup then Yes to Cleanup loans, pack, re-index etc… If no-one else is using the system the cleanup will take place.
- Assuming there are no problems a message will pop up to let you know the Backup is complete.
Shutdown Users option…
It seems one our best kept secrets, is that you can boot everyone out of LibCode when you need to by going into Utilities > File > Shutdown users…
This can take a few minutes because each part of LibCode checks to see if there is a “Hey, shutdown LibCode ASAP” message on the File Server every 3 minutes and then gives the person 3 minutes to shutdown. So, if you click Shutdown option it could take up to 6 minutes to get everyone off!
Tags: backing up, backup, do backup, how do i back up?, main backup, perform backup, backups
This option makes a copy of data AND software to another location (this can be used temporarily if Server / Network is down… you just need to remember to restore the data to the Server once it’s up again!).
- The Alternate Backup can be done while other people are using LibCode… anytime!
- The fail safe copy or CMESafe is a “mirror image” of the working folder and can be updated regularly throughout the day. Unlike the the Backup option, the alternate backup does not need exclusive use of the database (as it does not perform the housekeeping tasks).
- A standard setup would see P:\CMEPlus as the working folder (shared from a File Server) and D:\CMESafe on a partition of the local hard drive on the Main Circulation computer… if the whole network failed, this is the computer that you would like to see keep running until all is made well again.
- CMESafe normally exists on either the main library computer or the server, depending on the installation option chosen. If you’re using a peer to peer network within the library the CMEPlus folder (or main copy of LibCode Suite) will be installed on the circulation computer and the CMESafe (fail safe copy of LibCode Suite) is located on the C: of another computer (possibly the data entry machine).
- The locations stated above are the usual setups run by the majority of organisations, however they may vary from time to time depending on hardware and intended use.
If you are in anyway not confident about your backup setup, please call the LibCode Office to discuss your setup.
Instructions for Performing Alternative Backup of your Work:
In a normal system setup, the destination for an Alternate Backup is a CMESafe folder on the local hard drive of the main Circulation machine. These instructions assume you are doing the Alternate Backup while using the main Circulation computer.
- Load the LibCode Suite (double-click on the icon) and go into Utilities.
- Type password if necessary and / or click OK.
- Click Backup / Restore on bar menu.
- Click Alternate Backup then Yes to begin the backup.
- A folder selection screen appears and it should read C:\CMESafe or D:\CMESafe… if not you should change it. If you know your Alternate destination is not C:\CMESAFE D:\CMESafe… please enter those details.
- Assuming there are no problems a message will pop up to let you know the Alternate Backup is complete.
Tags: alternate backup, backing up, backups, do alternate backup, perform alternate backup
During this backup unreplaceable data is copied to a USB drive.
- DO NOT USE CD-R’s to perform this backup (Click here to read about CD-R backups).
- This backup is done to a removable or portable device OTHER THAN A CD-R.
- The External Backup can be done while other people are using LibCode… anytime!
- Should have at least 3 USB drives… rotate them! (ie. Use drive 1 today, drive 2 tomorrow, drive 3 the next day… back to Drive 1!).
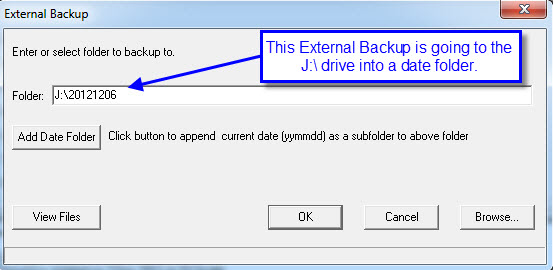
- Use the ‘Add Date’ option to create a folder with the date of the backup on it… makes it possible to rescue data from a long time ago!

Backing up All Files…
This option will backup all of the data files, some identification and setup information to removable backup media.
Instructions for Performing the External Backup of your Work:
We consider a portable (external) backup an absolutely necessary element of a reliable data safety routine. Flash, or USB Memory sticks/drives are the most reliable and easily used.
Steps…
- Plug the ”pen or thumb drive” into the USB Port of the computer.
- Open LibCode Suite > Utilities > Backup-Restore > External Backup > All.
- Browse and locate the Removable Disk.
- Once the directory path appears in the Folder area click the Add Date button. i.e. should say J:\LibraryBackup\20110825.
- Click OK.
- You will be told that this folder does not exist, would you like to create it? YES.
- Once the backup is complete you must click on the USB Drive icon on the bottom task bar
 and then click on STOP USB storage device. This will shut down the drive so it can be safely removed without damaging any files.
Some “experts” say don’t worry about telling Windows you are about to disconnect the USB drive…are they going to help you type your lost data back in if something goes wrong?
The MANUFACTURERS say “Please use Windows function to disconnect before removing the USB device” so please do that!
Tags: backing up, do backup, do external backup, flash drive backup, usb stick backup, perform external backup, thumb drive backup, backups
This facility is used when distribution CD’s are needed by users. The data compiled in this process does not contain any borrower information. It is merely a portable catalogue.
Setting up a Catalogue Distribution Disk…
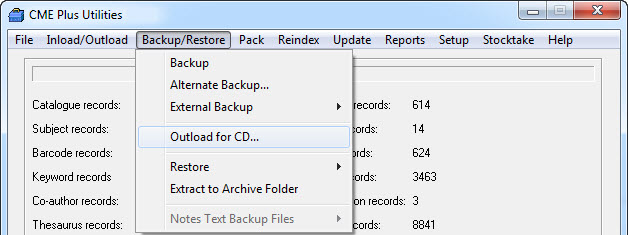
- LCSuite > Utilities > Backup/Restore > Outload for CD

- Yes …. to perform the operation.
- Use the Browse button to locate an existing folder you use for a file destination or just type in a path and the software will create the folder.
- Do NOT click the Add Date option.
- Exit the program and use Nero (or some other D burning software) to copy the contents of the created folder to the ROOT of the CDR (ie. files should not be in a folder on the CD).
- Test disk by inserting the first copy of the CD into another computer with autorun enabled. The enquiry module should start automatically (assuming the autorun function of your CD drive is turned on).
Tags: cd backup, cd outload, enquiry for cd, outload cd, outload for cd
Restoring data from a backup…
Restoring data can be done for a number of reasons to:
- Update LibCode Suite with newly converted data provided by LibCode Library Systems.
- Add to the catalogue database when using a non-networked computer for cataloguing.
- Restore data from previous backups after data corruption or other problem.
Restoring Data…
- To restore data from a backup folder you will need to make sure of the date the backup was done.
- Locate the backup you wish to restore from using Explorer.
- Check the modification dates on the .DBF files, this is the date the backup was done.
- If you can only see lots of icons, go to the top of the screen and click on View and select Details. This will list the file name, type and modification date.
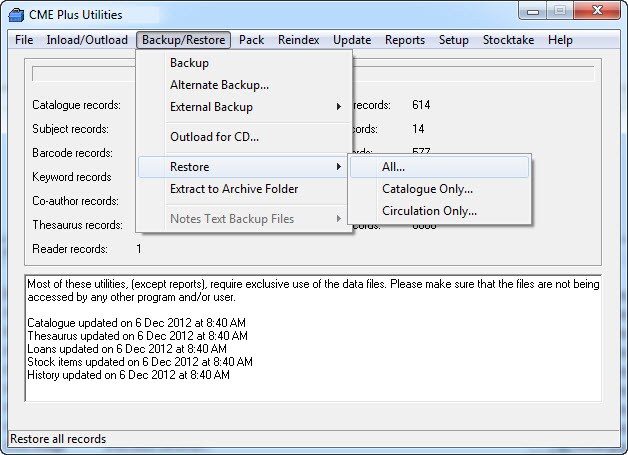
- When you’re confident that this is the data you want to restore, open up Utilities > Backup-Restore > Restore.
- You’re now given the opportunity to select the data you wish to restore, All, Catalogue Only or Circulation Only. In this example we have selected All.

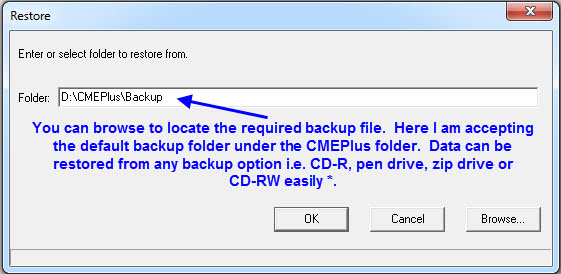
- The next screen allows you to select the location of the backup you would like to restore from.

* If the backup required is on a Server Tape backup it will be necessary to involve your IT Person in the restoration procedure. This is not an ideal situation as a lot of organisations only receive infrequent visits from IT Technicians, resulting in the inability to function until they arrive on-site.
Restoring All Data…
This will restore both the catalogue and the circulation data to the same point in time (the date of the backup).
Restoring Catalogue only…
This will restore only the catalogue data
- Normally this option is taken when the cataloguing of resources is done at another location not on the network.
- The data is backed up and a restore catalogue only is done to update the satellite catalogue data without changing the Circulation info on the machine.
Restoring Circulation only…
- If there is a problem with the Circulation database and the Catalogue is still fine it is possible to restore Circulation from a backup without touching the catalogue data from one machine to another using this option. It can be a little tricky, but once you have done it a couple of times you will find it useful.
Re-installing LibCode from a Backup CD-R with CMEPlus folder on it -
If you have had a system crash or need to move the LibCode Suite from one hard drive to another it is very easy to do.
If you have a CD-R you’ve burnt that contains either the:
- CMEPLUS folder and/or its contents,
OR
- CMESAFE folder and/or its contents.
You are seconds away from being back up and running.
Restoring from CD-R with CMEPlus folder on it:
- Place CD into drive and right-click on My Computer or the START button.
- Click Explore (may need a network admin to help you on this…).
- Click on the CD drive in the left list.
- Right click the CMEPlus folder in the right hand list and click Copy.
- Find the C: drive (Local Hard Drive) on the left hand list, Right click on it then click Paste.
- Once the copy operation is complete, you might need to change the file attributes on the folder and its contents… Right click on the new CMEPlus folder on the C:/ Drive and then click Properties.
- If there is a tick in the Read Only box, untick it and click Apply. If you get an option to apply the changes to All files and subfolders take that option…
(To check that Read Only attribute has been changed, double click the CMEPlus folder then click on one of the files, press Ctrl-A (to Select All), right click on one of the highlighted files and click Properties… the Read Only box should not be ticked.)
- All you need to do now is create your icons and you are off and racing!
If you don’t have a CMEPlus folder on the CD you’ll need to make a folder on the Local Hard Drive before you copy the files from the CD.
- Find the Local C:/ Drive and double click.
- Right click on the right hand side window and click New then Folder and call it CMEPlus.
- When you click on the CD Drive you’ll see a bunch of files and folders… just click on one of them then press Ctrl-A (Select all) then right click one of them and click copy… you then need to right click on the CMEPLus folder on the C:/ drive and Paste to copy the files.
- Change the Read Only attribute of the files as in Step 6 from the above list.
Any problems or questions… please call the LibCode Office (07) 4638 9025
Tags: restore
If you are using LibCode 7 Stage 3 then you will need to read this…
This procedure is set up to ensure that your backups are all completed in one session. These backups include External Backup, Alternate Backup and Main Backup. The All-in-One backup usually takes about five minutes to complete so you should run this at the end of each day in which you use LibCode.
To start the Backup:
1. Go to Utilities > Backup/Restore > All-in-One Backup
2. Confirm that you want to run the three backups, External, Alternate and Main by clicking Yes.
3. Ensure that you have a USB in the drive then click OK to do the External Backup (the current date/time folder will be created automatically).
4. Click OK to proceed.
5. The Alternate Backup screen shows the drive that the Alternate Backup is going to be saved to (this needs to be a Local/Hard Drive on the computer). If this is not correct you will need to Browse to fix.
6. Then click OK.
7. The Main Backup screen asks if you would like to skip a few processes (only tick this if you are really pressed for time, remember the whole procedure takes about five minutes!). Then click OK.
8. The next screen asks if you would like to do maintenance on the Data Files, click Yes. (No still does a backup but with no cleaning up of files.)
9. The last screen shows that Backup was completed successfully.
If this is not the case or if the Backup was interrupted, then please call LibCode Support on (07) 4638 9025.
Tags: backup, All-in-One, all, in, one


{ 0 comments… add one now }