Most schools will use this module on a daily basis.
The thing you should know about Circulation is that it is FULL of shortcuts. If you find it annoying to reach for the mouse all the time then you’ll want to start paying a little more attention to the pop-up messages that let you know the shortcut every time you point to something!
Functions of this module include:
Circulation can be password protected or a separate desktop icon can be created for restricted access by Teachers and Library Monitors see Utilities > Setup module.
Tags: Circulation
Go into LibCode Suite and load the Circulation module.
Click on the Lend… (or press Ctrl+L) button and the Select Borrower screen will appear…
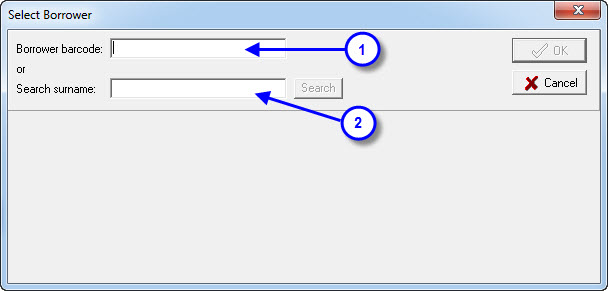
Find the borrower by using either.
- Their Barcode (Zap in the Borrower Barcode and the Borrower will appear) OR
- Their Surname (Type in a few letters and then select from a list).
Either way you will end up at the Lend screen…
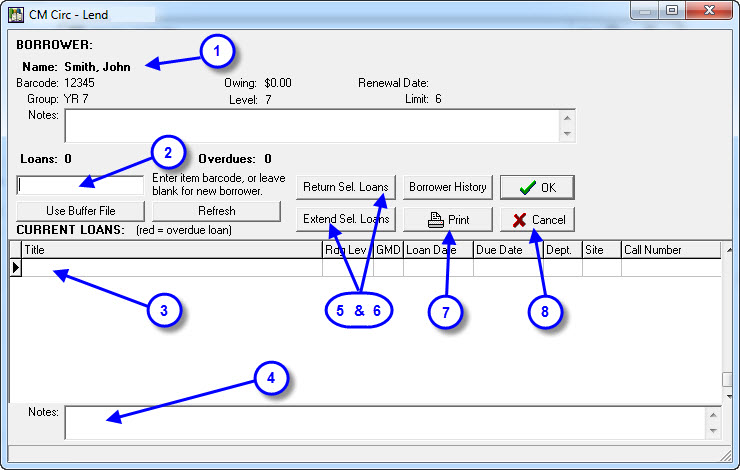
- Borrower: The information for the selected borrower is displayed. It is possible to enter a Borrower Note which appears each time the borrower presents… this is done via the Borrower button on main Circulation screen…
- Item Barcode: This is where the cursor automatically sits waiting for you to zap (or type) in a resource barcode…
- Current Loans: This is where the existing loans for the borrower are displayed… if you right click on a loan you get this little menu.
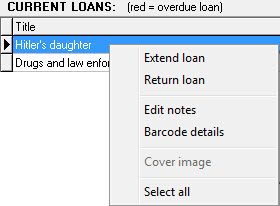
- Extend loan lets you enter a new return date for the loan you have highlighted.
- Return loan will actually return the loan (usually only used to return lost loans).
- Edit notes lets you type in a note for the item you have highlighted. When you return the loan you will be reminded of the details you type (this assumes you have Check Loan Notes option ticked in Utilities > Setup)
- Barcode details lets you jump to the actual barcode record of the item you have highlighted where you can change some of the details. E.g. Status to W for Written Off, Status Date, Marker, Barcode Notes can be changed via this option.
- Select all will simply highlight all displayed loans ready for a bulk extension, by clicking the Extend Sel Loans button or a bulk return with the Return Sel Loans button.
- Notes: This is an example note which can be manually attached to a loan by right clicking on the loan and selecting Edit Notes… Loan Notes pop up when the item is returned if you have the Check Loan Notes option turned on under Utilities > Setup.
- Returned Loans / Loan History: This button will pop up the Loan History for the currently selected borrower (this is the quickest way to see a borrower’s loan history!).
- Extend OR Return Sel Loans:
- Extend Sel Loans: If you highlight several loans in the Current Loans area you can use this button to grant an extension to all selected loans.
- Loans can be highlighted by holding down the Ctrl button and clicking on items or click on the first item hold down the Shift button and press the down (or up) arrow.
- Once you have something highlighted, click the Extend Sel Loans button to grant an extension…
- OR Return Sel Loans: Again, If you highlight several loans in the Current Loans area you can use this button to return all selected loans.
- Loans can be highlighted by holding down the Ctrl button and clicking on items or click on the first item hold down the Shift button and press the down (or up) arrow.
- Click the Extend Sel Loans button to grant an extension…
- Printing options: The Print button will produce a report of the current loans for the selected borrower, the Include Cost option can be turned on and off with a click. You also get options about what group of loans you would like to print… If you have highlighted several loans (by using Ctrl+Click or Shift+Down arrow) then you have options for what you would like to print out:
- All current loans.
- Today’s loans.
- Selected current loans.
- Cancel / OK: These buttons will exit the Lend screen… (any loans lent still saved) it does make a difference where you end up though.
If you just press <Enter> with the barcode field blank it’s the same as clicking OK.
If you press <Esc> on the Lend screen it’s the same as clicking Cancel.
Buffer File: Use this feature to loan resources out in bulk using a Buffer File. To create Buffer File see Utilities > Setup > Buffer File.
Error Messages in Circulation Module
From time to time error messages do pop up!
“Stream Read Error” when in lend screen- note that this school had images of their students in the borrower record.
This error relates to a problem with an image of a particular borrower.
To correct the error, simply enter a new image.
Use the Borrower Image button on the Borrower screen to access and delete the old image and import a new one.
Tags: extend, lend books, lend items, lend record, lend resources, return, lending resources
This is used to create a list of items IN a box that can be booked out by scanning one barcode…
(We suggest you return items individually!)
Making a bulk loan box
- Load LibCode > Utilities > Setup > Bulk Loan file…
- Barcode Buffer File Editor appears, scan in all the barcodes for the bulk loan set.
- Click Save As – MUST be saved in Data Folder (see the bottom left corner of the LibCode Main Menu to find out what this is).
- The file must start with BLK and end in .dat, so when save file screen appears, it must be saved in the LibCode working folder (Data Folder), should be BLK followed by the barcode that will be attached to the box and change the save as type to bulk loans file (eg BLKLSS12345.dat).
- Save.
To make another bulk loan file click new file and start scanning in barcodes for new bulk loan set.
To lend a bulk loan set
- Circulation > Lend > Call up borrower.
- Type in BLK and scan barcode.
Returning bulk loan set
Should be done by returning individual items to make sure all items have been returned (can return the bulk loan set complete, BLK scan barcode, but NOT a safe way to do it unless you know for CERTAIN that ALL items are in the box).
To remove/replace individual items from a bulk set
- Utilities > Setup > Buffer/Bulk Loan file.
- Open file (in this window ‘Change files of type’ to Bulk loan files), find and double click appropriate bulk loan file.
- To delete – Find item in list and right click.
- Click delete selected records option (item should turn red).
- To add in item – Scan barcode of new item into Add box.
- Close file.
- Save Changes.
Tags: lending in bulk, bulk loan boxes, bulk loans, resource boxes
Depending on your existing settings you may find that LibCode times out after a certain period of time and requires you to re-load. Is this happening to you? If so, don’t worry, it’s easily fixed!
- First of all, you need to know the location of the CMCirc.exe file. If you don’t know where the file is located simply go to the your LibCode Suite front menu and look for the details of your data folder (this is your CMCirc.file).
- Note that if you are in a State School your folder will most likely be located in your P: Drive.
- Once you know the location of the file, go to windows explorer, right click and browse the folders on your computer until you find the file.
- Once you have located the file, you need to create a direct shortcut to it.
- To do this all you need to do is right click on the name of the file and select the shortcut option- save the shortcut to your desktop to enable easy retrieval.
- Go to the shortcut and add a space followed by a /NT to the file name. This will stop a system timeout from occurring.
Tags: cirulcation timeout, time out, re-load LibCode, reload LibCode
Go into LibCode Suite and load the Circulation module
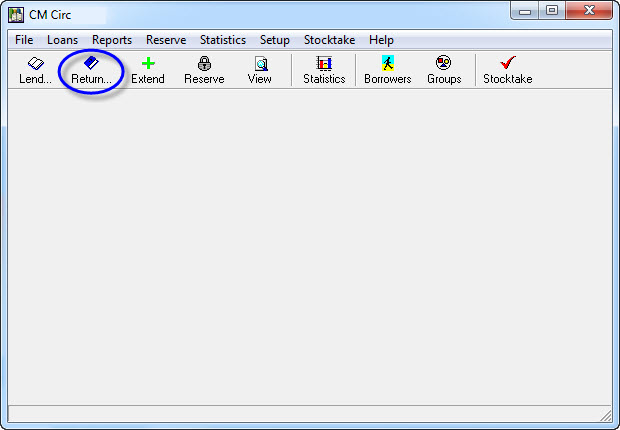
Click on the Return… button (or press Ctrl+R) and the Return screen will appear…
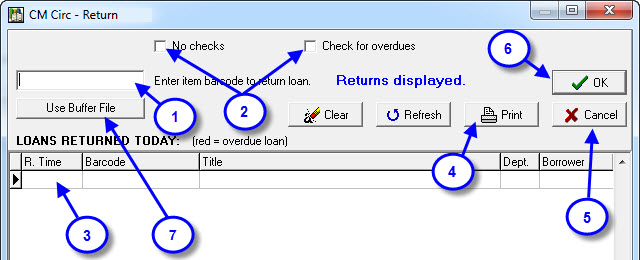
- Item Barcode: The cursor sits here automatically waiting for you to zap (or type) in the returned resource barcodes… There is no need to press <Enter> or do anything between returns, just keep zapping! (A warning screen appears if there is a problem you need to be aware of… make sure the sound on your computer is working if you want to hear warning sounds!!!)
- Check for Overdues & No Checks These options are pre-set in Utilities > Setup but can be turned on and off here as well. When ticked, the options make a message box pop up every time an overdue item is returned or if loan notes are found on a returned loan.
- Most schools will want to have Check for Overdues turned off…
- and Check Loan Notes turned on…
- (These option defaults are set in Utilities > Setup).
- Loans Returned Today: This area displays all the resources returned today. This list starts as blank on each new calendar day and is added to with each return… Items in red indicate an overdue loan was returned.
- Print: This allows you to print a list of returned items at any time.
- Cancel: This button will close the Returns screen at any time.
- OK: This option will also close the Returns screen at any time.
- Use Buffer File: Use this feature to return items in Bulk from a Buffer File. To create Buffer File see Utilities > Setup > Buffer File.
(If a returned resource had a loan note, it will be displayed on return and at the bottom of the return screen. Barcode notes on resources are displayed during the returns process also)
Tags: returned loans, returning loans, scanning in
The instructions below can step you through the lending and returning Variable Loan Bags. To setup your Variable Loan Bag click here.
Lending using a Variable Loan Bag:
- Load Circulation.
- Select ‘Lend’ across the top.
- Choose the borrower to whom you want to lend the variable loan bag.
- Either zap in the barcode or type in our barcode VLB001 and click ‘Enter’.
- This will pop up the ‘Loan Notes Editor’, enter what has been loaned in this Variable Loan Bag in this notes editor.
- Separate the items using or comma or by clicking enter.
- Click ‘OK’ and ‘Enter’ and it will lend that resource out with the details of what has been loaned displaying in the title of the resource.
Returning using Variable Loan Bags:
- Load Circulation.
- Select “returns’ across the top.
- Type or zap in the barcode.
- The program will now display what has been loaned in that Variable Loan Bag.
- If only one item has been returned delete it from the Loan Notes and cancel the return. It will then leave the Variable Loan Bag containing only one item on loan until the other item has been returned.
- When the final item has been returned, simply zap or type in the barcode in returns and click ‘Return Loan’ on the pop up.
Tags: lend variable loan bags, lending and returning non cataloged items, lending loan bags, lending variable laon bags, lending variable loan bags, return loan bags, return variable loan bags
There are several ways to extend an existing loan.
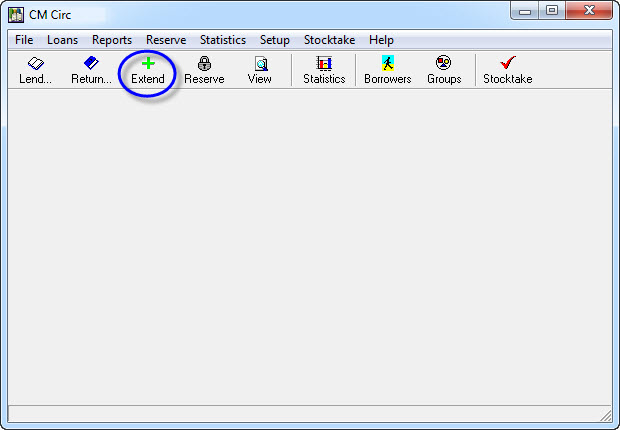
The most obvious is the Extend button on the Circulation screen (but you need to resource!):
- Click the Extend (Ctrl + X) button in the Circulation module.
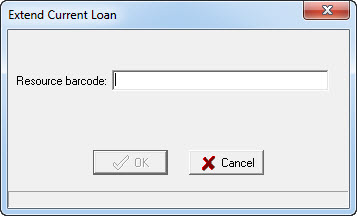
- Zap or type the Resource Barcode into the Extend Current Loans screen (you will need to press <Enter> or click OK if you type it in).
- The Extend Loan screen will appear with the Due Date automatically extended to the same date that it would be if you had lent it out today to the borrower.
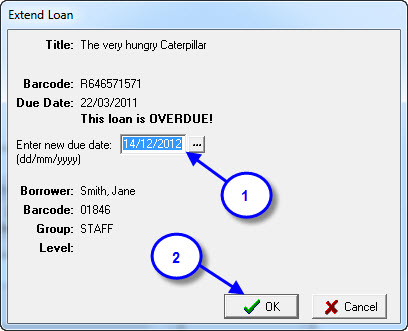
- You could further extend the loan by typing in a new Due Date manually or clicking on the ‘…’ button to select a date from a calendar. (Don’t forget you can click on the month in the popup calendar to select the month you want from a list!)
- The Extension is granted as soon as you press <Enter> or click OK!
See Also:
Bulk Extensions, Staff Extensions, Extending via View options, Extending via Lend screen.
Tags: extend item, extend loan, extend resource, extending loans
Reports relating to the circulation of resources are done here, including Loan History (Returned Loans).
Reports include:
- Current Loans… print out a list of current loans using the filter options to narrow down and sort the required information.
- Overdue Loans… list of overdue resources for groups or individual borrowers without values.
- Returned Loans (History of loans)… print historical reports for groups or individual borrowers.
- Unreturned Loans… as a normal report or you can generate pro-forma letters for printing on your organisations letter head to fold and post to borrowers (with or without values).
- See Statistics to create lists of resources borrowed by a particular group or borrower during period of time.
Once a report grid has been displayed, you can re-sort the data using any of the column headers.
- Click on the column heading to re-sort.
- You will notice that the column heading is now in bold to identify the order of the data.
This data is currently sorted by GROUP.

It is also possible to highlight multiple lines by using CTRL+Click or Shift+Down Arrow.
- After highlighting several loan records you just click the Show Sel. Only button to reduce the displayed list to show only the selected items… (strange but true!)
Tags: reports, create reports, create a report, print a report, how to make a report, generate a report, generating reports,
There are two types of reservations…
- Reservation – A simple queue for who should get the resource next.
- Advance Booking – Used to book a resource for a particular day in the future.
Reserving a Resource
- To Reserve a resource go into Circulation and click the Reserve button then select Add Reservation from the drop down list of options…

- Select the Borrower wanting to Reserve the resource by zapping in their barcode or by typing the first part of their surname and choosing from the list…

- Now select the Title you would like to Reserve by Title or Barcode…

- If there are available copies (ie. Copies not currently on loan) this screen will appear…
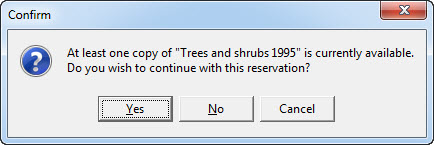
At this point you could tell the borrower that there seems to be at least one copy of the resource available for loan (maybe check the returns trolley) and you would click No to continue. You can continue with the Reservation if you like by clicking Yes.
- The Reservation Details screen appears…
(The details of the numbered items pointed out are listed below)
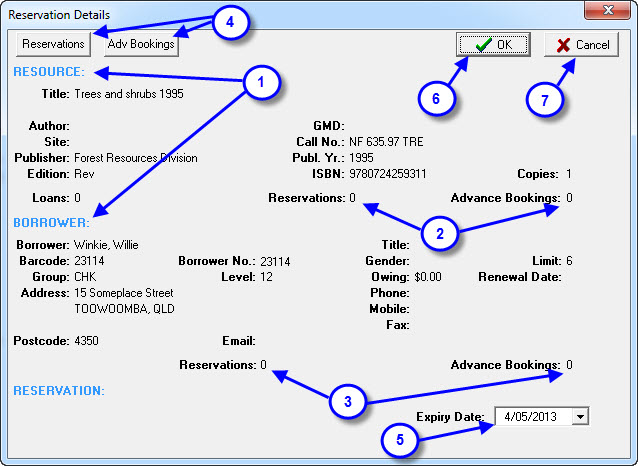
- The RESOURCE and BORROWER details are displayed.
- The number of existing Reservations and Advance Bookings for the Resource are displayed.
- This gives you an indication of how many people are already queued for this resource.
- If there are lots you should perhaps buy an extra copy of the item!
- The number of Reservations and Advance Bookings for the currently selected borrower are displayed.
- These two buttons will display the current queue of Reservations and Advance Bookings for the selected Resource only.
- The Expiry Date of the Reservation can be set here. If this Reservation is not used (ie. Borrower gets the resource) before this date is reached the Reservation will automatically expire on the displayed date. When you click the dropdown arrow a calendar will appear… you can use the arrows on the calendar to change months or click on the Month name itself to pick the month from a list (You can set a default number of days for Reservation Expiry in Utilities > Setup > Reservation Expiry).
- When you are happy with the settings of this Reservation click the OK button to save the Reservation.
- The Cancel button can be pressed at any time to Exit the Reservation screen without saving the new reservation
Tags: reservations, reserve an item, reserving
The view option is used for tracking information regarding either a borrower or a resource. It can also be used to view the history of either the resource or borrower.
Loan History for a specific Borrower…
There are several ways to get to a one click view loan history function for a specific Borrower.
- Click the View button in the Circulation module and select Borrower.

- Call up the borrower you would like to check either by Barcode or Surname.
- Click the Returned Loans or Borrower History button to instantly see the loan history.
The screen below is what you will see regardless of the way you choose to get there and although the displayed list is automatically in Title order, you can re-sort the list simply by clicking on the appropriate column header.
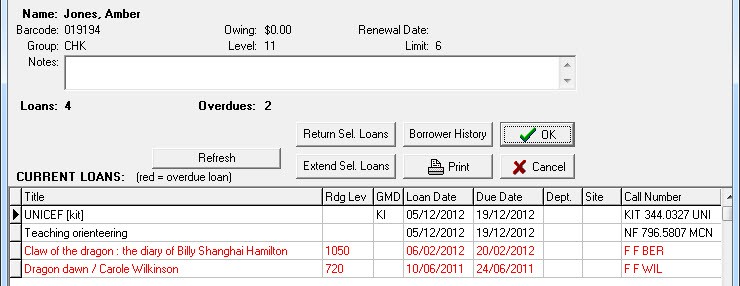
Note: Items in red are over-due.
Loan History for a Specific Resource…
To get to the one click view loan history for a specific resource you need to:
- Go into the Circulation module, click the View button and select Title.

- Locate the resource you would like to check on using the Title (then pick from a list) or zap in the Barcode of the resource to jump straight to it.

- Make sure the barcode of the resource you want to check is highlighted and click the Item History button to display the item’s history
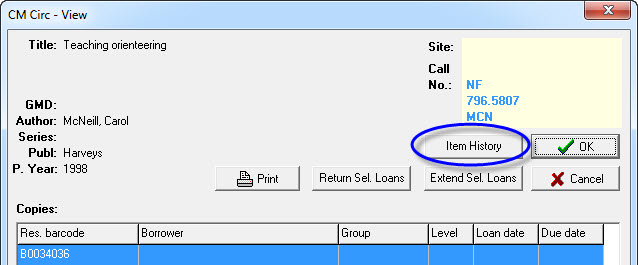
- The history of the selected item is displayed and is automatically in Loan Date order. You can re-sort the displayed list simply by clicking on the appropriate column header.

Tags: view resources, view borrower


{ 0 comments… add one now }