This area is used to bulk change details that appear on Cat Detail tab of the Data Entry module.
What can be changed using a catalogue bulk update?
- Authors, Series and Publisher.
- Department, Site and Location.
- Classification Number, Main Entry and GMD.
- Loan Periods.
- Links.
Basic Steps of A Bulk Update
- Load Utilities, perform the first backup.
- While still in Utilities, select ‘Update > Catalogue > Update’.
- Click through the backup warning if you have completed a backup otherwise exit and do the first backup.
- This step depends on what records your want to select, so before continuing write down what makes the records you want to update unique or different from the rest of the database. This might be Location, Site, Series, Publisher etc.
- Once you know what these characteristics are you can filter the database by choosing the field in the selection criteria drop down and putting in a low-high range or just putting the location etc in ‘Contains’ e.g. JF.
- Once you have set your selection criteria click ‘Apply’. Don’t worry all this does is filter your database by your selection criteria and display just those resources in the bottom section of the screen. Check these are the records you want to change and they have been selected for your bulk update.
- The next step is to choose your ‘Replacement Field’ in the drop down – this is the field on the resources that you want to change in bulk.
- Once you have chosen the field type or select what you would like to replace that field with in the ‘Replace with’ box.
- When you are happy you have the right records selected and have the right replacement data click ‘Replace’.
- You will now be prompted to to click ‘Yes’ if you wish to proceed.
- And that is it! All done the data has been replaced in the selected records.
Specific Updates
For specific update instructions click the below links:
Tags: catalogue (Bulk Data Changes), changing loan periods, deleting scis records, deleting unused scis records, global update, global update of gmd, fglobal update of loan period, global update of location, removing scis records, updating author, updating department, updating gmd information in bulk, updating loan periods in bulk, updating locations in bulk, updating publisher, updating series, updating sites
These instructions can be used to step through how to do a bulk update of your catalogue through the ‘Update/Catalogue’ feature in Utilities. This feature can be used to change any field in the Catalogue Details screen.
BE CAREFUL!!! You are actually editing data in bulk!
An example of bulk changing Catalogue record details would be:
- NF has been placed in the Location field for all Non-fiction resources.
- After careful consideration it is decided that the Location field should be empty on all Non-fiction resources because the spine labels on the books do not have NF on them.
Steps for bulk edit of Location… (ALWAYS backup before doing ANY bulk Update)
- Load LibCode Suite and go into Utilities then go into Update.
- Select Catalogue from dropdown menu and select Update.
- If backup HAS been done click Yes to pass backup warning message.
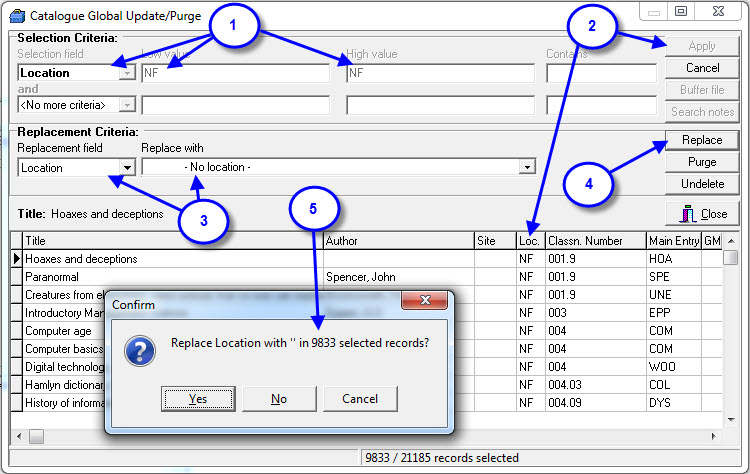
See screen dump of below what the Catalogue Update screen should look like for this example.
- Set Selection Criteria Field (Location) / Low Value is NF / High Value is NF (Could be any value in Location field).
- Click Apply and check that ALL the records displayed in the data display table are actually the records you want to change…
(This is a REALLY important step that allows you to scroll through the records that will be edited!)
- If you are confident that you do want to change all the records displayed, then set the Replacement Field as Location and choose Replacement Value as – No Location.
- Click Replace button.
- Check the number of records about to be changed and if you are happy to make the change click Yes to do the job… (otherwise click No or Cancel to try setting criteria again)
(These steps would remove the NF from the Location field for all items where the Location field contains NF even if there are thousands of records to be changed.)
* Remember to go into Utilities > Setup > Authority Files > Location and remove the NF Location entry so it doesn’t get used again!
Tags: updating catalogue in bulk, bulk update of location, global update of location, update location, updating location
This is an unusual operation because you are actually changing Barcode record information using Catalogue record search criteria… this function was added because it’s often necessary to do this!
An example of bulk changing Loan Period details using Catalogue record details as selection criteria would be:
- F has been placed in the Location field for all Fiction resources.
- After careful consideration it is decided that the Loan Period for fiction books should be 14 days instead of 7.
Steps for bulk edit of Loan Period for a certain Location…
(ALWAYS backup before doing ANY bulk Update)
- Load LibCode Suite and go into Utilities then go into Update.
- Select Catalogue from dropdown menu and select Update.
- If backup HAS been done click Yes to pass backup warning message.
- Set Selection Criteria Field (Location) / Low Value is F / High Value is F.
- Click Apply and check that ALL the records displayed in the data display table are actually the records you want to change…
- If you are confident that you do want to change all the records displayed then set the Replacement Field as Loan Period (BC) and set Replacement Value as 14.
- Click Replace.
- Check the number of records about to be changed and if you are happy to make the change click Yes to do the job… (otherwise click No or Cancel to try setting criteria again)
These steps would change all the Fiction resource loan periods to 14 days (even if there are thousands of records to be changed).
Tags: bulk update of loan period, change loan period, global update of loan period, loan period update, update loan period, updating loan periods in bulk (via catalogue)
An example of bulk changing Catalogue record details would be:
- EQ has been placed in the GMD field for all Electrical Equipment resources.
- After careful consideration it is decided that the GMD field should be EQE (Equipment – Electrical) so they can be brought into line with the Equipment – Mechanical that have a GMD of EQM.
- So, the GMD of EQE – Equipment, Electrical has been added to the GMD table via Utilities > Setup > GMD… and you are ready to bulk change the records…
Steps for bulk edit of GMD info… (ALWAYS backup before doing ANY Bulk Update)
- Load LibCode Suite and go into Utilities then go into Update.
- Select Catalogue from dropdown menu and select Update.
- If backup HAS been done click Yes to pass backup warning message.
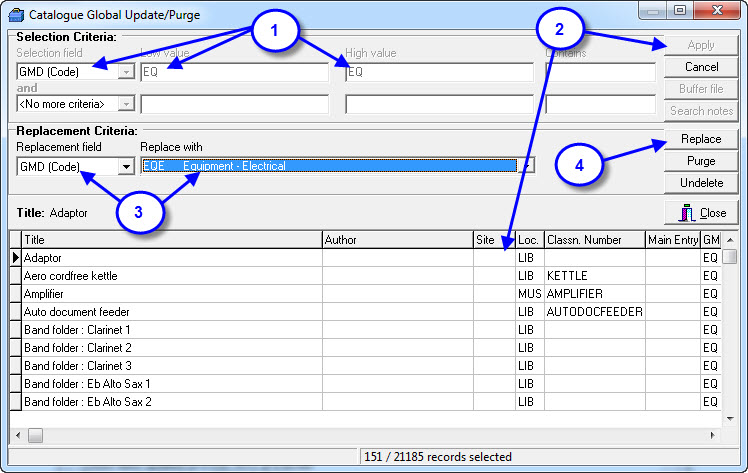
- Set Selection Criteria Field (GMD) / Low Value is EQ / High Value is EQ.
- Click Apply and check that ALL the records displayed in the data display table are actually the records you want to change…
- If you are confident that you do want to change all the records displayed then set the Replacement Field as GMD and choose Replacement Value as EQE Equipment – Electrical.
- Click Replace.
- Check the number of records about to be changed and if you are happy to make the change click Yes to do the job… (otherwise click No or Cancel to try setting criteria again)
These steps would change the GMD on all EQ records to EQE (even if there are thousands of records to be changed).
Tags: bulk update of gmd, change gmd, global change, global update, update gmd information in bulk
Use the steps below to delete unused SCIS records only after you have edited all those that need to be.
- Go into SCIS/ Edit in Data Entry and check the number of records present, write this number down.
- Load Utilities and do a Backup (just the first option).
- Once the Backup is complete, click the Update Menu, select Catalogue and Update.
- When prompted about having done a backup, press the relevant Function key e.g. F10.
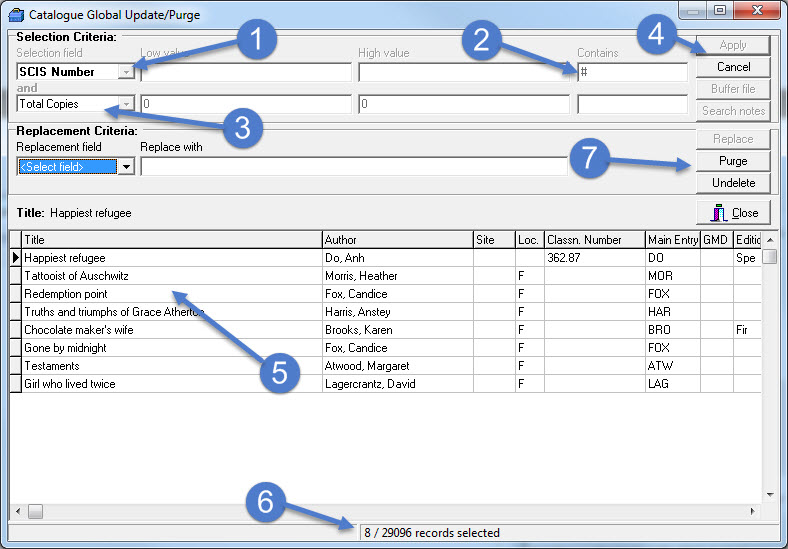
- Under Selection Criteria select ‘SCIS Number’.
- Put a # in the ‘Contains’ Field
- In the ‘And no more criteria’ box use the dropdown to select Total Copies, 0 in Low Value and 0 in High Value
- Click ‘Apply’.
- This will now filter the database and display all the resources that have a # still in their SCIS Number field with Total Copies of 0.
- Check the total filtered records across the bottom of the page, matches with the number you wrote down, if it does we are ready to proceed if not, something has gone wrong.
- Click ‘Purge’ on the right hand side and ‘Yes’.
- This will now have purged all of your records containing a # in the ‘SCIS Number’ field.
Tags: deleting scis records, delete unused scis records, deleting unused scis records, unused scis records
From time to time it is a good idea to use the various options under the Update > Catalogue > Links area. This will update, check and re-align host entries with the relevant Linked records.
Changes may have been made to the host entry and the Link information may have been overlooked. An example of this would be the relocation of a host entry to a new location or the host entry may have been missing in the last stocktake and no changes to the status of the linked record had been made.
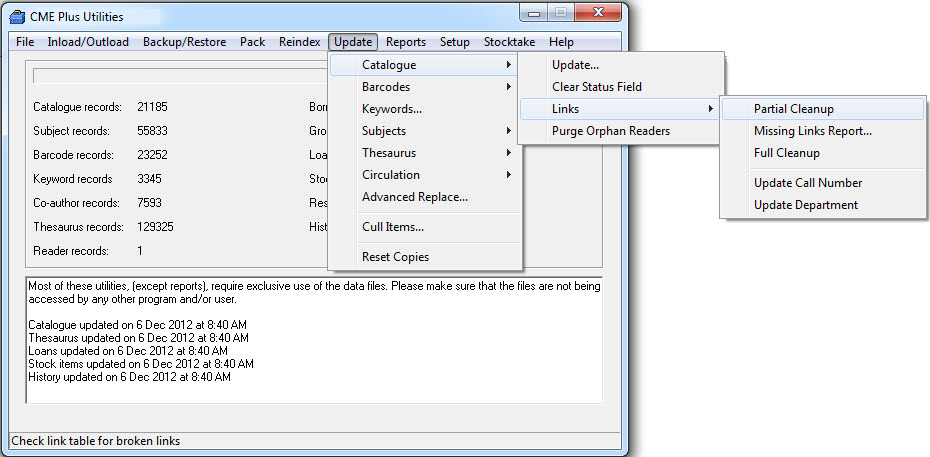
Partial Cleanup:
Will check the link table for broken links but will not update linked records.
Missing Links Report:
This report will list the catalogue records which contain ‘LINK’ in the SCIS No. field, and for which no corresponding host record can be found because the entry in the link table is missing.
Full Cleanup:
This will permanently remove linked records from the catalogue if no host is found.
Update Call Number:
During this process the site, location, Dewey number and main entry fields of linked records will be updated to match those of the host records
Tags: clean links, cleanup links, clean up links, update links, updating links in database
These instructions will step you through completing a catalogue update using a buffer file. Please click the below links for instructions on how to create buffer files.
Steps:
- Load Utilities, perform the first backup.
- Select ‘Update – Catalogue – Update’.
- Click through the backup warning if you have completed a backup otherwise exit and do the first backup.
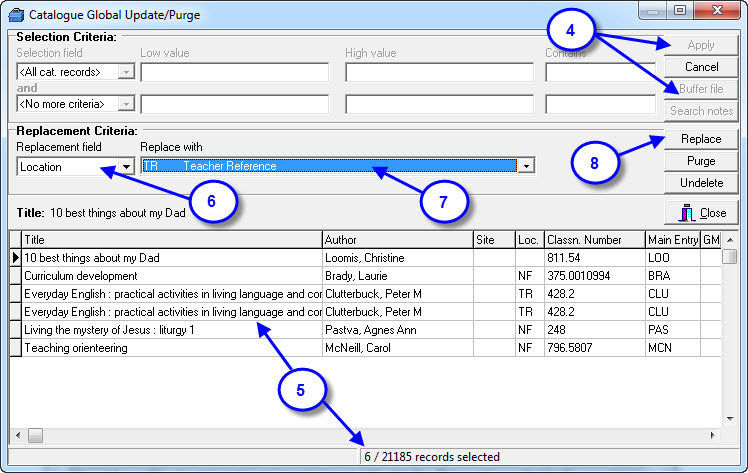
- Simply click ‘Buffer File’ on the right hand side select your Buffer File, once it is highlighted click ‘Apply’.
- Don’t worry all this does is filter your database by your buffer file and display just those resources in the bottom section of the screen. Check these are the records you want to change and they have been selected for your bulk update.
- The next step is to choose your ‘Replacement Field’ in the drop down box - this is the field on the resources that you want to change in bulk.
- Once you have chosen the field type or select what you would like to replace that field with in the ‘Replace with’ box.
- Once you are happy you have the right records selected and have the right replacement data click ‘Replace’.
- You will now be prompted to to click ‘Yes’ if you wish to proceed.
- And that is it! All done the data has been replaced in the selected records.
Tags: catalogue update by buffer file, edit with buffer file, change with buffer file


{ 0 comments… add one now }