08.07 Reports (Utilities)

Within the Utilities module of the LibCode Suite you can view, print and save many different forms of reports.

There are all sorts of other reports available in LibCode via Circulation Reports, Data Entry Reports…

*** Don’t forget the Enquiry Module Reports and Data Entry Catalogue tab that has a Report Generator tucked in behind the display grid… you format the report by changing the data grid layout!

The Utilities module can provide the following reports:

A few examples of other really useful reports include:

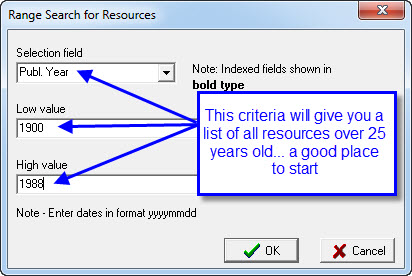
  • Potential Cull Items List by Publication Date – Enquiry > Title and other searches > Range > Set the criteria to include a certain range of Publication Dates (Publ. Year is the field to select) as demonstrated below…

Arrow

  • Data Entry.

 Tags: reports, spine labels

{ 0 comments… add one now }

Leave a Comment

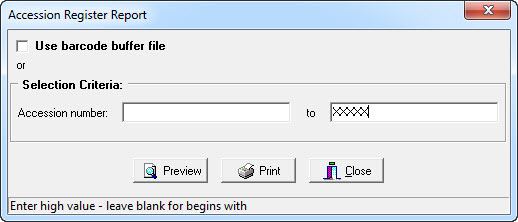
Accession Register Report allows you to print a list of resources within a specific range of accession numbers.

Arrow

Once the accession number parameters have been set the report generated will list the following details -

  • Accession Number.
  • Barcode.
  • Title.
  • Place of Publication.
  • GMD.
  • Call Number & Site.
  • Status.
  • Acquisition Date (and if applicable the Status Date).
  • Supplier / Invoice / Order Number.
  • Cost.

You can also use a Barcode Buffer file to refine your search criteria.

Tags: accession register

{ 0 comments… add one now }

Leave a Comment

There is no report specifically written for this purpose but you can do this if required by repeating the following steps:

  • Go to Circulation and then into Borrowers.
  • As you view that list you can tell by looking at the borrowers who has loans and who does not.
  • (Bold = HAS loans…)
  • Click the Group column header to list all children together according to their groups.
  • Hold down the CTRL button and click each NOT Bold student… once you have them all highlighted click the Show Sel. Only button up the top of the data grid…
  • The list produced will be of the students who do not currently have an item on loan!

Tags: report showing students who do not have items on loan, students without loans, student loans, student loan, no loans

{ 0 comments… add one now }

Leave a Comment

Barcode listings can be used to print a list of specific resources contained in a particular area.

The advantage of a Barcode Listing in Shelf List order over a Shelf List is that you get each individual copy of a resource listed.

This allows the positive identification of each barcoded copy of a resource, not just the presence of the main catalogue details.

Some useful examples of Barcode Listings:

Trying to explain Selection Criteria:

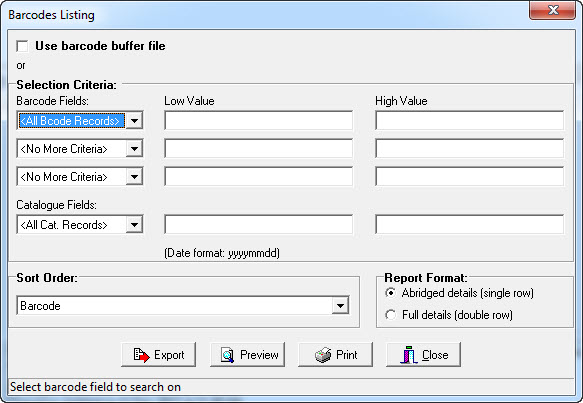
Barcode Listings are created using Low and High data values… think of it as a Data Range search.

“Low Value” = lowest possible value… eg. 1 is Less Than 2, A is Less Than Z…

“High Value” = highest possible value… eg. ZZZZZ is the Highest possible value for a 5 character field…

Setting the Low Value and High Value as the same thing… eg. Status – Low Value M and High Value M means the field MUST be equal to M.

As you can see below you can use up to 3 Barcode Fields and one Catalogue field to select the list of resources to display…
Arrow

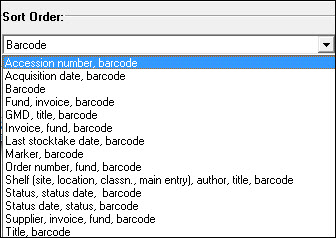
Setting the Sort Order:

Once the Selection Criteria has been set you can select the Sort Order of the report by selecting from the list you get when you click on the Sort Order dropdown box below the selection criteria section of the screen. You must set the Sort Order before you click Apply or you need to start the process again.
Arrow

Changing the Report Format:

The Report Format can also be selected to produce an Abridged (single row) or a Full Details (double row) listing.

* Always preview your reports (this will save a lot of paper).

Some useful examples of Barcode Listings:


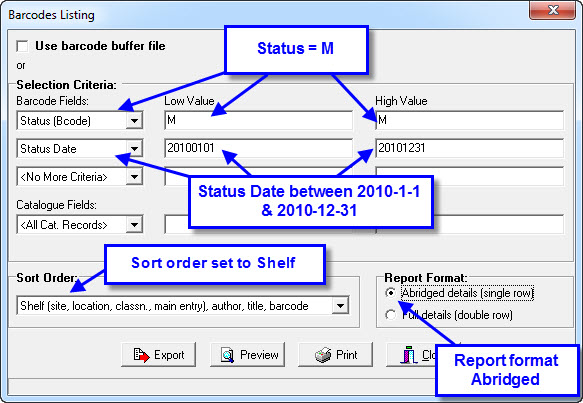
Missing Items List

Make a list of specific copies of a resource that were marked missing (had an M put in the Status field of the Barcode) between the 1st of January 2010 and 31st December 2010.

Note:

The Sort Order is Shelf List for this example… Title and Accession Number order would be more useful for record keeping!
Arrow


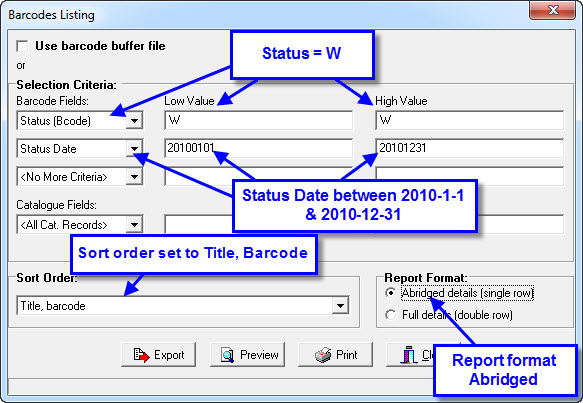
Written Off Items List

Make a list of specific copies of a resource that were marked as Written Off (had a W put in the Status field of the Barcode) between the 1st of January 2010 and 31st December 2010.

Note:

The Sort Order is Title List for this example… Title and Accession Number order are great for record keeping!
Arrow


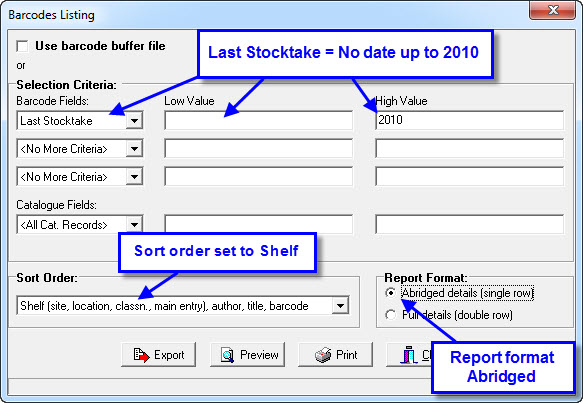
Last Stocktaken Date List

Make a Shelf list of resources that have not been stocktaken since before 2010. Paging through this list on the screen will give you an idea of what sections of your collection need to be stocktaken. Obviously, you can go back year by year to find out the urgent attention sections… eg 2005 or before 8 years ago!

Note:

The Sort Order is Shelf List for this example… This will make it easy to identify the sections that need some TLC!
Arrow


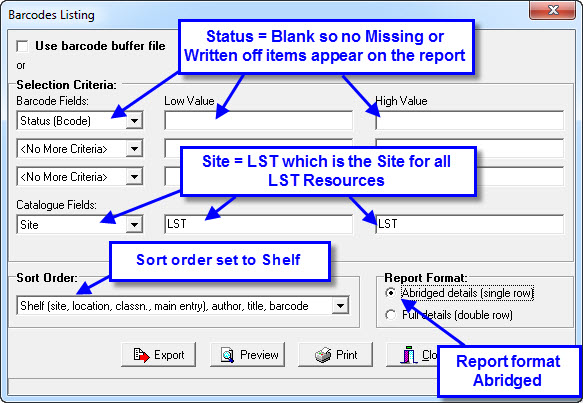
Barcode List for Stocktaking resources in Learning Support site

Make a Shelf list of individual resources in a specific Site (LST in this example) so that the list can be used to tick off resources as they are located. Each item that is NOT found needs an M for Missing put into the Status field of the barcode and should also have a Status Date added.

Note:

It is much quicker if a portable barcode scanner or a normal scanner plugged into a laptop can be used to gather the LST resource barcodes.

You could scan the barcodes into a NotePad document and use the File Append function to inload them into a normal stocktake.
Arrow

Tags: barcodes listing
{ 0 comments… add one now }

Leave a Comment

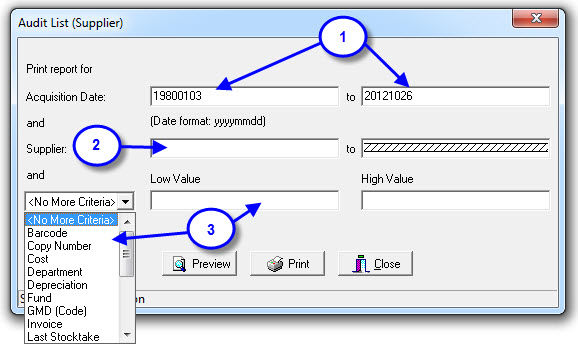
Audit Lists (Supplier) will generate a report detailing resources purchased from various suppliers during a set period of time.

This report will group and display the following information:

  • Supplier Details including:
    • Invoice Number.
    • Sub-totals and totals for both invoices and supplier.
    • Total cost of all Acquisitions.
    • Average price of each resource.
  • Resource Details including:
    • Accession Number.
    • Barcode.
    • Title.
    • GMD.
    • Author.
    • Acquisition Date.
    • Fund.
    • Cost.

Arrow

  1. The dates that default in are currently the lowest and the highest possible values.  These can be changed to look at a specific period of time.
  2. You can select a particular supplier.  If your data is a little inconsistent you might be better off checking your current supplier list in XXXX?
  3. The search can be further refined by using additional filter options from this list, again setting low and high values.

Tags: audit list supplier

{ 0 comments… add one now }

Leave a Comment

Audit Lists by Fund allow you to print a list of resources purchased with specific funds.

This report lists:

  • The Fund.
  • Invoice Numbers.
  • Accession Number.
  • Barcode.
  • Title.
  • GMD.
  • Acquisition Date.
  • Supplier.
  • Cost.
  • Sub total and Total.
  • Average price per book.

Arrow

Example…

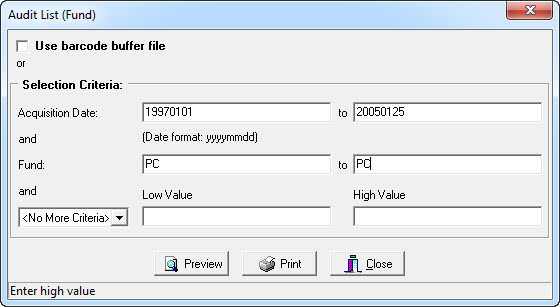
The P & C Association has been generously allocating $5,000 for the past three years to the Library for the purchase of resources and you would like to approach the P & C for further funds for the upcoming year.  In order to demonstrate how the monies have been spent previously you could print a list of resources for inclusion in your submission and tabling into the minutes of the meeting.

  • In the Acquisition date the Low Value would be 20030101 and the High Value 20050607 (this is from when they started donating money to today’s date)
  • The Fund is PC to PC (where PC = P & C)
  • There is no need to select and further criteria
  • Click on the preview button

Tags: audit list fund

{ 0 comments… add one now }

Leave a Comment

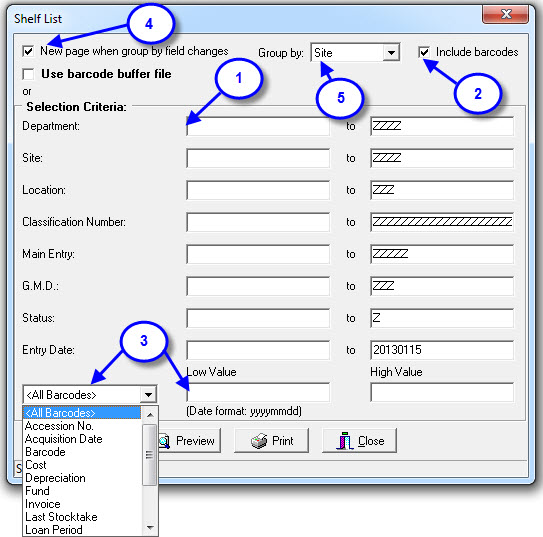
The Shelf List Report allows you to print a shelf list of resources for manual checking.

  1. When you first open this report you will notice that on the left hand side of the screen the fields are blank – this is the lowest possible value.  On the right hand side the fields are full of Z’s – this is the highest possible value.  If you clicked on the preview button at the bottom without changing any of the fields you would generate a report with every item in your library listed.  It is only when you start changing fields that the report result is narrowed.
    • ‘blank’ to ZZZZZ = everything.
    • ‘blank’ to ‘blank’ = this field MUST be blank.
  2. The Include Barcodes option can be unticked if you do not require the barcode number on the report.  This is not so common so it defaults to being selected.
  3. Further Selection Criteria can be added to narrow down the search even further.
  4. You can select to start a new page when group by field changes.
  5. Data can be grouped by: Site, Location, GMD or Series.

Arrow

Tags: shelf list, shelf lists

{ 0 comments… add one now }

Leave a Comment

This report is a great way to check out your collection for stocktaking, collection analysis and data consistency.

  1. Load Utilities.
  2. Select ‘Reports / Collection Statistics’.
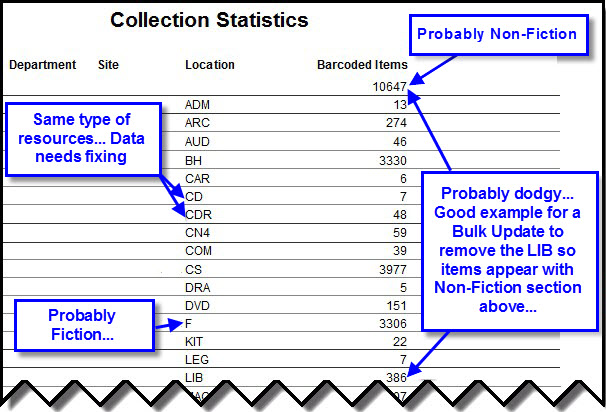
  3. The report will now load displaying all sections broken down by Department / Site / Location… and number of barcoded items in each section.

Here is an example report with some issues that need some attention:

Arrow

  • Notice the 7 CD resources? They should be CDR and that’s a good example of when you just jump into Data Entry, Click on the Location column header to sort the data in Location order and type CD in the Find box to jump to the first record that needs fixing…
    • Shift-F12 (Next in List function) is your friend when it comes to jumping back to the next record after where the item was BEFORE you changed it! (Check it out you will use it a LOT as you clean up data!)
  • Notice the 386 LIB location records? They should not have LIB in the Location field in this collection… after checking these items in Data Entry using the Filter – Location – Equal to – LIB function to look at the items I see that they are actually Non-Fiction items with Classification numbers and just have an extra LIB added to the Location field.
    • This is a prime example for a Bulk Update to change all items with a Location – Lib to Lib… Replace the Location with – No Location and all is well. See Catalogue Update instructions for a more detailed description of the bulk update process… Be Careful!

Tags: collection statistics

{ 0 comments… add one now }

Leave a Comment

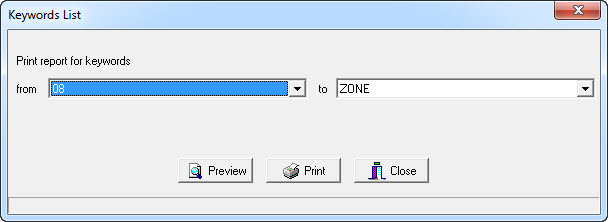
From time to time it is a good idea to check the Used Keywords List for data consistency.

Arrow

Tags: used keywords list

{ 0 comments… add one now }

Leave a Comment

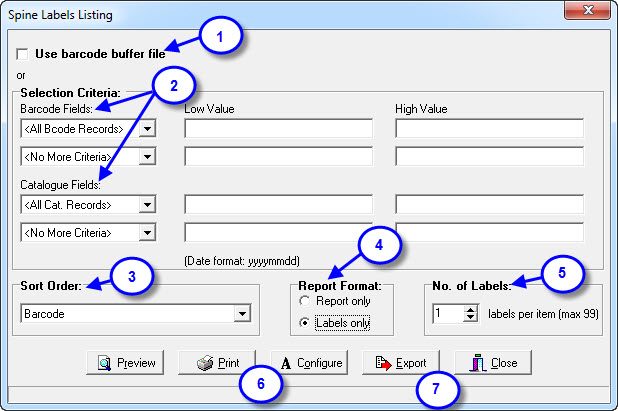
Printing Spine Labels:

  1. If you have created a Buffer File to print your spine labels refer to the instructions below.
  2. Use the selection criteria to define the resources you wish to print labels for.  In most cases you would use either the Acquisition Date from the 1st Catalogue field drop down or an Accession Number range from the 1st Barcode field drop down.  Set your parameters accordingly.
  3. Choice the most appropriate sort order for the labels, eg title order.
  4. Choose either Report only (generates a one line listing of resources and includes; Barcode, GMD, Title, Site, Call Number, Author, Accession Number and Acquisition Date) or Labels only.
  5. If you have selected to print Labels only, you can choose to print the required amount of labels for each book.  Two labels per book, one on the spine and another either on the front or back cover (makes sorting and shelving so much easier).
  6. If you would like to customise your spine labels click on the Configure button and make the relevant changes.  (Although your selection will default in the next time you print labels, you might like to make a note of your preferences for future reference.)
  7. If you wish to use alternative spine labels you can export an AVY.DBF file for use with your Avery label program.
  8. Always preview your labels or report to save time and money.
  9. Choose the label you wish to start printing from.

Arrow


Arrow

Spine Label Printing using a Buffer File:

  1. If you have created a Buffer File simply tick the Use barcode buffer file.
  2. The Selection Criteria fields will disappear.
  3. Sort order will default to ‘No sort’.
  4. Choose either Report only (generates a one line listing of resources and includes; Barcode, GMD, Title, Site, Call Number, Author, Accession Number and Acquisition Date) or Labels only.
  5. If you have selected to print Labels only you can choose to print the required number of labels for each book.  Two labels per book, one on the spine and another either on the front or back cover makes sorting and shelving so much easier.
  6. If you would like to customise your spine labels click on the Configure button and make the relevant changes.  (Although your selection will default in the next time you print labels, you might like to make a note of your preferences for future reference.)
  7. If you wish to use alternative spine labels you can export an AVY.DBF file for use with your Avery label program.
  8. Always preview your labels or report to save time and money.
  9. Select the .buf file you have created and click open.
  10. Choose the label you wish to start printing from.

Tags: spine labels

{ 0 comments… add one now }

Leave a Comment

08.07.10 Borrower Barcodes…

October 19, 2012

Borrower Barcodes can now be printed either by Group or by Level.  This facility is very handy if your school is only small as it eliminates the need to purchase specific Borrower Barcodes.  The lists that are generated can be kept in a display folder on the circulation desk for easy reference, particularly when classes [...]

Read the full article →