08.08 Setup…

Basic description of Terms used in Customizing Software…

These tables need to be created prior to any data entry.  By entering this information into tables the chance of inconsistent data entry is minimised.

General Material Designation or Description pop-up table (GMD field)

Used to describe the type of a resource.

Only used for non-book resources.

Country

Contains a list of the possible country of publication so you can use this during data entry.

Department

Contains a list of the possible Departments that resources can be stored in so you can use this during data entry.

Site

Contains a list of the possible Sites that resources can be stored in so you can use this during data entry.

Location

Contains a list of the possible Locations that might be used during data entry

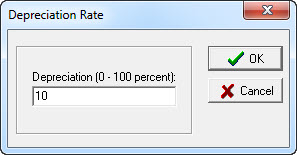
Depreciation Rate

Sets the percentage of depreciation for calculating current value of resources.

Loan Period Default

Used to set the loan period, which is entered automatically on new resources.

Can easily be changed on the Data Entry screen regardless of default.

Staff Extension

Used to automatically extend Staff loans.

Number of days entered here are added to normal resource loan period.

Reservation Expiry

Used to set a default number of days that Reservations will expire after (reservations are automatically deleted after a certain date…) see the Expiry date on the Reservations screen when you are actually reserving a resource for a borrower.

Loan Cut-off Dates

Ensures loans are not allowed to be due back past a certain date.

Can be used in conjunction with Staff Extension to eliminate Staff overdues.

Check for Overdues

When a loan is taken out by a borrower with overdues or an overdue is returned, a warning box is displayed or not displayed because of this setting.

Check Loan Notes

When a resource is returned any loan notes will automatically be displayed.

Most centres will want this option turned on.

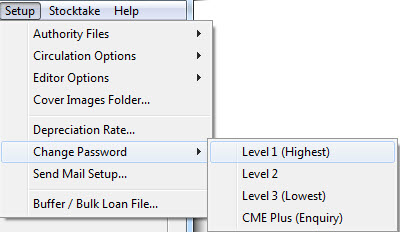
Change Password

This is where you set three levels of system password (default is none).

Password is case sensitive.

Buffer File

Used to create a list of resource barcodes for future use eg bulk updating, culling, stocktaking.

Tags: setup, set up, set-up

{ 0 comments… add one now }

Leave a Comment

The below settings are located under the Authority Files menu.

General Material Designation or Description pop-up table (GMD field)

  • Used to describe the type of a resource.
  • Only used for non-book resources.
  • Feel free to add entries to this list as necessary.
  • Generally the Enquiry (OPAC) does not display resources that have no valid Copies (ie. No barcodes that are not Written off, Missing or On Order).

If you create a new GMD and you know there will be no barcodes on the items and you still want them to appear in the catalogue… make sure you include an asterisk (*) in the Code details (eg. CV*) because this overrides the hide function.

Country

  • Default list of countries a resource was published in.  Not required information but can be useful to demonstrate bias in point of view on a controversial topic!

Site

  • Makes it possible to restrict / explain the sites of satelite collections around the school.
  • Add up to four letters as a Site code and type in a description so everyone knows what the codes stand for!

Location

  • Makes it possible to restrict / explain the Locations within your collection.
  • Each Site may have several Locations with them (sort of refined Site info for split collections).
  • Add up to three letters for a Location code and type in a description so everyone knows what the codes stand for!

Department

  • Makes it possible to setup different Circulation Systems for each department in your school.
  • Add up to three letters for a Department code and type in a description so everyone knows what the codes stand for!
  • A Department is one step higher than a Site: Department -> Site -> Location.

Reading Level & Scheme

  • These two separate Authority files control the Reading Levels and Schemes that you can add to your resources in the Reader Module in Data Entry.
  • Add up to three letters for a Reading Level/ Scheme code and type in a description so everyone knows what the codes stand for!

{ 0 comments… add one now }

Leave a Comment

Yes. Windows 7 on Server 2003 is compatible with Libcode.

If your MOE3 involves a change from Windows Server 2003 to Server 2008, you must get a person with appropriate rights to alter the registry on any computer used for data entry of circulation.


The address of the necessary document, links and instructions are at the following address:

http://data.libcode.com.au/download/smbdoc.doc


You may also like to download this one page note for techs:

http://data.libcode.com.au/download/lc_moe.doc


{ 0 comments… add one now }

Leave a Comment

Any circulation related settings are located under this menu option.

The Circulation settings which can be changed from here are located below:

{ 0 comments… add one now }

Leave a Comment

The Depreciation Rate is an annual percentage of initial purchase cost.  Once set it is used to calculate current value of resources for reports if you opt to include the Depreciated Value.  This function is usually used for Departmental resources when it is necessary to budget for resource replacement

Steps for adjusting the Depreciation Rate…

LibCode Suite > Utilities > Setup > Depreciation Rate… >  type in the percentage number and click OK to save changes.

Arrow

{ 0 comments… add one now }

Leave a Comment

There are three levels of passwords that allow varying degrees of access to software modules and functions.  Passwords should be set if there is any chance that unauthorised users can access Library Staff shortcuts (LibCode Menu, Data Entry, Utilities etc.).

Arrow

Level 1 (LibCode Suite Administrator)

  • Provides access to all software functions.
  • Highest level and will allow you access all modules once you have entered the password once. Used to keep non library staff out of special functions of the  database.

Level 2 (Library Staff)

  • Provides access to Data Entry, Circulation and most Utilities functions.
  • This level will allow access to all of the functions required for the day to day running of the LibCode Suite.  At this level you are restricted to only those functions in Utilities necessary for daily tasks eg. Backups and Reports all other functions are protected and the LCSuite menu requires a password to be loaded.

Level 3 (Circulation Only)

  • Setting a level 3 will only allow the user to access the Lending and Returning functions (and the enquiry module for looking up resources).

Note: If you wanted to set a level 3 password you must set levels 1 to 2, similarly you can only set a level 2 password after you have set a level 1. Where a level 3 is required but a level 2 is not necessary you can set the level 1 and level 2 password as the same word to avoid confusion. Make your passwords easy to remember AND easy to type!  Passwords can be very annoying if they are poorly chosen!  Remember that passwords are case sensitive…

{ 0 comments… add one now }

Leave a Comment

A Buffer file is simply a list of barcodes that can be used to make changes to data. This is handy when the collection of resources have nothing in common.

Some examples of use:

  • Culling – you could scan or type in the barcodes of a bunch of items you want to cull, then tell LibCode to use the list to remove the items from the catalogue.
  • Bulk updates – if you wanted to change the location of a group of resources to another site or location, you would use the buffer file to change the details on a select group of resources.
  • Stocktaking -  this will allow you to collect resource barcodes from a number of locations and import the collected information using the File Append option of Circulation > Stocktake > File Append…  Remember to change the file type to all files to find your file!

Example: Setting up a Buffer File for Culling

  1. Go to Utilities > Setup > Buffer file.
  2. Scan in the barcodes and save the file as something relevant eg Cull040715.buf (the numbers are today’s date backwards) in a place you will remember. When you save the file the program will automatically open the CMEPlus folder for you. It would be a good idea to create a new folder within the CMEPlus folder called BUFFERS. By putting all of your buffer files inside the CMEPlus folder they are automatically backed up when you do your normal backups.
  3. You can add to this file as you need to, just the same way as you open and close any document.
  4. When you’re ready to cull the resources DO YOUR BACKUPS!!!
  5. Once the backups are done go into Utilities > Update > Cull items. Click on the Browse button at the end of the Buffer file field and locate the buffer file you need from the drop down list. Highlight it and click on OK.
  6. Once the file name appears in the Buffer file name field, click on apply.
  7. Now check the number of filtered records at the bottom of the screen to make sure you have the correct amount.
  8. Print off a list of the resources by clicking on the print button (and look at them first in the preview).
  9. Only when you are happy with the list, click on the CULL button and follow the prompts.
  10. When the items have been culled, you need to go into Utilities > Update > Reset copies. This will check the number of barcoded copies of each resource against the number of copies in the front catalogue screen for each resource and adjust the total if necessary.

{ 0 comments… add one now }

Leave a Comment

Setup Email Settings

You will need to find out these details from your Technician before you start:

  • SMTP Host.
  • Email Address.

Steps:

  1. Load Utilities
  2. Select Setup > Send Mail Setup.
  3. Enter your host e.g. mail.ilisys.com.au & then enter your email address in the �From� box.
  4. Click OK.

And that’s it, now you can email all your overdues.

{ 0 comments… add one now }

Leave a Comment

Using the below steps you can change the Circulation Warning Sound to a more distinctive sound if you would like.

  1. Load LibCode Suite > Utilities.
  2. Select Setup > Circulation Options.
  3. Choose Circ. Warning Sound and simply choose what you think will be the most distinctive warning sound for use in Circulation.

This sound will be heard when any error or pop up occurs in Circulation, such as a loan you are returning being found to not be on loan at all.

{ 0 comments… add one now }

Leave a Comment

Setting Up / Changing the location of the Images folder used by Circulation:

  1. Load Utilities.
  2. Select Setup > Circulation Options.
  3. Choose Bor. Images Folder and type in the location of your borrower images.

For instructions on how to add borrower images to your borrowers click here.

Note: If the borrower photos are already stored on the file server and accessible via network from the Circulation computer then the Images folder could just be setup as the path to the existing photo folder. For example P:STUDENTPHOTOS. If the filenames of the photos are the same as the Student Enrolment numbers (which should be the same as the Borrower Barcode in LibCode Circulation) then the photos will appear automatically each time a borrower is called up.


{ 0 comments… add one now }

Leave a Comment