LibCode 6.7.9.0


Arrow

A Library is an amazing place!

Your Library contains some kind of representation of, or reference to, every idea any human in the history of cognitive process has ever bothered to think about long enough to write something down (in theory)… and if that doesn’t give you goose bumps… please don’t let the kids know!?

The fact that someone, somewhere thinks it is important enough that students and teachers have access to all of this information…. that alone should let you know that the library is an immensely important place! That person is the reason that each and every school has a collection of resources that cost at least $75,000 (and that’s an estimated value for only 3000 resources) to buy… let alone cover, catalogue, store and provide access to! Easily the most expensive thing in a school except the actual buildings! (Most schools have upwards of $250,000 invested in books alone!)

The idea of a “Library” (the old idea) no longer fits the bill to describe what students and teachers can access. The general consensus right now is that this amazing “hub” of information access needed a new name… it’s now a “Resource Centre”… and fair enough! Our software takes this into account by providing access to all sorts of resources – and that list will continue to grow.

Books, E-Books, Websites, Documents, Pictures, Book reviews, Audio Visual resources, Learning Objects, WebQuests… if you have it… we catalogue it in LibCode. What about local sporting clubs and museums? Local experts in obscure fields of research… the list is as long as there are types of resources.

So what can you do to help give students and teachers a good understanding of how to find their way around your Resource Centre?

“We’re just a small school, we don’t have time…”

  • Time for what…?
  • Time to provide access to the most expensive resource in your school?
  • Time to pass a young human the tools to discover their own world?

We at Libcode think it’s important that we spend every working day developing tools to help young people and teachers find information – but we can’t use them for you!

Our software development depends on what we see happening in schools… your feedback and suggestions are essential!

LibCode is more than just a circulation system and a stock manager for resources…
The purpose of this software is:

  • To match researchers to resources regardless of whether they are physical or electronically stored
  • To help teach research skills by clearly defining what is being searched for
  • Empowering the independent learner to discover new ideas
  • To centralise resource access… not just for books
    • Electronically stored documents
    • Files
    • Pictures
    • Music/sound files
    • Internet sites
    • Learning objects
    • Anything else I’ve not mentioned that you can think of…

LibCode Suite in General…

General

  • The name “CME…” stands for “Concept Map Explorer…” which is its intended purpose. If you’re not sure what a Concept Map is then it is certainly worth looking into… students and teachers will benefit!
  • Fully networkable…several users can be doing several things at the same time
  • Functionality split up into Modules and each module has its own EXE so access is easily restricted (3 levels of passwords can also be set via Utilities)
  • Can create distributable CDs for a self-starting Enquiry module
  • Network fail-safe option allows library staff to continue work while network/server is down
  • Optional local installation (with copy on server) to cater for unstable networks

Security

  • Good security, with Enquiry module users requiring “Read Only” access to files
  • Standard, Alternate and External backup options built-in

If Backup Policies are followed:

  • Local backup can be activated within minutes of a medium-long term network failure
  • CD-Backup can be used on any computer as a self-starting Enquiry catalogue

Standards

  • Interface with SCIS bibliographic services on Web or CD
  • Interface for interaction with the SCIS Authority files on CD
  • Imports/Exports data in USMARC format
  • Table Exports in various delimited formats
  • Compatible with Win 9x, Win 2000, XP, Server 2003 (although Windows 95 Workstations should not be used with Server 2003… they don’t get along very well!)

Licencing

  • LibCode Suite is provided with a 12 months user licence. Please refer to the Licence Agreement

Tags: libcode, most expensive resource in school, school library, small school, why use libcode, your library, resource centre, CME web, CME, Concept Map Explorer, License, License Agreement, Licence, Licence Agreement, library

{ 0 comments… add one now }

Leave a Comment

Following is the information you will need to know to get started with LibCode Suite…

 Tags: installation, installing LibCode suite, set up options, customise LibCode, getting started, starting LibCode

{ 0 comments… add one now }

Leave a Comment

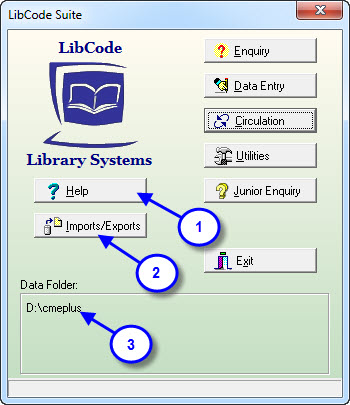
This is the ‘gateway’ to the LibCode Suite.

The LibCode Suite Menu:

  • Runs from LCSuite.exe and provides access to all modules by clicking on the required button.
  • Allows for passwords to be setup via Utilities > Setup > Change Password to restrict access to various modules and functions.
  • If you have the CME Web Module you will need use the Exports module for the outload of data to the CME Web catalogue.
  • Most importantly displays the location of the current working folder at the bottom of the screen in the ‘Data Folder’ location.  You should be aware of where your system is running from and always check this information when opening your LibCode Suite… Be aware of where your system is actually stored!
  • Ensures that once a module is opened it can be minimised for quick recall.  There is no need to close unused modules until the end of the day.  (The only exception to this general rule is where poor power supply is an issue.  Modules should then be closed after use avoiding issues with indexes and data corruption)

Arrow

1. Help options

  • ReadMe – Not used.
  • Tutorials – Links to on screen Tutorials if installed.
  • Manuals – Links to on screen Manual if installed.
  • Register – Used to re-register LibCode Suite each year.
  • Re-index – Special Re-index function for emergency use only.
  • Free Space – Lets you know how much hard drive space you have spare!

2. Exports module for the outload of data to CME Web catalogue

3. The Data Folder area displays the location of the current working data folder

Tags: Data folder, LCS Menu, HOD Report, Head of Department, Textbook Check, Numbers check, Textbook numbers

{ 0 comments… add one now }

Leave a Comment

The Enquiry module should be the main reason your school has a library system…

We believe research skills are important… very important. So important we’ve given our OPAC a strange name.  CMEPlus… Concept Map Explorer and more (Plus!)…

It’s an ideas explorer.  Teachers can use it just to generate ideas lists to help with class discussions, I could waffle on for pages about the potential  but that all presents itself if researchers get a good introduction and a helping hand from time to time (I’m looking around for a soap box but there’s none about).

Each and every time a student (or teacher for that matter) walks into your Resource Centre, you have an opportunity to help them develop better research skills:-

  • How many Teachers grew up with access to computers?
  • How can Teachers help Students if they don’t know themselves?
  • How can you help anyone if you don’t understand what’s available to you?
  • How many different research tools can you show them?
  • Is it possible that each time someone leaves the Resource Centre, they have a little more to think about than when they walked in?
  • Can your Resource Centre help growing minds develop a better understanding of the world they live in?

A Research Tool!

Where you’re able to search for resources and ideas…

The research tool we have created is not just a “here’s what you are looking for…” tool

It has been designed:-

  • To make sure people are thinking about what they are doing.
  • To teach people how to search by thinking about what they know and how to find resources and other ideas.
  • Not to be like an internet search where you punch in a topic then troll through thousands of entries, maybe or maybe not finding what you need… the Enquiry module asks you to think and gives researchers the opportunity to explore ideas.
  • Developing research skills is what a school resource access system should be about.

The screen that does a little more than you’d guess…

The Subject Search screen is the interesting one.  All the other search screens are simply alphabetical searches… type in some details, check out a list of resources.

The Subject search has so much more to offer if you take the time to look around.

Please, please, please take the time to experiment with this screen… work through some examples and have a look at what you can offer people who use this research tool.  We’ve built the tool, you need to show young people how to use it!

Spend a bit of time getting to know this part of the Libcode Suite.  As mentioned earlier… this is the “front end”.  This is the reason why so much time and effort has been put into typing in thousands and thousands of records…

If you are actually looking for resources and not just using CMEPlus as an ideas explorer or a brainstorming tool you’ll probably end up with a list of resources on the screen… in this case you’ll want to know more about Using the Results Screen (Resource Lists)

Tags: concept, Dewey, Enquiry, related, sorting, subdivisions, toolbars, used,  valid

{ 0 comments… add one now }

Leave a Comment

This module is not only for Adding a new resource… it is also for:

The main aim when entering data is CONSISTENCY.  Please take advantage of the tools the software provides to help you be consistent!

A few things to remember during the data entry process:-

  •  There are a number of shortcut keys that can be used while entering data.  Keep your eyes peeled for pop-up hints and help messages that mention shortcut keys.  We mention the functions throughout this manual and in the Tutorials but they are usually mentioned in the actual software! Point to a button or field and read the bottom of the screen.
  • Be consistent (use the drop down validation lists to help where possible).
  • Enter the first part of the title and press <F8> to check if the item you are entering is already in the system (if the whole title has already been typed use the mouse to highlight part of the Title before pressing F8).
  • Type in the first few letters of a subject into the Dewey field and press <F8> to find an approximate Dewey number and use Related Topics and Approx Dewey sort to check.
  • Enter a Dewey in the Dewey field and press <F7> to check for existing resources at selected Dewey (used to be F8 and… I’m still not sure why we changed it!).
  • When using <F8> Subject/Dewey from the Dewey field to catalogue resources, use Related Topics and Dewey sort to help discover a broader range of interesting / unusual SCIS subjects for your catalogue.
  • Use the <F4> duplicate function to speed up data entry.
    • This can be “primed” using an existing record by highlighting a record on the Catalogue tab and Clicking Record / Copy Fields (Ctrl+M), OR
    • If the entire record is to be duplicated use Copy Record (Ctrl+O). This means you do not need to re-type data from previous record.  Once you have initiated the Copy Record option the record now appearing on the screen is the duplicate.  This option is most useful when there are multiple copies of a resource to be located in different areas.
  • A researcher should be able to locate a resource without assistance from staff (this relies on data entry techniques and relevant information posted near access terminals and over shelves/sections of the collection).

Make SURE you backup after each day that data is entered into the database.

Locating Resources for Editing:

Once data has been entered it will appear listed in alphabetical order each time this module is loaded.  See Editing Resource Data for more details about the lookup functions of the Data Entry module.

Don’t forget the Grid Options and Report Generator which are available to help you check and organise data.

Tags: clear, dataentry, editing, filter, filtered, locating, report generator, resource data entry, scis, toolbars and shortcut keys

{ 0 comments… add one now }

Leave a Comment

InloadOutload

  • Add Filter details e.g. Location F for Fiction
  • Choose where the file is to be saved
  • Split the file
  • Outload ISBNs with no cover image

OutloadISBNS

NB: In Step 2. DO NOT save the files into the CMEPlus or LibCode folder e.g. save the files to another destination e.g. ISBN folder on the Desktop

  • Click OK then Commence Outload of Records

records

Files should look like this…

  • Log into SCIS and on the Download page scroll down to Import records from .csv or .txt files

scan

  • Click on Choose a file to find the first file (this will end with a 001), then open

csv

  • Click Create Request
  • Click Download Images (this should save the file to Downloads)

request

  • Go to Utilities & Settings > Extract SCIS Cover Images

extract

  • Locate the downloaded images file e.g. Downloads

dloads

  • See above, you will need to change the Files of Type: at the bottom of the page, use the drop down arrow to select Zip Archive Files (*.zip)
  • Once opened the Confirm screen will show, click Yes to extract the Cover Images
  • Another Confirm screen will show asking to delete the SCIS image zip file, click Yes to this
  • The cover images in the first ISBN file used are now in the database, repeat with the remaining files.

It is a good idea to delete the ISBN files as they are used so as not to cause any confusion or repeat inloading.

{ 0 comments… add one now }

Leave a Comment

To find the relevant classification number (LibCode uses the Dewey Decimal Classification System) LibCode offers a handy tool!

  1. From the item record located in Data Entry, type a topic relating to the item into the “classification number field” and click on the  < … >  at the end of the field.
  2. Choose the bottom option i.e. <Show subjects with their Classification numbers>.
  3. LibCode will suggest a Dewey Decimal Number for you!
  4. If you think it is an appropriate number, simply choose it!
  5. If not, repeat the steps listed above but use a different subject.
  6. Don’t forget to add the subject you chose to your item record by clicking the Subject tab.

HINT!  If you’re still having trouble, try searching the catalogues of other libraries for the same item!  If you find another library with the same item, you’re in luck!  Check the number they’ve used to classify the item and if it fits in with your collection, use it!

Tags: finding a classification number, DDC, Dewey decimal classification system, call number, location number, cataloguing

{ 0 comments… add one now }

Leave a Comment

Most schools will use this module on a daily basis.

The thing you should know about Circulation is that it is FULL of shortcuts.  If you find it annoying to reach for the mouse all the time then you’ll want to start paying a little more attention to the pop-up messages that let you know the shortcut every time you point to something!

Functions of this module include:

Circulation can be password protected or a separate desktop icon can be created for restricted access by Teachers and Library Monitors see Utilities > Setup module.

Tags: Circulation

{ 0 comments… add one now }

Leave a Comment

The Utilities module is the heart of the LibCode Suite program and it is here that you protect and maintain your database.  The resource database would be one of the largest databases in your organisation costing thousands of dollars to replace.  For this reason you as the Librarian / Resource Manager need to become familiar with the functions within the Utilities module.

These include:

 Tags: utilities

{ 0 comments… add one now }

Leave a Comment

The Junior HYG (Enquiry Module) gives younger students or those with learning difficulties the ability to locate their own resources.  With a simplified screen layout and basic search strings students can locate resources by selecting the method that they would like to use:

  • about.
  • where the title contains.
  • by the author.
  • in the series.
  • with the keyword.

All searches are done on a ‘begins with’ basis and will generate a list of resources accordingly.

Example:

Searching for a resource by Author:

  1. Select ‘by the author’ from the search filter option
  2. Enter the authors surname , or at least the first 3 characters and then click on the Go button.
  3. When the list of resources are displayed they can be re-arranged by clicking on the column headers eg. if you wanted the list in Title order click on the title column header.
  4. To view the available copies of the resources click on the Copies In button (this will only be relevant if the Junior HYG is running from a server copy of CMEPlus).

Searching for a resource by subject:

  1. From the search filter select ‘about’.
  2. Type in the subject (or at least the first 3 characters) of interest and click on the GO button.
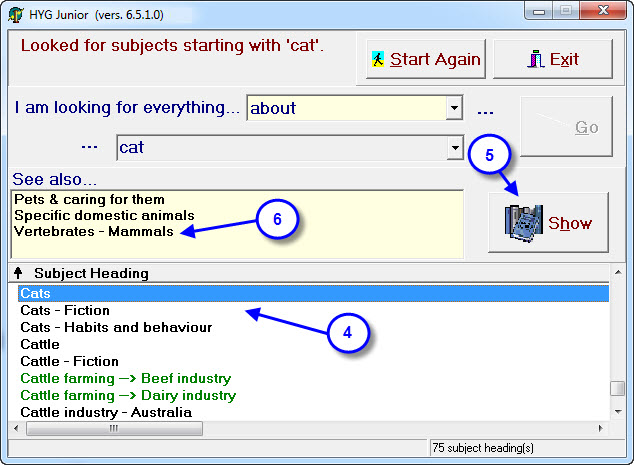
  3. When the list of subjects are displayed you will notice some are green these are ‘See’ references ie. non-valid headings referring you to the valid heading.  These can be selected and you will be shown a list of resources that have used the valid heading.
    • If you’re only interested in one particular subject double click on the subject heading (or highlight and click on the ‘Show’ button) and a list of resources will be displayed.
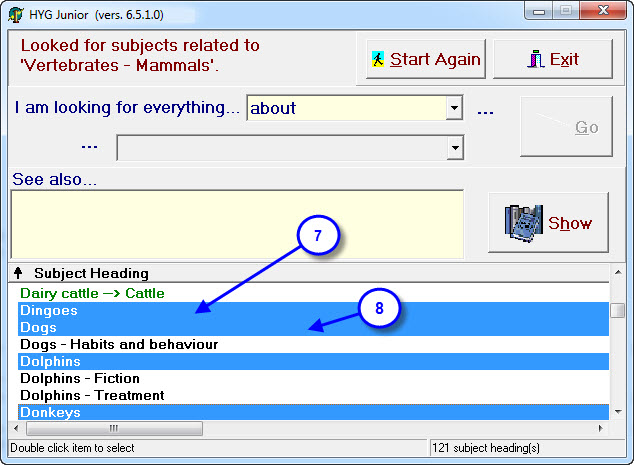
    • If there is more than one subject that interests you, hold down the CTRL key and click on as many subject headings as you like using the left mouse button then click on the ‘Show’ button to be taken to the a list of resources of interest.
    • When the list of subject headings are displayed you can highlight the one that you’re interested in the most, then check the ‘See also’ area (in yellow at the top of the screen).  In this field is a list of related topics, every subject heading will have at least one related topic.  You can click on this related topic and then create a list of all of the subjects relating to this topic (see below).

Arrow

Steps:

  1. Select from the drop down list ‘about’.
  2. Type in at least the first three letters of the subject.
  3. Click on the ‘Go button’.

Arrow

  1. From the list of subject headings you can either double click on one subject heading.
  2. Or highlight multiple headings using the CTRL + left click option then click on the ‘Show’ button.
  3. You might be interested more in the ‘See also…’ reference in this instance Vertebrates – Mammals.

Arrow

  1. All of the subject headings related to Vertebrates – Mammals are listed.
  2. By using the CTRL + left click method you can highlight multiple subject headings (including green ones) then click on the ‘Show’ button to create a list of resources.
  3. Clicking on the column headers will resort the list of resources for you.


{ 0 comments… add one now }

Leave a Comment

10. Stocktaking with LibCode Suite…

November 26, 2012

YAY!!! It’s stocktake time! If we start with that kind of enthusiasm perhaps we’ll get through this job without a change of career?! Just remember… you do this job so when YOU look for resources in your catalogue you WILL find them on the shelves. Simple. What is a stocktake? Checking what is on the [...]

Read the full article →

11. SCIS & CMEWeb Uploads

December 10, 2012

Below you can find links to pages outlining how to use SCIS and how to do your CMEWeb Uploads. Using SCIS Exporting ISBNs for SCIS Cover Images Inload CMEWeb Uploads

Read the full article →

12. Regular Tasks…

October 10, 2012

There are a number routines and steps that you will need to become familiar with over time. We have outlined a few worthy of mention here, although several are not actually required tasks, you will find this list useful as a prompt. Daily Tasks you should consider each and every time you use the LibCode [...]

Read the full article →

13. Support Options

December 10, 2012

We provide support to LibCode Suite clients who agree to our Licence Agreement, as support is provided free under this agreement. For details of the LibCode Suite Licence Agreement Click here. Website: Our support website available at www.libcode.com.au/support contains extra support material.  Newsletters, Demonstrations, FAQ’s, Handy Hints, Downloadable Upgrades, Suggestion forms, Problem Report forms and [...]

Read the full article →

14. Installation, Upgrades, Renewing Licence and Technical Information…

December 10, 2012

Installation: Whilst LibCode suite is completely self contained and relies on no registry entries there are a couple of simple requirements to keep your software running smoothly – see Minimum Hardware Specifications. LibCode Suite Upgrades: Upgrades are free and downloadable from our website. Simply jump onto www.libcode.com.au/support login and select ‘LibCode Suite Upgrades’ and follow [...]

Read the full article →